Blackmagicdesign Blackmagic Studio Camera Operation Manual
Hide thumbs
Also See for Blackmagic Studio Camera:
- Installation and operation manual (409 pages) ,
- Installation and operation manual (42 pages) ,
- Installation and operation manual (295 pages)

Related Manuals for Blackmagicdesign Blackmagic Studio Camera


Summary of Contents for Blackmagicdesign Blackmagic Studio Camera
- Page 1 Installation and Operation Manual Blackmagic Studio Camera Mac OS X ™ Windows ™ 日本語, Français, Deutsch, Español, 中文, English and Русский 한국어 November 2014...
- Page 2 Blackmagic Studio Camera English 日本語 Français Deutsch Español 中文 한국어...
- Page 3 Welcome Thank you for purchasing Blackmagic Studio Camera! We are extremely excited to have designed the Blackmagic Studio Camera. Ever since I was a teenager I have loved live production, it’s so exciting! Traditionally cameras with talkback and tally were very expensive and physically large, so hard to manage.
-
Page 4: Table Of Contents
Using Camera Control Turning Your Camera On DaVinci Resolve Primary Color Corrector Synchronizing Settings Connections Developer Information Blackmagic Studio Camera - Left Side Blackmagic Studio Camera - Right Side Blackmagic Video Device Embedded Control Protocol Overview Studio Camera Settings Assumptions... -
Page 5: Getting Started
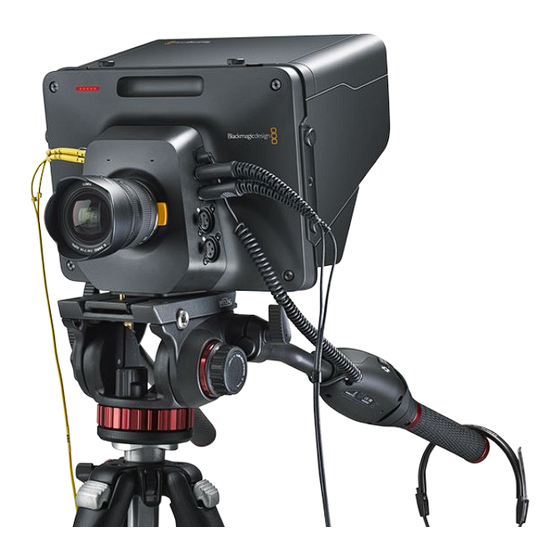
Getting Started Getting Started Introducing Blackmagic Studio Camera Features 1. FRONT TALLY LIGHT Indicates to the on-air talent which camera is currently "live". See page 12. 2. LANC REMOTE 2.5mm stereo jack for LANC remote control supports iris, zoom and focus control. See page 8. - Page 6 Access the menu on the LCD. See page 15. 22. POWER BUTTON Press the power button to turn on the Blackmagic Studio Camera. Press and hold the button to turn the OPTICAL OUT camera off. See pages 7 and 15.
-
Page 7: Attaching A Lens
Getting Started Attaching a Lens Getting started with your Blackmagic Studio Camera is as simple as attaching a lens and turning the camera on. To remove the protective dust cap from the lens mount, hold down the locking button and rotate the cap counterclockwise until it is released. -
Page 8: Connections
Connections Connections Blackmagic Studio Camera - Left Side LANC Remote Control The remote port on your camera is used to remotely control lens focus, iris and zoom adjustments when using a compatible lens. The port is a 2.5 mm stereo jack using the standard LANC protocol. -
Page 9: Blackmagic Studio Camera - Right Side
SDI Out Use the SDI Out connector to output 10-bit 4:2:2 video to professional SDI video equipment such as routers, monitors, SDI capture devices and broadcast switchers. Blackmagic Studio Camera HD supports 3G-SDI, and Studio Camera 4K supports 12G-SDI. SDI In The SDI input allows the camera operator to view the Program (PGM) output. -
Page 10: Camera Settings
Studio Camera Settings Camera Settings Camera Settings To configure settings on your Blackmagic Studio Camera, press the MENU button. Use the navigation buttons to highlight menus and use the SET button to confirm your selection. Video Format Select the video format you wish to output. A list of supported formats is on the left of the page. -
Page 11: Audio Settings
Camera Settings Audio Settings To adjust audio input and audio monitoring settings on your Blackmagic Studio Camera, press the MENU button and select the microphone icon to the left of the display. Audio Input Switches audio between using the camera's internal microphone and the XLR audio connectors. -
Page 12: Monitoring Settings
Camera Settings Monitoring Settings To adjust the display settings for the LCD, press the MENU button and select the monitor icon. Brightness Move the slider icon left or right to adjust brightness settings for the LCD. The default setting is 60%. Zebra Blackmagic Cameras have a zebra feature which gives an indication of exposure levels. -
Page 13: Studio Settings
Camera Settings Studio Settings To adjust the display settings for the LCD, press the MENU button and select the headphones icon. Camera Number If you want your Studio Camera to receive tally signals from an ATEM switcher, you'll need to set the camera number on your camera. -
Page 14: Adjusting Settings
Camera Settings Adjusting Settings Blackmagic Studio Camera supports electronic lens control, which allows you to adjust lens settings such as aperture and auto focus. The focus peaking feature creates a green edge around the sharpest parts of the image so you can easily confirm your focus. Focus peaking is only visible on the LCD and does not affect the SDI output. -
Page 15: Additional Settings
SDI output. Menu Press this button to bring up the Menu and then use the arrow buttons to navigate. Power Press the power button to turn on the Blackmagic Studio Camera. Press and hold the button to turn the camera off. -
Page 16: Camera Video Output
You can easily view the Program (PGM) output from the switcher by connecting it to your Studio Camera's SDI or optical fiber input. Blackmagic Studio Camera also features a reference input which allows multiple cameras to be genlocked to a blackburst or tri-level reference signal. Genlocking cameras, VTRs and other devices to an external reference signal helps to eliminate timing errors which may result in the picture jumping when switching between different sources. -
Page 17: Blackmagic Camera Utility
Blackmagic Camera Utility Blackmagic Camera Utility How to Update Your Camera Software on Mac OS X After downloading the Blackmagic Camera Utility software and unzipping the downloaded file, open the resulting disk image to reveal its contents. Launch the Blackmagic Camera Installer and follow the on screen instructions. How to Update Your Camera Software on Windows After downloading the Blackmagic Camera Utility software and unzipping the downloaded file, you should see a Blackmagic Camera Utility folder containing this PDF manual and the Blackmagic... -
Page 18: Attaching Accessories
Attaching Accessories Attaching Accessories Sun Shade The Studio Cameras include a foldable sun shade to shade the LCD in bright conditions and ensure optimum viewing is possible at all times. Step 1. Locate the 6 thumbscrews that are included with your Studio Camera. Step 2. -
Page 19: Using Atem Software Control
Now you have a video connection from the switcher to your Blackmagic Studio Camera, you can also get the advantage of live tally indicators on your camera, as well as being able to view the program feed of the switcher by pressing your camera’s PGM button. -
Page 20: Using Camera Control
Using ATEM Software Control Using Camera Control Launch ATEM Software Control and click on the Camera button located at the bottom of the software window. You’ll see a row of labeled camera controllers containing tools to adjust and refine each camera’s image. - Page 21 Using ATEM Software Control Iris/Pedestal Control The iris/pedestal control is located within the cross hairs of each camera controller. The control illuminates red when its camera is on air. To open or close the iris, drag the control up or down. Holding the shift key allows only iris adjustments. To darken or lift the pedestal, drag the control left or right.
-
Page 22: Davinci Resolve Primary Color Corrector
CCU interface to a user interface that's more like a primary color corrector on a post production color grading system. Your Blackmagic Studio Camera features a DaVinci Resolve primary color corrector built in. If you have used DaVinci Resolve, then creatively, grading in your Blackmagic Studio Camera will be identical so you can use your color grading experience for live production. - Page 23 Using ATEM Software Control Color Wheels The Lift/Gamma/Gain controls allow tonally specific yet overlapping regions of adjustment. In photographic terms lift, gamma and gain corresponds to shadows, mid tones and highlights. Use the color wheels in the following ways to make fine or aggressive adjustments: Click and drag anywhere within the color ring: Note that you don’t need to drag the color balance indicator itself.
-
Page 24: Synchronizing Settings
Lum Mix Setting Contrast, Saturation, Hue and Lum Mix settings. The color corrector built into your Blackmagic Studio Camera is based on the DaVinci Resolve primary color corrector. DaVinci has been building color correctors since the early 1980’s and most Hollywood films are color graded on DaVinci Resolve than any other method. -
Page 25: Developer Information
Developer Information Developer Information Blackmagic Video Device Embedded Control Protocol Version 1.0 If you are a software developer you can use the Video Device Embedded Control Protocol to construct devices that integrate with our products. Here at Blackmagic Design, our approach is to open up our protocols and we eagerly look forward to seeing what you come up with! Overview This document describes an extensible protocol for sending a uni-directional stream of small control... - Page 26 Developer Information Abstract Message Packet Format Every message packet consists of a three byte header followed by an optional variable length data block. The maximum packet size is 64 bytes. Destination device (uint8) Device addresses are represented as an 8 bit unsigned integer. Individual devices are numbered 0 through 254 with the value 255 reserved to indicate a broadcast message to all devices.
- Page 27 Developer Information Defined Commands Command 0 : change configuration Category (uint8) The category number specifies one of up to 256 configuration categories available on the device. Parameter (uint8) The parameter number specifies one of 256 potential configuration parameters available on the device. Parameters 0 through 127 are device specific parameters.
- Page 28 Developer Information 128: signed 5.11 fixed point Data elements are signed 16 bit integers representing a real number with 5 bits for the integer component and 11 bits for the fractional component. The fixed point representation is equal to the real value multiplied by 2^11. The representable range is from -16.0 to 15.9995 (15 + 2047/2048).
- Page 29 Developer Information Group Parameter Type Index Minimum Maximum Interpretation Lens Focus fixed16 0.0=near, 1.0=far Instantaneous autofocus void trigger instantaneous autofocus Aperture (f-stop) fixed16 -1.0 16.0 Aperture Value (where fnumber = sqrt(2^AV)) Aperture (normalised) fixed16 0.0=smallest, 1.0=largest Aperture (ordinal) int16 Steps through available aperture values from minimum (0) to maximum (n) Instantaneous auto void...
- Page 30 Developer Information Group Parameter Type Index Minimum Maximum Interpretation Audio Mic level fixed16 0.0=minimum, 1.0=maximum Headphone level fixed16 0.0=minimum, 1.0=maximum Headphone program mix fixed16 0.0=minimum, 1.0=maximum Speaker level fixed16 0.0=minimum, 1.0=maximum Input type int8 0=internal mic, 1=line level input, 2=low mic level input, 3=high mic level input Input levels fixed16...
- Page 31 Developer Information Group Parameter Type Index Minimum Maximum Interpretation Configuration Real Time Clock int32 [0] time BCD - HHMMSSFF [1] date BCD - YYYYMMDD Reserved Reserved Colour Correction Lift Adjust fixed16 [0] red -2.0 default 0.0 [1] green -2.0 default 0.0 [2] blue -2.0 default 0.0...
- Page 32 Developer Information Example Protocol Packets Operation Packet Byte Length header command data trigger instantaneous auto focus on camera 4 turn on OIS on all cameras set exposure to 10 ms on camera 0x10 0x27 0x00 0x00 (10 ms = 10000 us = 0x00002710) add 15% to zebra level 0x33 0x01 0...
-
Page 33: Help
After checking the version of Blackmagic Camera Utility software installed on your computer, please visit the Blackmagic Support Center at www.blackmagicdesign.com/support to check for the latest updates. While it is usually a good idea to run the latest updates, it is wise to avoid updating any software if you are in the middle of an important project. -
Page 34: Warranty
Warranty Warranty 12 Month Limited Warranty Blackmagic Design warrants that this product will be free from defects in materials and workmanship for a period of 12 months from the date of purchase. If a product proves to be defective during this warranty period, Blackmagic Design, at its option, either will repair the defective product without charge for parts and labor, or will provide a replacement in exchange for the defective product. - Page 35 インストール / オペレーション マニュアル Blackmagic Studio Camera Mac OS X ™ Windows ™ 日本語 2014年11月...
- Page 36 ます。 私は10代の頃からライブプロダクションを愛していますが、 このカメラを発表 できることは本当に嬉しいことです。 従来、 トークバックやタリーなどの機能の付い たカメラは、 非常に高価でサイズも大きく、 容易に使用できるものではありませんで した。 私たちは、 トークバックやタリーだけでなく、 大型カメラの持つカメラコント ロール機能をよりコンパクトなカメラに搭載することで、 この問題を解決したいと切 に願っていました。 これが、 Blackmagic Studio Cameraの開発に至った理由です。 私たちは携帯性に 優れた非常に小さなカメラを作りたいと考えていましたが、 通常、 小さなカメラに は、 小さなスクリーンが搭載されています。 これは、 私たちが求めていたものではあ りませんでした。 私たちが本当に求めていたのは、 大型のビュー ファインダーだった のです。 その結果、 非常に大きな美しいビュー ファインダーを搭載し、 かつ最小サイズ の放送用カメラ、 Blackmagic Studio Cameraが完成したのです!正確なフォーカス...
- Page 37 Blackmagic Studio Cameraについて レ ンズの取り付け カメラコントロールの使用 カメラの電源を入れる DaVinci Resolve Primary Color Corrector 設定の同期 接続 Blackmagic Studio Camera - 左面 Developer Information Blackmagic Studio Camera - 右面 Blackmagic Video Device Embedded Control Protocol Overview カメラ設定 (Camera Settings) Assumptions カメラ設定 (Camera Settings)...
-
Page 38: はじめに
はじめに はじめに Blackmagic Studio Cameraについて 機能 1. フロントタリーライト 主演者に対し、 現在どのカメラが 「ライブ」 状態にあるかを表示します。 45ページ参照。 2. LANCリモート LANCリモートコントロール用の2.5mmステレオジャック。 アイリス、 ズーム、 フォーカスコントロールに対 応。 41ページ参照。 3. 航空機用ヘッドフォン 0.25インチTRSコネクター。 航空機用ヘッドセットを使用して、 PGM/コントロールルームオーディオをモニタ リング。 41ページ参照。 4. ヘッドフォンマイク入力 0.206インチTRSコネクター。 航空機用ヘッドセットを使用して、 コントロールルームとコミュニケーション 可能。 41ページ参照。 5. オーディオ入力 オーディオ入力用 1/4インチ バランスXLRコネクター 2系統。 41ページ参照。... - Page 39 19. セットボタン (SET) このボタンを押すと、 メニューで選択した項目が確認できます。 48ページ参照。 20. ディスプレイボタン (DISPLAY) このボタンを押すと、 オーバーレイのオン/オフを切り替えられます。 48ページ参照。 21. メニューボタン (MENU) LCD上のメニューにアクセスします。 48ページ参照。 22. 電源ボタン 電源ボタンを押すと、 Blackmagic Studio Cameraがオンになります。 ボタンを長押しすると、 カメラがオフ になります。 40、 48ページ参照。 OPTICAL OUT OPTICAL IN 23. USBコネクター SDI OUT カメラのファームウェアのアップデート用 USB miniポート。 50ページ参照。...
-
Page 40: レ ンズの取り付け
はじめに レ ンズの取り付け Blackmagic Studio Cameraは、 レンズを取り付け、 電源を入れるだけで簡単に使用を開始できます。 レン ズマウントから保護用のダストキャップを外すには、 ロックボタンを押しながら、 キャップを反時計回りに回 します。 レンズの取り付け、 取り外し時は、 Blackmagic Cameraの電源をオフにしてください。 レンズを取り付ける : ステップ 1 レンズ上のドット (点) とカメラのマウント部分のドットを合わせます。 多くのレンズには、 青、 赤、 白のドットか、 その他の目印がついています。 ステップ 2 レンズがマウントにロックするまで時計回りに回します。 ステップ 3 レンズを外す時は、 ロックボタンを押しながら、 レンズを反時計回りに12時の位置まで回し、 ゆっく り外します。 レンズを装着していないときは、 センサーがゴミや埃にさらされています。 常にダストキャップを付けてセン... -
Page 41: 接続
接続 接続 Blackmagic Studio Camera - 左面 LANCリモートコントロール 互換性のあるレンズを使用している場合は、 カメラのリモートポートを使用してレンズのフォーカス、 アイリス、 ズームを遠隔操作で調整できます。 リモートポートは標準LANCプロトコルの2.5mmステレオジャックです。 アクティブ方式MFTレンズは、 LANCコントローラーでズームサーボを制御できます。 現在、 以下のレンズがサ ポートされています。 ‚ Panasonic Lumix G X Vario PZ 14-42mm f/3.5-5.6 Power O.I.S. レンズ ‚ Panasonic Lumix G X Vario PZ 45-175mm f/4.0-5.6 Zoom O.I.S. レンズ... -
Page 42: Blackmagic Studio Camera - 右面
Camera 4Kは6G-SDIをサポートしています。 光ファイバーケーブルは、 コンピューターネットワークで使用され るのと同じケーブルあるため、 様々な種類が入手可能です。 光ファイバーケーブルは最長28マイル (約45km) ま で接続できるので、 最も要求の多い野外放送イベントにも十分に対応できます。 光ファイバー入力とSDI入力を 両方接続している場合は、 最初に接続されたデバイスからの出力が使用されます。 SDI出力 SDI出力を使用して、 ルーター、 モニター、 SDIキャプチャーデバイス、 放送用スイッチャーなどのプロ仕様SDIビ デオ機器に、 10-bit 4:2:2ビデオを出力できます。 Blackmagic Studio Camera HDは3G-SDI、 Studio Camera 4Kは12G-SDIをサポートしています。 SDI入力 SDI入力を使用して、 カメラマンはプログラム出力 (PGM) を確認できます。 PGMボタンを押すだけで、 ライ ブカメラ出力とスイッチャーからのプログラム出力の切り替えをトグルオン/オフできます。 光ファイバー入力と SDI入力を両方接続している場合は、 最初に接続されたデバイスからの出力が使用されます。 Studio Camera を使用してBlackmagic HyperDeck Shuttleなどのデバイスに収録している場合は、... -
Page 43: カメラ設定 (Camera Settings
カメラ設定 (Camera Settings) カメラ設定 ( Camera Settings ) カメラ設定 (Camera Settings) Blackmagic Studio Cameraを設定するには、 「MENU」 ボタンを押してください。 ナビゲーションボタンを使 用してメニューをハイライトし、 「SET」 ボタンで選択したメニューを確定します。 Video Format 出力したいビデオフォーマットを選択します。 対応フォーマットは同ページの左側に記載されています。 Gain ゲイン設定は、 撮影時に照明量が少ない場合に役立ちます。 デフォルト設定は0dBになっ ています。 6dBずつ、 +18dBまでゲインを上げることができます。 White Balance 様々な色温度条件用に、 6つのホワイトバランス ・ プリセットがあります。 ‚ タングステン光用 3200K ‚... -
Page 44: オーディオ設定 (Audio Settings
カメラ設定 ( Camera Settings ) オーディオ設定 (Audio Settings) Blackmagic Studio Cameraでオーディオ入力およびオーディオモニタリング設定を調整するには、 「MENU」 ボタンを押して、 ディスプレイの左側にあるマイクアイコンを選択してください。 Audio Input カメラの内蔵マイクおよびXLRオーディオコネクターのオーディオの切り替えが可能です。 Microphone Level マイク入力は、 内蔵マイクの収録レベルを調整します。 オーディオのスライダーを左右に動かすことで、 レベ ルを上げ下げできます。 Studio Cameraは、 ステレオマイクを内蔵しています。 外部マイクは、 外部オー ディオソースが接続されていない場合、 オーディオチャンネル1、 2に収録します。 Input Level 外部オーディオコネクターは、 mic/lineレベルオーディオに対応しています。 オーディオミキサーやアンプなど、 外部オーディオ機器に接続する場合は 「Line」 を選択してください。 「Mic Low」 と 「Mic High」 は、 マイク信... -
Page 45: モニター設定 (Monitoring Settings
カメラ設定 ( Camera Settings ) モニター設定 (Monitoring Settings) LCDのディスプレイ設定を調整するには、 「MENU」 ボタンを押して、 モニターアイコンを選択してください。 Brightness スライダーアイコンを左右に動かすことで、 LCDの明るさを調整できます。 デフォルト設定は60%になってい ます。 Zebra Blackmagic Cameraのゼブラ機能は、 露出レベルの目安を表示します。 ゼブラ露出レベル (100%) を超えた 箇所は、 斜線が表示されます。 ゼブラ機能をオンにして、 左右の矢印アイコンでゼブラ警告レベルを選択してください。 デフォルト設定は中 (Medium) になっています。 Focus Peaking フォーカスピーキングのレベルを調整できます。 設定には、 オフ、 低、 中、 高 (Off、 Low、 Medium、 High)... -
Page 46: スタジオ設定 (Studio Settings
カメラ設定 ( Camera Settings ) スタジオ設定 (Studio Settings) LCDのディスプレイ設定を調整するには、 「MENU」 ボタンを押して、 ヘッドフォンアイコンを選択してください。 Camera Number ATEMスイッチャーからStudio Cameraにタリー信号を送信したい場合、 各カメラにカメラ番号を付ける必要 があります。 カメラに番号が付いているとスイッチャーから適切なカメラにタリー信号を送信できます。 カメ ラ番号は1-99に設定可能です。 デフォルト設定は1になっています。 Reference Source ゲンロックソースの選択に使用します。 Studio Cameraは、 プログラムSDI入力、 あるいは外部ゲンロック ソースにロックできます。 外部ゲンロックソースを使用している場合、 ソースを変更するとカメラが新しいソー スに再ロックするため、 グリッチの原因となることに留意してください。 Reference Timing リファレンスタイミングを、 ライン/ピクセルベースでマニュアル調整できます。 Headset Level ボリュームスライダーを左右に動かすことで、... -
Page 47: スイ ッチャーに接続
カメラ設定 ( Camera Settings ) スイ ッチャーに接続 Blackmagic Studio Cameraは10-bit 4:2:2ビデオを出力するため、 放送用スイッチャーや他のSDIビデオ機器 に接続できます。 また、 光ファイバー入出力が搭載されているので、 カメラ側でATEM Camera Converterを使 用する必要はありません。 Studio CameraのSDI/光ファイバー入力とスイッチャーを接続すれば、 スイッチャー からのプログラム出力を簡単に確認できます。 FOCUS IRIS DISPLAY MENU 「Focus」 ボタン Studio Cameraでオート フォーカスレンズを使用している場合、 「FOCUS」 ボタンでフォーカスピーキング/ オート フォーカスが可能です。 「FOCUS」 ボタンを1回押すとオート フォーカスが、 「FOCUS」 ボタンを2回... -
Page 48: 追加設定
カメラマンにとって、 担当のカメラの映像よりも、 プログラム出力を確認する方が重要な場合があります。 ラ イブカメラ出力とスイッチャーからのプログラム出力をトグルボタンで切り替えられます。 外部ビデオソースを 接続するには、 SDIあるいは光ファイバー入力を使用します。 FOCUS IRIS DISPLAY MENU ルックアップテーブル (LUT) Studio Cameraは、 PTT、 PGMなど、 ライブプロダクションに必 現在未対応。 要な設定ボタンを搭載しています。 上下左右の矢印ボタン メニューのナビゲーションに使用します。 「Set」 ボタン 選択したメニューを決定する際に使用します。 ディ スプレイ (Display) LCDスクリーンで、 フレームガイドおよびバッテリー残量インジケーターのオーバーレイをトグルオン/オフします。 SDI出力にはこれらの情報はオーバーレイされません。 「MENU」 ボタン 同ボタンを押してメニューを呼び出し、 矢印ボタンでナビゲーションします。 電源ボタン 電源ボタンを押してBlackmagic Studio Cameraをオンにします。 オフにするには、 同ボタンを長押しします。... -
Page 49: カメラのビデオ出力
カメラのビ デオ出力 カメラのビデオ出力 スイ ッチャーに接続 Blackmagic Studio Cameraは10-bit 4:2:2ビデオを出力するため、 放送用スイッチャーや他のSDIビデオ機器 に接続できます。 また、 光ファイバー入出力が搭載されているので、 カメラ側でATEM Camera Converterを使 用する必要はありません。 Studio CameraのSDI/光ファイバー入力とスイッチャーを接続すれば、 スイッチャーからのプログラム出力を簡 単に確認できます。 また、 Studio Cameraはリファレンス入力にも対応しており、 複数のカメラをブラックバーストおよび3値シン クリファレンス信号にゲンロックすることができます。 カメラ、 VTR、 その他のデバイスを外部のリファレンス 信号にゲンロックすることで、 タイミングのエラーを回避でき、 ソース間のスムーズな切替が可能となります。 レコーダーに接続 Studio Cameraの出力を収録したい場合は、 カメラのSDI出力をBlackmagic HyperDeck ShuttleなどのSSDレ コーダーのSDI入力に接続します。 さらに、 HyperDeckのSDI出力をStudio CameraのSDI入力に接続すれば、... -
Page 50: Blackmagic Camera Utility
Blackmagic Camera Utility Blackmagic Camera Utility Mac OS Xでカメラソフトウェアをアップデートする Blackmagic Camera Utilityをダウンロードし、 ダウンロードしたファイルを解凍します。 ディスクイメージを 開き、 コンテンツを表示します。 Blackmagic Cameraインストーラーを起動し、 画面に表示される指示に従います。 Windowsでカメラソフトウェアをアップデートする Blackmagic Camera Utilityをダウンロードし、 ダウンロードしたファイルを解凍します。 このPDFマニュアル と Blackmagic Camera Utilityインストーラーが入ったBlackmagic Camera Utilityフォルダが表示されます。 インストーラーをダブルクリックし、 画面に表示される指示に従ってインストールします。 カメラソフトウェアをアップデート コンピューターに最新のBlackmagic Camera Utilityをインストールし、 USBケーブルでコンピューターとカメ ラを接続します。 Mini USB2.0 ポートは、 カメラの底部に付いています。 Blackmagic Camera Utilityソフトウェア... -
Page 51: アクセサリを装着
アクセサリ を装着 アクセサリを装着 サンシェード Studio Cameraは折りたたみ式のサンシェードが付いているので、 明るい環境でもLCDスクリーンが影になり、 常に最適な条件でモニタリングできます。 ステップ 1 Studio Cameraに同梱されている6つの蝶ネジをはめます。 ステップ 2 サンシェードの穴とカメラのマウントポイントを揃え、 上部と両サイドに2つずつある蝶ネジを締 めてサンシェードを固定します。 その他のアクセサリ スタジオでのニュース番組では、 カメラを台座にマウントして、 大型のレンズやテレプロンプター用のレールを 取り付けたい場合もあるでしょう。 野外中継では、 マイクや外部バッテリー、 LANCリモートコントローラー をアタッチして使用することもあります。 Studio Cameraは、 底面に2つの⅜インチマウントポイント、 そして 両サイドと上面に¼インチのマウントポイントが付いています。 このため、 プロダクションの規模に応じたリグ をフレキシブルにカスタマイズできます。... -
Page 52: Atem Software Controlの使用
SD, HD and Ultra HD switchable unless indicated SDI出力からは送信できません。 LOCK TO TALK LOCK TO TALK TROL CONTROL ステップ 3. Blackmagic Studio Cameraの 「MENU」 ボタンを押します。 Studio Settings > Camera Number CH 1 CH 2 CH 1 CH 1 CH 2 CH 2... -
Page 53: カメラコントロールの使用
ATEM Software Control の使用 カメラコントロールの使用 ATEM Software Controlを起動して、 ソフトウェアウィンドウの下部にある 「Camera」 ボタンをクリックします。 ラベル付きのカメラコントローラー列が表示され、 各カメラのイ メージを調整/微調整するツールを使用できます。 これらのコントローラーの使い方は簡単です。 マウスを使っ てボタンをクリックしたり、 クリック&ドラッグするこ とで調整できます。 設定アイコンをクリックしてカメラコントロー ルのAux出力を選択。 カメラコントロールの選択 カメラコントロールページの上部にあるボタン列で、 コントロールしたいカメラ番号を選択します。 ウィンドウサイ ズに入りきらない数のカメラを使用している場合、 あるいはカラーコレクターウィンドウを開いている場合は、 こ れらのボタンを使っ てコントロールしたいカメラを選択します。 カメラコントロールのモニタリング用にAux出力を 使用している場合は、 これらのボタンを押して、 コントロールするカメラを変更すると、 該当のカメラのビデオ出力 がスイ ッチャー プリファレンスで設定したAux出力に送信されます。 チャンネルステータス チャンネルステータスは、 各カメラコントローラーの上部にあり、 カメララベル、 オンエア ・インジケーター、 ロック ボタンを表示します。... - Page 54 ATEM Software Control の使用 アイリス/ペデスタルレベル・ コントロール アイリス/ペデスタルレベル・ コントロールは、 各カメラコントローラーの十字線上にあります。 該当のカメラがオ ンエアされている場合、 このコントロールは赤く光ります。 アイリスを開く/閉じるには、 コントロールを上下に動かします。 「SHIFT」 キーを押さえていればアイリスのみを 調整できます。 ペデスタルレベルを下げる/上げるには、 コントロールを左右に動かします。 Macでは 「command」 キー、 Windows では 「CONTROL」 キーを押さえていれば、 ペデスタルレベルのみを調整できます。 コース設定 アイリス/ペデスタルレベル・ コントロールの左側にあるコース設定は、 アイリスの幅を制限するために使用し ます。 この機能は、 露出過多の映像のオンエア防止に役立ちます。 コースのしきい値を設定するには、 まずアイリスコントロールを使用してアイリスを完全に開きます。 次にコース 設定を上下に動かして適正露出を設定します。 コースのしきい値を設定したことで、 アイリスを調整する際に適 正露出を越えることを防止できます。...
-
Page 55: Davinci Resolve Primary Color Corrector
ます。 DaVinci Resolve Primary Color Corrector カラーコレクションの経験があるユーザーは、 カメラコントロールのインター フェースをスイ ッチャースタイルの CCUインター フェースから、 ポスト プロダクションで使用するカラーグレーディングシステムのプライマリーカラー コレクター・ ユーザーインター フェースに変更することもできます。 Blackmagic Studio Cameraは、 DaVinci Resolveのプライマリーカラーコレクターを内蔵しています。 Blackmagic Studio CameraでのグレーディングはDaVinci Resolveと全く同じなので、 ライブプロダクションで もDaVinci Resolveの経験を活かしたクリエイティブなカラーグレーディングが可能です。 カラーコレクターパネルはすべてのカメラコントローラーから拡張でき、 追加設定と完全なプライマリーカラー コレクター・インター フェースで、 より多彩なカラーコレクション ・ コントロールが可能になります。 カラーホイール、 そしてサチュレーションなどの設定を調整でき、 シャドウ、 ミッドトーン、 ハイライトの設定を同... - Page 56 ATEM Software Control の使用 カラーホイール リフト/ガンマ/ゲインのコントロールを使えば、 特定のトーンでオーバーラップする部分を調整できます。 リフト、 ガンマ、 ゲインは、 それぞれ、 シャドウ、 ミッドトーン、 ハイライトに当たります。 カラーホイールを以下のように使用して、 微調整や大胆な調整を行って下さい: カラーリング内でクリック&ドラッグ : カラーバランス ・インジケーター自体をドラッグする必要は ありません。 カラーバランスインジケーターを動かすと、 下にあるRGBパラメーターに、 各チャ ンネルの変更が反映されます。 カラーリング内でシフトクリック&ドラッグ : カラーバランス ・インジケーターを、 カーソルの絶対 位置にジャンプするので、 スピーディに大幅な調整が可能です。 カラーコレクションパネルのリフト/ガンマ/ゲイン ・ カラー ホイール。 カラーリング内でダブルクリック :マスターホイール調整をリセットせずに、 カラー調整をリセット します。 カラーリング右上のリセットコントロールをクリック...
-
Page 57: 設定の同期
ヒュー設定 ヒュー設定は、 カラーホイールの周囲のすべてのヒュー (色相) をローテートします。 デフォルト設定は、 180°に なっており、 オリジナルのヒュー配置を表示します。 この数値を上げ下げすると、 カラーホイールに表示される ヒュー配置に沿って、 すべてのヒューを両方向にローテーションできます。 ルマミックス設定 コントラスト、 サチュレーション、 ヒュー、 ルミナンスミックス設定。 Blackmagic Studio Cameraに内蔵されたカラーコレクターは、 DaVinci Resolveプライマリーカラーコレクター に基づいています。 DaVinci Resolveは1980年代初頭よりカラーコレクターを設計しており、 多くのハリウッド映 画がDaVinci Resolveを強いようしてカラーグレーディングされています。 つまり、 Blackmagic Studio Cameraに内蔵されたカラーコレクターには、 ユニークかつクリエイティブなパワフ ルな機能が搭載されています。 YRGB処理はこれらの機能のうちの1つです。 カラーグレーディングの際、 RGBあるいはYRGB処理を選択できます。 ハイエンドのカラリストたちはYRGB処理 を好みますが、 これは色をより正確にコントロールでき、 各チャンネルをはっきりと区別して調整し、 より多くの... -
Page 58: Blackmagic Video Device Embedded Control Protocol
Developer Information Developer Information Blackmagic Video Device Embedded Control Protocol Version 1.0 If you are a software developer you can use the Video Device Embedded Control Protocol to construct devices that integrate with our products. Here at Blackmagic Design our approach is to open up our protocols and we eagerly look forward to seeing what you come up with! Overview This document describes an extensible protocol for sending a uni-directional stream of small control... - Page 59 Developer Information Abstract Message Packet Format Every message packet consists of a three byte header followed by an optional variable length data block. The maximum packet size is 64 bytes. Destination device (uint8) Device addresses are represented as an 8 bit unsigned integer. Individual devices are numbered 0 through 254 with the value 255 reserved to indicate a broadcast message to all devices.
- Page 60 Developer Information Defined Commands Command 0 : change configuration Category (uint8) The category number specifies one of up to 256 configuration categories available on the device. Parameter (uint8) The parameter number specifies one of 256 potential configuration parameters available on the device. Parameters 0 through 127 are device specific parameters.
- Page 61 Developer Information 128: signed 5.11 fixed point Data elements are signed 16 bit integers representing a real number with 5 bits for the integer component and 11 bits for the fractional component. The fixed point representation is equal to the real value multiplied by 2^11. The representable range is from -16.0 to 15.9995 (15 + 2047/2048).
- Page 62 Developer Information Group Parameter Type Index Minimum Maximum Interpretation Lens Focus fixed16 0.0=near, 1.0=far Instantaneous autofocus void trigger instantaneous autofocus Aperture (f-stop) fixed16 -1.0 16.0 Aperture Value (where fnumber = sqrt(2^AV)) Aperture (normalised) fixed16 0.0=smallest, 1.0=largest Aperture (ordinal) int16 Steps through available aperture values from minimum (0) to maximum (n) Instantaneous auto void...
- Page 63 Developer Information Group Parameter Type Index Minimum Maximum Interpretation Audio Mic level fixed16 0.0=minimum, 1.0=maximum Headphone level fixed16 0.0=minimum, 1.0=maximum Headphone program mix fixed16 0.0=minimum, 1.0=maximum Speaker level fixed16 0.0=minimum, 1.0=maximum Input type int8 0=internal mic, 1=line level input, 2=low mic level input, 3=high mic level input Input levels fixed16...
- Page 64 Developer Information Group Parameter Type Index Minimum Maximum Interpretation Configuration Real Time Clock int32 [0] time BCD - HHMMSSFF [1] date BCD - YYYYMMDD Reserved Reserved Colour Correction Lift Adjust fixed16 [0] red -2.0 default 0.0 [1] green -2.0 default 0.0 [2] blue -2.0 default 0.0...
- Page 65 Developer Information Example Protocol Packets Operation Packet Byte Length header command data trigger instantaneous auto focus on camera 4 turn on OIS on all cameras set exposure to 10 ms on 0x10 0x27 0x00 0x00 camera 4 (10 ms = 10000 us = 0x00002710) add 15% to zebra level 0x33...
- Page 66 てください。 ‚ Windowsでは、 スタートメニューあるいはスタート画面から 「Blackmagic Camera Utility」 を開きま す。 ヘルプメニューをクリックして 「About Blackmagic Camera Utility」 を選択し、 バージョンを確認 してください。 最新のソフトウェアを入手する コンピューターにインストールされたBlackmagic Camera Utilityのバージョンを確認した後、 Blackmagic サ ポートセンター(www.blackmagicdesign.com/jp/support)で最新のソフトウェア ・ アップデートをチェックして ください。 常に最新のソフトウェアを使用することを推奨しますが、 重要なプロジェクトの実行中は、 ソフト ウェアのアップデートは行わない方がよいでしょう。 バッテリーの交換 Studio Cameraの内蔵バッテリーは、 お客様ご自身で修理することはできません。 バッテリー交換が必要な場 合は、 最寄りのBlackmagic Designサービスセンターに送付して修理を依頼してください。 保証期間を過ぎてい...
- Page 67 保証 保証 12ヶ月限定保証 Blackmagic Designは、 お買い上げの日から12ヶ月間、 本製品の部品および仕上がりについて瑕疵がないこ とを保証します。 この保証期間内に製品に瑕疵が見つかった場合、 Blackmagic Designは弊社の裁量におい て部品代および人件費無料で該当製品の修理、 あるいは製品の交換のいずれかで対応いたします。 この保証に基づいたサービスを受ける際、 お客様は必ず保証期限終了前にBlackmagic Designに瑕疵を通知 し、 適応する保証サービスの手続きを行ってください。 お客様の責任において不良品を梱包し、 Blackmagic Designが指定するサポートセンターへ配送料前払で送付いただきますようお願い致します。 理由の如何を問わ ず、 Blackmagic Designへの製品返送のための配送料、 保険、 関税、 税金、 その他すべての費用はお客 様の自己負担となります。 不適切な使用、 または不十分なメンテナンスや取扱いによる不具合、 故障、 損傷に対しては、 この保証は 適用されません。 Blackmagic Designはこの保証で、 以下に関してサービス提供義務を負わないものとしま す。 a) 製品のイン ストールや修理、 サービスを行うBlackmagic Design販売代理人以外の者によって生じた 損傷の修理、...
-
Page 68: Français
Manuel d'utilisation et d'installation Blackmagic Studio Camera Mac OS X ™ Windows ™ Français novembre 2014... - Page 69 écrans. C'est ce que nous voulions éviter. Ce que nous recherchions, c'était un viseur beaucoup plus grand ! Et voilà le résultat : la Blackmagic Studio Camera est une petite caméra broadcast mais elle possède un très grand viseur qui est un vrai plaisir à...
- Page 70 Sommaire Blackmagic Studio Camera Mise en route Utilisation de l'ATEM Software Control Introduction à la Blackmagic Studio Camera Fonction Camera Control Monter un objectif Utilisation de la fonction Camera Control Mise en route de votre caméra DaVinci Resolve Primary Color Corrector Synchronisation des paramètres...
-
Page 71: Mise En Route
Mise en route Mise en route Introduction à la Blackmagic Studio Camera Caractéristiques 1. VOYANT TALLY FRONTAL Indique à l'acteur quelle caméra passe actuellement à l'antenne. Voir page 78. 2. CONTRÔLE À DISTANCE LANC Le jack stéréo de 2,5mm pour le contrôle à distance LANC prend en charge le contrôle du diaphragme, du zoom et de la mise au point. - Page 72 22. BOUTON DE MISE EN MARCHE OPTICAL IN Appuyez sur le bouton de mise en marche pour allumer la Blackmagic Studio Camera. Appuyez sur le bouton SDI OUT et maintenez-le enfoncé pour éteindre la caméra. Voir page 73 et 81.
-
Page 73: Monter Un Objectif
Mise en route Monter un objectif Pour mettre en route votre Blackmagic Studio Camera, il vous suffit de monter un objectif et d'allumer l'appareil. Pour retirer le cache de protection de la monture d'objectif, maintenez le bouton de verrouillage enfoncé et tournez le cache dans le sens inverse des aiguilles d'une montre jusqu'à ce qu'il soit libéré. Nous vous recommandons d'éteindre systématiquement votre caméra avant de monter ou d'ôter un objectif. -
Page 74: Connexions
Connexions Connexions Blackmagic Studio Camera - Côté gauche Contrôle à distance LANC Le port LANC de votre caméra permet de contrôler à distance la mise au point de l'objectif et les réglages du diaphragme et du zoom lorsque vous utilisez un objectif compatible. Le port est un jack stéréo de 2,5 mm qui prend en charge le protocole LANC. -
Page 75: Blackmagic Studio Camera - Côté Droit
Connexions Blackmagic Studio Camera - Côté droit Entrée/Sortie optiques L'entrée et la sortie fibre optique utilisent des connecteurs LC conformes aux normes de l'industrie, qui prennent en charge des signaux 3G-SDI sur la Studio Camera HD, et des signaux 6G-SDI sur la Studio Camera 4K. -
Page 76: Paramètres De La Studio Camera
Paramètres de la Studio Camera Paramètres de la caméra Pour configurer les paramètres de votre Blackmagic Studio Camera, appuyez sur le bouton MENU. Utilisez les boutons de navigation pour mettre les menus en surbrillance et confirmez votre sélection à l'aide du bouton SET. -
Page 77: Paramètres Audio
Paramètres de la Studio Camera Paramètres Audio Pour ajuster les paramètres de l'entrée et du contrôle audio sur votre Blackmagic Studio Camera, appuyez sur le bouton MENU et sélectionnez l'icône microphone situé à gauche de l'écran. Entrée audio (Audio Input) Fait basculer l'audio entre le microphone interne de la caméra et les connecteurs audio XLR. -
Page 78: Paramètres Monitoring
Paramètres de la Studio Camera Paramètres Monitoring Pour ajuster les paramètres d'affichage de l'écran LCD, appuyez sur le bouton MENU et sélectionnez l'icône moniteur. Luminosité (Brightness) Déplacez le curseur vers la gauche ou vers la droite pour ajuster les paramètres de luminosité de l'écran LCD. Par défaut, ce paramètre est réglé... -
Page 79: Paramètres Studio
Paramètres de la Studio Camera Paramètres Studio Pour ajuster les paramètres d'affichage de l'écran LCD, appuyez sur le bouton MENU et sélectionnez l'icône casque. Numéro de la caméra (Camera Number) Si vous désirez que votre Studio Camera reçoive des signaux tally d'un mélangeur ATEM, il vous faudra configurer le numéro de la caméra sur votre caméra. -
Page 80: Ajustement Des Paramètres
Paramètres de la Studio Camera Ajustement des paramètres La Blackmagic Studio Camera prend en charge le contrôle d'objectif électronique, ce qui vous permet d'ajuster les paramètres de l'objectif tels que le diaphragme et la mise au point automatique. La fonction focus peaking est une aide à... -
Page 81: Paramètres Supplémentaires
Appuyez sur ce bouton pour faire apparaître le menu, puis naviguez à l'aide des boutons flèche. Bouton de mise en marche Appuyez sur le bouton de mise en marche pour allumer la Blackmagic Studio Camera. Appuyez sur le bouton et maintenez-le enfoncé pour éteindre la caméra. -
Page 82: Sortie Vidéo De La Caméra
Les Blackmagic Studio Cameras acheminent de la vidéo 4:2:2 10 bits, ce qui vous permet de vous connecter à des mélangeurs broadcast ainsi qu'à d'autres périphériques vidéo SDI. La Blackmagic Studio Camera dispose d'une entrée et d'une sortie optiques, il n'est donc pas nécessaire de connecter d'ATEM Camera Converters à... -
Page 83: Blackmagic Camera Utility
Blackmagic Camera Utility Blackmagic Camera Utility Comment mettre à jour le logiciel de votre caméra sur Mac OS X Après avoir téléchargé le logiciel Blackmagic Camera Utility et dézippé le fichier téléchargé, ouvrez l’image disque pour révéler son contenu. Lancez le Blackmagic Camera Installer et suivez les instructions figurant sur l’écran. Comment mettre à... -
Page 84: Fixation Des Accessoires
Fixation des accessoires Fixation des accessoires Pare-soleil La Studio Camera inclut un pare-soleil pliable pour abriter l’écran lorsque la luminosité est forte et assurer un affichage optimal en permanence. Étape 1. Repérez les 6 vis ailées se trouvant sur votre Studio Camera. Étape 2. -
Page 85: Utilisation De L'atem Software Control
Utilisation de l'ATEM Software Control Fonction Camera Control Votre Blackmagic Studio Camera peut être commandée à partir d'un mélangeur ATEM au moyen de la fonction Camera Control du logiciel ATEM Software Control. Pour ouvrir la fonction Camera Control, il suffit de cliquer sur le bouton Camera. -
Page 86: Utilisation De La Fonction Camera Control
Utilisation de l'ATEM Software Control Utilisation de la fonction Camera Control Lancez le logiciel ATEM Software Control et cliquez sur le bouton Camera situé au bas de la fenêtre du logiciel. Vous apercevrez une rangée de fenêtres qui permettent de commander toutes les caméras et qui contiennent des outils puissants pour ajuster et affiner l'image de chaque caméra. - Page 87 Utilisation de l'ATEM Software Control Contrôle de l'iris et du niveau de noir Le contrôle de l'iris et du niveau de noir est situé au sein de la croix de centrage de chaque fenêtre de contrôle de caméra. Le contrôle s'illumine en rouge lorsque la caméra est à l'antenne. Pour ouvrir ou fermer l'iris, déplacez le contrôle vers le haut ou vers le bas.
-
Page 88: Davinci Resolve Primary Color Corrector
à celle d'un correcteur colorimétrique primaire que l'on trouve communément sur les systèmes d’étalonnage. Votre Blackmagic Studio Camera intègre le correcteur colorimétrique primaire DaVinci Resolve. Si vous avez utilisé DaVinci Resolve auparavant, créativement parlant, l'étalonnage sur la Blackmagic Studio Camera sera identique à... - Page 89 Utilisation de l'ATEM Software Control Cercles chromatiques Les commandes Lift/Gamma/Gain permettent de contrôler des zones définies par leurs tons. Toutefois, ces zones se chevauchent. En photographie, les termes lift, gamma et gain correspondent aux basses lumières, tons moyens et hautes lumières. Utilisez les cercles chromatiques de l'une ou l'autre des façons décrites ci-après pour effectuer des ajustements minutieux ou plus extrêmes : Cliquez et déplacez votre pointeur n'importe où...
-
Page 90: Synchronisation Des Paramètres
Lorsque les deux appareils sont connectés, les signaux Camera Control sont envoyés du mélangeur ATEM à votre Blackmagic Studio Camera. Si un paramètre est accidentellement ajusté à partir de votre Studio Camera, la fonction Camera Control réinitialisera automatiquement le paramètre en question pour maintenir la synchronisation. -
Page 91: Developer Information
Developer Information Developer Information Blackmagic Video Device Embedded Control Protocol Version 1.0 If you are a software developer you can use the Video Device Embedded Control Protocol to construct devices that integrate with our products. Here at Blackmagic Design our approach is to open up our protocols and we eagerly look forward to seeing what you come up with! Overview This document describes an extensible protocol for sending a uni-directional stream of small control messages... - Page 92 Developer Information Abstract Message Packet Format Every message packet consists of a three byte header followed by an optional variable length data block. The maximum packet size is 64 bytes. Destination device (uint8) Device addresses are represented as an 8 bit unsigned integer. Individual devices are numbered 0 through 254 with the value 255 reserved to indicate a broadcast message to all devices.
- Page 93 Developer Information Defined Commands Command 0 : change configuration Category (uint8) The category number specifies one of up to 256 configuration categories available on the device. Parameter (uint8) The parameter number specifies one of 256 potential configuration parameters available on the device. Parameters 0 through 127 are device specific parameters. Parameters 128 though 255 are reserved for parameters that apply to multiple types of devices.
- Page 94 Developer Information 128: signed 5.11 fixed point Data elements are signed 16 bit integers representing a real number with 5 bits for the integer component and 11 bits for the fractional component. The fixed point representation is equal to the real value multiplied by 2^11. The representable range is from -16.0 to 15.9995 (15 + 2047/2048).
- Page 95 Developer Information Group Parameter Type Index Minimum Maximum Interpretation Lens Focus fixed16 0.0=near, 1.0=far Instantaneous autofocus void trigger instantaneous autofocus Aperture (f-stop) fixed16 -1.0 16.0 Aperture Value (where fnumber = sqrt(2^AV)) Aperture (normalised) fixed16 0.0=smallest, 1.0=largest Aperture (ordinal) int16 Steps through available aperture values from minimum (0) to maximum (n) Instantaneous auto void...
- Page 96 Developer Information Group Parameter Type Index Minimum Maximum Interpretation Audio Mic level fixed16 0.0=minimum, 1.0=maximum Headphone level fixed16 0.0=minimum, 1.0=maximum Headphone program mix fixed16 0.0=minimum, 1.0=maximum Speaker level fixed16 0.0=minimum, 1.0=maximum Input type int8 0=internal mic, 1=line level input, 2=low mic level input, 3=high mic level input Input levels fixed16...
- Page 97 Developer Information Group Parameter Type Index Minimum Maximum Interpretation Configuration Real Time Clock int32 [0] time BCD - HHMMSSFF [1] date BCD - YYYYMMDD Reserved Reserved Colour Correction Lift Adjust fixed16 [0] red -2.0 default 0.0 [1] green -2.0 default 0.0 [2] blue -2.0 default 0.0...
- Page 98 Developer Information Example Protocol Packets Operation Packet Byte Length header command data trigger instantaneous auto focus on camera 4 turn on OIS on all cameras set exposure to 10 ms on camera 4 0x10 0x27 0x00 0x00 (10 ms = 10000 us = 0x00002710) add 15% to zebra level 0x33 0x01...
-
Page 99: Assistance
Après avoir vérifié la version du logiciel Blackmagic Camera Utility installée sur votre ordinateur, veuillez visiter le Centre d’assistance Blackmagic à l’adresse suivante www.blackmagicdesign.com/support pour vérifier les dernières mises à jour. Même s'il est généralement conseillé d'exécuter les dernières mises à jour, il est prudent d’éviter d’effectuer une mise à... -
Page 100: Garantie
Garantie Garantie Garantie limitée à 12 mois Par la présente, Blackmagic Design garantit que ce produit sera exempt de défauts matériels et de fabrication pendant une durée de un an à compter de la date d'achat. Si un produit s’avère défectueux pendant la période de garantie, Blackmagic Design peut, à... -
Page 101: Deutsch
Installations- und Bedienungsanleitung Blackmagic Studio Camera Mac OS X ™ Windows ™ Deutsch November 2014... - Page 102 Willkommen Danke, dass Sie sich für eine Blackmagic Studio Camera entschieden haben! Auch wir sind restlos vom Design der Blackmagic Studio Camera begeistert. Schon als Teenager war ich Feuer und Flamme für die Liveproduktion weil sie so spannend ist! Klassische Kameras mit Talkback und Tally waren früher extrem teuer und derart sperrig, dass sie schwer zu handhaben waren.
- Page 103 Einschalten Ihrer Kamera DaVinci Resolve Primary Color Corrector (DaVinci Resolve Tool für die primäre Farbkorrektur) Anschlüsse Synchronisation von Einstellungen Blackmagic Studio Camera – linke Seite Developer Information Blackmagic Studio Camera – rechte Seite Blackmagic Video Device Embedded Control Protocol Kamera-Einstellungen...
-
Page 104: Erste Schritte
Erste Schritte Erste Schritte Einleitung Blackmagic Studio Camera Funktionsmerkmale 1. VORDERES TALLY-LICHT Zeigt den Darstellern an, welche Kamera sich gegenwärtig auf Sendung befindet. Siehe Seite 111. 2. LANC-FERNBEDIENUNG Der 2,5 mm Klinkenstecker für die LANC-Fernbedienung unterstützt Blenden-, Zoom- und Fokussiersteuerung. - Page 105 Erlaubt den Zugriff auf das Menü auf dem LCD. Siehe Seite 114. 22. EIN- UND AUSSCHALTTASTE OPTICAL OUT Die Blackmagic Studio Camera wird per Druck auf die Power-Taste eingeschaltet. Halten Sie diese Taste zum OPTICAL IN Ausschalten der Kamera gedrückt. Siehe Seite 106 und 114.
-
Page 106: Anbringen Eines Objektivs
Erste Schritte Anbringen eines Objektivs Um die Arbeit mit Ihrer Blackmagic Studio Camera aufzunehmen, brauchen Sie nichts weiter tun, als ein Objektiv anzubringen und die Kamera einzuschalten. Halten Sie zum Entfernen der Staubschutzkappe vom Objektivanschluss die Verriegelungstaste gedrückt und drehen Sie dann die Kappe gegen den Uhrzeigersinn bis sie sich löst. -
Page 107: Anschlüsse
Anschlüsse Anschlüsse Blackmagic Studio Camera – linke Seite LANC-Fernbedienung Über den Remote-Port Ihrer Kamera lassen sich bei Einsatz eines kompatiblen Objektivs die Fokussierung, Blenden- und Zoomeinstellungen des Objektivs fernsteuern. Der Port ist eine 2,5-mm-Stereoklinkenbuchse und verwendet das LANC-Standardprotokoll. Aktive MFT-Objektive gestatten Ihnen, den Zoomservo per LANC-Fernbedienung zu steuern. Folgende Objektive werden zurzeit unterstützt:... -
Page 108: Blackmagic Studio Camera - Rechte Seite
Anschlüsse Blackmagic Studio Camera – rechte Seite Glasfaser-Eingang/Ausgang Der Glasfaser-Eingang und -Ausgang ist mit branchenüblichen LC-Buchsen ausgestattet. Beide unterstützen 3G-SDI an der Studio Camera HD sowie 6G-SDI an der Studio Camera 4K. Glasfaserkabel sind überall erhältlich, da sie auch für Computervernetzungen benutzt werden. Mit Glasfaserkabeln lassen sich Signale über Entfernungen von bis zu 45 km übermitteln. -
Page 109: Kamera-Einstellungen
Einstellungen Kamera-Einstellungen Kamera-Einstellungen Drücken Sie die MENU-Taste (Menü), um die Einstellungen Ihrer Blackmagic Studio Camera zu konfigurieren. Benutzen Sie die Navigationstasten, um Menüs zu aktivieren, und die SET-Taste, um Ihre Auswahl zu bestätigen. Videoformat Wählen Sie das gewünschte Videoausgabeformat aus. Bitte entnehmen Sie die unterstützten Formate der linksseitig abgebildeten Tabelle. -
Page 110: Audio-Einstellungen
Kamera-Einstellungen Audio-Einstellungen Drücken Sie zur Vorgabe der Eingangs- und Audiokontrolleinstellungen Ihrer Blackmagic Studio Camera die MENÜ-Taste (MENU) und wählen Sie das links vom Display angezeigte Mikrofon-Symbol aus. Audioeingang Schaltet zwischen dem Einsatz der Buchsen des internen Mikrofons und den XLR-Audiobuchsen der Kamera um. -
Page 111: Einstellungen Für Das Monitoring
Kamera-Einstellungen Einstellungen für das Monitoring Drücken Sie die MENÜ-Taste (MENU) und wählen Sie das Monitor-Symbol aus, um die Display-Einstellungen des LCD vorzugeben. Helligkeit (Brightness) Bewegen Sie das Schiebereglersymbol nach links oder rechts, um die Helligkeitseinstellungen des LCD anzupassen. Die Helligkeit ist auf 60 % voreingestellt. Zebra Blackmagic-Kameras sind mit einer Zebra-Funktion ausgestattet, die Aufschluss über die Belichtungsstärken gibt. -
Page 112: Studio-Einstellungen
Kamera-Einstellungen Studio-Einstellungen Drücken Sie die MENÜ-Taste (MENU) und wählen Sie das Kopfhörer-Symbol aus, um die Display-Einstellungen des LCD vorzugeben. Kameranummer (Camera Number) Wenn Ihre Studio Camera Tally-Signale von einem ATEM-Mischer empfangen soll, müssen Sie auf Ihrer Kamera zunächst eine Kameranummer vorgeben. Dies gewährleistet, dass der Mischer das Tally-Signal an die richtige Kamera übermittelt. -
Page 113: Anpassen Der Einstellungen
Kamera-Einstellungen Anpassen der Einstellungen Die Blackmagic Studio Camera unterstützt elektronische Blendensteuerung. Das erlaubt Ihnen, Blendeneinstellungen wie die Öffnungsweite und automatische Fokussierung anzupassen. Mit der Fokus- Peaking-Funktion werden die schärfsten Bildbereiche grün umrandet, damit Sie sich mühelos Ihrer Scharfstellung vergewissern können. Fokus-Peaking ist ausschließlich auf dem LCD zu sehen und wirkt sich nicht auf die SDI-Ausgabe aus. -
Page 114: Zusätzliche Einstellungen
Menu (Menü) Drücken Sie diese Taste, um das Menü aufzurufen und navigieren Sie mit den Pfeiltasten. Power (Ein- und Ausschalter) Die Blackmagic Studio Camera wird per Druck auf die Power-Taste eingeschaltet. Halten Sie diese Taste zum Ausschalten der Kamera gedrückt. -
Page 115: Videoausgang Der Kamera
Videoausgang der Kamera Videoausgang der Kamera Anschließen von Videomischern Blackmagic Studio Cameras geben 10-Bit Videodaten in 4:2:2 aus, damit Sie Broadcast-Mischer und anderweitiges SDI-Videoequipment anschließen können. Der Glasfaser-Eingang und -Ausgang macht kameraseitige ATEM Camera Converter überflüssig. Sie können die Programmausgabe (PGM) des Mischers mühelos sehen, indem Sie diesen Ausgang an den SDI- oder Glasfaser-Eingang Ihrer Studio Camera anschließen. -
Page 116: Blackmagic Camera Utility (Dienstprogramm)
Blackmagic Camera Utility (Dienstprogramm) Blackmagic Camera Utility (Dienstprogramm) So aktualisieren Sie Ihre Kamerasoftware unter Mac OS X Laden Sie die Blackmagic Camera Utility Software herunter, entpacken Sie die heruntergeladene Datei und öffnen Sie das resultierende Datenträgersymbol, um den Inhalt zu enthüllen. Starten Sie das Programm Blackmagic Camera Installer und folgen Sie den Anweisungen auf dem Bildschirm. -
Page 117: Befestigen Von Zubehör
Befestigen von Zubehör Befestigen von Zubehör Gegenlichtblende Die mit der Studio Camera gelieferte faltbare Gegenlichtblende dient zum Schutz des LCD vor grellem Licht, damit das Display jederzeit klar erkennbar ist. Schritt 1. Legen Sie sich die im Lieferumfang Ihrer Studio Camera enthaltenen sechs Flügelschrauben zurecht. Schritt 2. -
Page 118: Arbeiten Mit Atem Software Control
Kamera mit der richtigen Tally-Leuchte angezeigt wird. Jetzt wo eine Videoverbindung von Ihrem Mischer zu Ihrer Blackmagic Studio Camera besteht, können Sie auch die Tally-Indikatoren an Ihrer Kamera nutzen und per Druck der PGM-Taste Ihrer Kamera den Programm-Feed ansehen. -
Page 119: Arbeiten Mit „Camera Control" (Kamerasteuerung)
Arbeiten mit ATEM Software Control Arbeiten mit „Camera Control" (Kamerasteuerung) Starten Sie die Bediensoftware ATEM Software Control und klicken Sie am unteren Rand der Benutzeroberfläche auf das Kamerasymbol. Nun erfolgt die Anzeige einer Zeile von gekennzeichneten Kamerafenstern mit leistungsfähigen Tools zur Anpassung und Verfeinerung des Bildes der jeweiligen Kamera. Die Bedienelemente sind einfach handhabbar. Klicken Sie die Symbole mit Ihrer Maus an oder nehmen Sie Anpassungen per Klick und einer Ziehbewegung vor. - Page 120 Arbeiten mit ATEM Software Control Blenden-/Schwarzwert-Steuerung Blende und Schwarzwert werden über den kreisförmigen Button im Fadenkreuz der einzelnen Kamerafenster gesteuert. Dieser Button leuchtet rot auf, wenn die Kamera auf Sendung ist. Ziehen Sie den Button zum Öffnen oder Schließen der Blende nach oben oder unten. Bei gedrückt gehaltener SHIFT-Taste ist nur der Blendenwert anpassbar.
-
Page 121: Davinci Resolve Primary Color Corrector (Davinci Resolve Tool Für Die Primäre Farbkorrektur)
Kamerasteuerung für eine Benutzeroberfläche optieren, die dem Tool für die primäre Farbkorrektor eines Postproduktions- Gradingsystems gleicht. Ihre Blackmagic Studio Camera ist mit einem integrierten DaVinci Resolve Tool für die primäre Farbkorrektur ausgestattet. Wenn Sie bereits mit DaVinci Resolve gearbeitet haben, können Sie Ihre dabei gesammelten Erfahrungen bei Liveproduktionen für kreatives Colorgrading mit der Blackmagic Studio Camera einsetzen, da dies genauso funktioniert. - Page 122 Arbeiten mit ATEM Software Control Farbräder Die Schaltflächen Lift (Schwarztöne), Gamma (Mitteltöne) und Gain (Weißtöne) gestatten die Anpassung entlang des gesamten Tonwertspektrums, selbst in sich überlappenden Bereichen. Im fotografischen Sinne versteht man unter „Lift", „Gamma" und „Gain" die Schatten, Mitten und Lichter. So verwenden Sie die Farbräder, um feine oder rigorose Anpassungen vorzunehmen: Führen Sie an beliebiger Stelle im Farbrad einen Klick und eine Ziehbewegung aus: Hinweis: Die Farbbalance-Anzeige selbst braucht nicht bewegt zu werden.
-
Page 123: Synchronisation Von Einstellungen
Einstellung „Lum Mix" (Luminanzmischung) Farbton und Luminanzmischung Ihre Blackmagic Studio Camera ist mit einem integrierten DaVinci Resolve Tool für die primäre Farbkorrektur ausgestattet. DaVinci baut seit Anfang der 1980er Jahre Farbkorrektursysteme und es werden mit DaVinci Resolve mehr Hollywood-Spielfilme gegradet als mit jeder anderen Applikation. -
Page 124: Developer Information
Developer Information Developer Information Blackmagic Video Device Embedded Control Protocol Version 1.0 If you are a software developer you can use the Video Device Embedded Control Protocol to construct devices that integrate with our products. Here at Blackmagic Design our approach is to open up our protocols and we eagerly look forward to seeing what you come up with! Overview This document describes an extensible protocol for sending a uni-directional stream of small control messages... - Page 125 Developer Information Abstract Message Packet Format Every message packet consists of a three byte header followed by an optional variable length data block. The maximum packet size is 64 bytes. Destination device (uint8) Device addresses are represented as an 8 bit unsigned integer. Individual devices are numbered 0 through 254 with the value 255 reserved to indicate a broadcast message to all devices.
- Page 126 Developer Information Defined Commands Command 0 : change configuration Category (uint8) The category number specifies one of up to 256 configuration categories available on the device. Parameter (uint8) The parameter number specifies one of 256 potential configuration parameters available on the device. Parameters 0 through 127 are device specific parameters. Parameters 128 though 255 are reserved for parameters that apply to multiple types of devices.
- Page 127 Developer Information 128: signed 5.11 fixed point Data elements are signed 16 bit integers representing a real number with 5 bits for the integer component and 11 bits for the fractional component. The fixed point representation is equal to the real value multiplied by 2^11. The representable range is from -16.0 to 15.9995 (15 + 2047/2048).
- Page 128 Developer Information Group Parameter Type Index Minimum Maximum Interpretation Lens Focus fixed16 0.0=near, 1.0=far Instantaneous autofocus void trigger instantaneous autofocus Aperture (f-stop) fixed16 -1.0 16.0 Aperture Value (where fnumber = sqrt(2^AV)) Aperture (normalised) fixed16 0.0=smallest, 1.0=largest Aperture (ordinal) int16 Steps through available aperture values from minimum (0) to maximum (n) Instantaneous auto void...
- Page 129 Developer Information Group Parameter Type Index Minimum Maximum Interpretation Audio Mic level fixed16 0.0=minimum, 1.0=maximum Headphone level fixed16 0.0=minimum, 1.0=maximum Headphone program mix fixed16 0.0=minimum, 1.0=maximum Speaker level fixed16 0.0=minimum, 1.0=maximum Input type int8 0=internal mic, 1=line level input, 2=low mic level input, 3=high mic level input Input levels fixed16...
- Page 130 Developer Information Group Parameter Type Index Minimum Maximum Interpretation Configuration Real Time Clock int32 [0] time BCD - HHMMSSFF [1] date BCD - YYYYMMDD Reserved Reserved Colour Correction Lift Adjust fixed16 [0] red -2.0 default 0.0 [1] green -2.0 default 0.0 [2] blue -2.0 default 0.0...
- Page 131 Developer Information Example Protocol Packets Operation Packet Byte Length header command data trigger instantaneous auto focus on camera 4 turn on OIS on all cameras set exposure to 10 ms on camera 4 0x10 0x27 0x00 0x00 (10 ms = 10000 us = 0x00002710) add 15% to zebra level 0x33 0x01...
-
Page 132: Hilfe
Nachdem Sie überprüft haben, welche Version des Dienstprogramms Blackmagic Camera Utility auf Ihrem Computer installiert ist, besuchen Sie zum Auffinden der neuesten Aktualisierungen bitte das Blackmagic Support Center unter www.blackmagicdesign.com/support/de. Zwar ist es in der Regel empfehlenswert, die neuesten Updates zu laden, aber dennoch sind Software-Updates möglichst zu vermeiden, wenn Sie sich inmitten eines wichtigen Projekts befinden. -
Page 133: Garantie
Garantie Garantie 12 Monate eingeschränkte Garantie Blackmagic Design gewährt eine Garantie auf Material- und Verarbeitungsfehler von 12 Monaten ab Kaufdatum. Wenn sich ein Produkt innerhalb dieser Garantiezeit als fehlerhaft erweist, wird die Firma Blackmagic Design nach ihrem Ermessen das defekte Produkt entweder ohne Kosten für Teile und Arbeitszeit reparieren, oder Sie erhalten im Austausch für das defekte Produkt einen Ersatz. -
Page 134: Español
Manual de instalación y funcionamiento Blackmagic Studio Camera Mac OS X ™ Windows ™ Español noviembre de 2014... - Page 135 Bienvenido ¡Gracias por haber adquirido una Studio Camera de Blackmagic! Estamos muy contentos de haber diseñado esta nueva cámara. Desde adolescente, siempre tuve pasión por las producciones en directo. ¡Son tan emocionantes! Las cámaras con intercomunicadores y sistemas de señalización siempre han sido sumamente costosas y difíciles de manejar debido a su gran tamaño.
- Page 136 Encendido de la cámara Herramientas de DaVinci Resolve para correcciones primarias Conexiones Sincronización de ajustes Blackmagic Studio Camera - Lado izquierdo Developer Information Blackmagic Studio Camera - Lado derecho Blackmagic Video Device Embedded Control Protocol Ajustes de la Studio Camera...
-
Page 137: Primeros Pasos
Primeros pasos Primeros pasos Introducción Características 1. LUZ PILOTO FRONTAL Indica a la persona frente a las cámaras cuál de ellas está transmitiendo. Ver página 144. 2. CONEXIÓN LANC Conexión estéreo de 2,5 mm para controlar el enfoque y la apertura del diafragma a distancia. Ver página 140. 3. - Page 138 Primeros pasos 11. PANTALLA LCD Permite monitorizar las imágenes transmitidas desde la cámara y la salida de programa o ver el menú. Ver página 144. 12. LUZ PILOTO TRASERA Al encenderse indica al camarógrafo que su cámara está transmitiendo en directo. 13.
-
Page 139: Montaje Del Objetivo
Primeros pasos Montaje del objetivo Para comenzar a utilizar la cámara, basta con colocar un objetivo y encenderla. Para quitar la tapa protectora de la montura, mantenga presionado el botón de bloqueo y gire la tapa hacia la izquierda para aflojarla. Recomendamos siempre apagar la cámara antes de colocar o retirar un objetivo. -
Page 140: Conexiones
Conexiones Conexiones Blackmagic Studio Camera - Lado izquierdo Conexión LANC Permite ajustar el enfoque, acercar o alejar la imagen y modificar la apertura del diafragma a distancia en objetivos compatibles. Consta de un conector hembra estéreo de 2.5 mm que utiliza el protocolo LANC estándar. -
Page 141: Blackmagic Studio Camera - Lado Derecho
Conexiones Blackmagic Studio Camera - Lado derecho Entrada/Salida óptica La entrada y salida de fibra óptica dispone de conectores LC convencionales y admite señales 3G-SDI (Studio Camera HD) y 6G-SDI (Studio Camera 4K). Existe una gran variedad de cables de fibra óptica disponibles en el mercado porque son los mismos que se utilizan en las redes informáticas. -
Page 142: Ajustes De La Studio Camera
Ajustes de la Studio Camera Ajustes de la Studio Camera Ajustes de la cámara Para modificar los ajustes de la cámara, presione el botón MENU. Utilice los botones de navegación para resaltar menús y el botón SET para confirmar los parámetros seleccionados. Formato de vídeo Seleccione el formato de vídeo que desea utilizar. -
Page 143: Ajustes De Audio
Ajustes de la Studio Camera Ajustes de audio Para modificar los ajustes de audio en la cámara, presione el botón MENU y seleccione el ícono del micrófono ubicado a la izquierda de la pantalla. Entrada de audio Permite utilizar el audio del micrófono interno de la cámara o de las conexiones XLR. Volumen del micrófono Permite ajustar el volumen de grabación del micrófono integrado. -
Page 144: Ajustes De Monitorización
Ajustes de la Studio Camera Ajustes de monitorización Para modificar los ajustes de la pantalla, presione el botón MENU y seleccione el ícono del monitor. Brillo Mueva el control deslizante hacia la izquierda o la derecha para ajustar el brillo de la pantalla. El valor preestablecido es 60%. -
Page 145: Ajustes De Estudio
Ajustes de la Studio Camera Ajustes de estudio Para modificar los ajustes de la pantalla, presione el botón MENU y seleccione el ícono de los auriculares. Número de cámara Para que la Studio Camera puede utilizar el sistema de señalización en forma conjunta con el mezclador, es preciso identificarla con un número. -
Page 146: Modificación De Los Ajustes
Ajustes de la Studio Camera Modificación de los ajustes La Studio Camera permite controlar el objetivo en forma electrónica, lo cual hace posible modificar ciertos ajustes tales como la apertura y el enfoque automático. El indicador de enfoque genera un borde verde alrededor de las partes más nítidas de la imagen para poder enfocar correctamente con facilidad. -
Page 147: Ajustes Adicionales
Ajustes de la Studio Camera Ajustes adicionales Push to Talk (PTT) Al llevar a cabo una producción en directo, es de suma importancia que los camarógrafos puedan comunicarse con el director y con los demás integrantes del equipo en la sala de control. Simplemente presione este botón y manténgalo presionado mientras habla. -
Page 148: Salida De Vídeo De La Cámara
Salida de vídeo de la cámara Salida de vídeo de la cámara Conexión a mezcladores Las Studio Cameras transmiten imágenes en formato 4:2:2 a 10 bits, de modo que es posible conectarlas a mezcladores y otros equipos SDI. Como disponen de una entrada y salida de fibra óptica no es necesario utilizar ATEM Camera Converters. -
Page 149: Programa Utilitario De La Cámara
Programa utilitario de la cámara Programa utilitario de la cámara Cómo actualizar el software de la cámara en sistemas operativos Mac OS X Luego de bajar el programa Blackmagic Camera Utility y descomprimir el archivo descargado, abra la imagen de disco correspondiente para ver sus contenidos. Ejecute la aplicación Blackmagic Camera Installer y siga las instrucciones que aparecen en la pantalla. -
Page 150: Accesorios
Accesorios Accesorios Parasol La Studio Camera incluye un parasol plegable para dar sombra a la pantalla en condiciones de mucho brillo y asegurar una visualización óptima en todo momento. Paso 1. Ubique las seis tuercas de mariposa incluidas en la cámara. Paso 2. -
Page 151: Uso Del Programa De Control
Uso del programa de control Uso del programa de control Control de la cámara La Studio Camera puede manejarse desde un mezclador ATEM mediante el módulo de control incluido en el programa ATEM Software Control. Se puede acceder al mismo haciendo clic en el botón de la cámara y permite ajustar con facilidad diferentes parámetros tales como la apertura del diafragma, la ganancia y el enfoque al utilizar objetivos compatibles, además de balancear las cámaras y crear imágenes sorprendentes con las funciones de corrección primaria de DaVinci Resolve. -
Page 152: Uso Del Módulo De Control
Uso del programa de control Uso del módulo de control Ejecute el programa ATEM Software Control y haga clic en el botón de la cámara situado en la parte inferior de la ventana. Verá una serie de controladores con herramientas para ajustar y mejorar la imagen de cada cámara. -
Page 153: Enfoque Manual
Uso del programa de control Control del diafragma/pedestal Este control se encuentra en el retículo central de cada controlador y se enciende en rojo cuando la cámara está al aire. Para abrir o cerrar el diafragma, arrastre el círculo hacia arriba o abajo. Al mantener presionada la tecla de mayúsculas mientras se mueve el círculo solo se modifica la apertura del diafragma. -
Page 154: Herramientas De Davinci Resolve Para Correcciones Primarias
Uso del programa de control Ganancia de la cámara Este control permite aumentar la ganancia de la cámara. Es de suma importancia al filmar en condiciones de luz escasa para evitar que las imágenes queden subexpuestas. Para aumentar o disminuir la ganancia, haga clic sobre las flechas correspondientes. -
Page 155: Controles Generales
Uso del programa de control Círculos cromáticos Los controles “Lift”, “Gamma” y “Gain” permiten realizar ajustes interdependientes pero a su vez específicos para ciertas tonalidades. En términos fotográficos, dichos controles corresponden a las sombras, tonos intermedios y luces respectivamente. Para realizar ajustes drásticos o sutiles, utilice los círculos cromáticos de las siguientes maneras: Haga clic dentro del círculo y arrastre el ratón: Nótese que no es necesario arrastrar el indicador de balance de color. -
Page 156: Sincronización De Ajustes
Uso del programa de control Matiz Este control permite modificar los matices de la imagen recorriendo el perímetro del círculo cromático. El valor predeterminado de 180 grados muestra la distribución original del matiz. Al incrementarlo o disminuirlo, todos los matices se modificarán en sentido horario o antihorario en el círculo cromático. Mezcla de luminancia Ajustes para el contraste, la saturación, el matiz y la mezcla de luminancia... -
Page 157: Developer Information
Developer Information Developer Information Blackmagic Video Device Embedded Control Protocol Version 1.0 If you are a software developer you can use the Video Device Embedded Control Protocol to construct devices that integrate with our products. Here at Blackmagic Design our approach is to open up our protocols and we eagerly look forward to seeing what you come up with! Overview This document describes an extensible protocol for sending a uni-directional stream of small control messages... - Page 158 Developer Information Abstract Message Packet Format Every message packet consists of a three byte header followed by an optional variable length data block. The maximum packet size is 64 bytes. Destination device (uint8) Device addresses are represented as an 8 bit unsigned integer. Individual devices are numbered 0 through 254 with the value 255 reserved to indicate a broadcast message to all devices.
- Page 159 Developer Information Defined Commands Command 0 : change configuration Category (uint8) The category number specifies one of up to 256 configuration categories available on the device. Parameter (uint8) The parameter number specifies one of 256 potential configuration parameters available on the device. Parameters 0 through 127 are device specific parameters. Parameters 128 though 255 are reserved for parameters that apply to multiple types of devices.
- Page 160 Developer Information 128: signed 5.11 fixed point Data elements are signed 16 bit integers representing a real number with 5 bits for the integer component and 11 bits for the fractional component. The fixed point representation is equal to the real value multiplied by 2^11. The representable range is from -16.0 to 15.9995 (15 + 2047/2048).
- Page 161 Developer Information Group Parameter Type Index Minimum Maximum Interpretation Lens Focus fixed16 0.0=near, 1.0=far Instantaneous autofocus void trigger instantaneous autofocus Aperture (f-stop) fixed16 -1.0 16.0 Aperture Value (where fnumber = sqrt(2^AV)) Aperture (normalised) fixed16 0.0=smallest, 1.0=largest Aperture (ordinal) int16 Steps through available aperture values from minimum (0) to maximum (n) Instantaneous auto void...
- Page 162 Developer Information Group Parameter Type Index Minimum Maximum Interpretation Audio Mic level fixed16 0.0=minimum, 1.0=maximum Headphone level fixed16 0.0=minimum, 1.0=maximum Headphone program mix fixed16 0.0=minimum, 1.0=maximum Speaker level fixed16 0.0=minimum, 1.0=maximum Input type int8 0=internal mic, 1=line level input, 2=low mic level input, 3=high mic level input Input levels fixed16...
- Page 163 Developer Information Group Parameter Type Index Minimum Maximum Interpretation Configuration Real Time Clock int32 [0] time BCD - HHMMSSFF [1] date BCD - YYYYMMDD Reserved Reserved Colour Correction Lift Adjust fixed16 [0] red -2.0 default 0.0 [1] green -2.0 default 0.0 [2] blue -2.0 default 0.0...
- Page 164 Developer Information Example Protocol Packets Operation Packet Byte Length header command data trigger instantaneous auto focus on camera 4 turn on OIS on all cameras set exposure to 10 ms on camera 4 0x10 0x27 0x00 0x00 (10 ms = 10000 us = 0x00002710) add 15% to zebra level 0x33 0x01...
-
Page 165: Ayuda
Luego de verificar la versión del programa instalada en el ordenador, visite el Centro de Soporte Técnico en www.blackmagicdesign.com/support para comprobar si hay actualizaciones disponibles. Aunque generalmente es una buena idea ejecutar las últimas actualizaciones, evite actualizar cualquier programa si se encuentra en medio un proyecto importante. -
Page 166: Garantía
Garantía Garantía 12 meses de garantía limitada Blackmagic Design garantiza que el producto adquirido no presentará defectos en los materiales o en su fabricación por un período de 12 meses a partir de la fecha de compra del mismo. Si un producto resulta defectuoso durante el período de validez de la garantía, Blackmagic Design podrá... - Page 167 安装操作手册 Blackmagic Studio Camera Mac OS X ™ Windows ™ 中文 2014年11月...
- Page 168 Blackmagic Studio Camera是我们的得意之作。 我从十几岁起便对精彩的现场制 作产生了浓厚的兴趣! 通常带有对讲系统和Tally提示的摄影机都价格不菲, 而且 体积较大, 使用并不方便。 针对这一难题, 我们设计出了一款机身紧凑, 却依然具 备大型摄影机所拥有的对讲系统、 Tally和摄影机控制等精彩功能。 这些便是我们当初设计Blackmagic Studio Camera的初衷。 我们希望设计出的 摄影机能拥有更小机身以便携带, 可是通常较小的摄影机便意味着更小的屏幕。 这是我们需要避免的。 我们要的是更大的寻像器! Blackmagic Studio Camera是 迄今最小的广播级摄影机, 却有着超大寻像器, 为您带来无与伦比的拍摄体验! 有了这么大的寻像器, 您可以更精确地对焦和取景! 此外, 这款优秀的摄影机还具备Tally指示灯、 对讲系统、 强劲的内置电池, 并配备 灵活的MFT镜头卡口。 您需要的所有配备都设计周全, 一步到位! 摄影机自带的 幻象电源可连接较大的防风型专业麦克风; 此外, 由于摄影机内置光纤接口, 您...
- Page 169 Blackmagic Studio Camera简介 摄影机控制简介 安装镜头 使用摄影机控制 启动摄影机 DaVinci Resolve Primary Color Corrector 同步设置 接口 Developer Information Blackmagic Studio Camera - 左侧接口 Blackmagic Studio Camera - 右侧接口 Blackmagic Video Device Embedded Control Protocol Overview Studio Camera设置 Assumptions 摄影机设置 Blanking Encoding 音频设置...
-
Page 170: Blackmagic Studio Camera简介
入门 入门 Blackmagic Studio Camera简介 功能 1. 机身正面的TALLY指示灯 可提示镜头前的工作人员哪部摄影机正处于 “播出” 状态。 详见第177页。 2. LANC遥控 2.5mm立体声插孔用于LANC遥控控制, 可调节光圈和焦距。 详见第173页。 3. 航空级耳麦 0.25英寸TRS接口用于监看PGM节目视频并通过航空级耳麦和控制室进行交流。 详见第173页。 4. 耳机麦克风输入 使用0.206英寸TRS接口可连接航空级耳麦与控制室进行交流。 详见第173页。 5. 音频输入 2个1/4英寸平衡XLR接口用于音频输入。 详见第173页。 6. 光纤输入/输出 光纤输入和输出的布线长度可达28英里 (约合45公里) 。 详见第174页。 OPTICAL OUT OPTICAL IN 7. SDI输出... - Page 171 入门 11. 10英寸LCD屏幕 实时监看摄影机输出画面或节目输出画面, 也可用来查看菜单。 详见第177页。 12. 机身背面的TALLY指示灯 当该摄影机的信号画面处于 “播出” 状态时, 该指示灯会亮起以提醒摄影师注意。 13. FOCUS对焦按钮 按此按钮一次可自动对焦, 按两次可在LCD屏幕上显示峰值对焦。 详见第179页。 14. IRIS光圈按钮 按此按钮一次可自动曝光。 详见第179页。 FOCUS IRIS DISPLAY MENU 15. PTT对讲按钮 按住按钮的同时说话。 连按两次可开启免提通信。 再次按下按钮可回到默认状态。 详见第180页。 16. PGM节目按钮 按此按钮可在摄影机实时拍摄画面和来自控制室切换台的节目输出画面之间切换。 详见第180页。 17. LUT查找表按钮 暂时不可使用。 18. 菜单导航按钮 可在LCD屏幕上浏览菜单。...
-
Page 172: 安装镜头
入门 安装镜头 Blackmagic Studio Camera的准备工作十分快捷, 只需安装镜头并开机即可使用。 先按住锁定按钮, 同时 逆时针转动镜头卡口的防尘盖直至其释放便可将其取下。 请在安装和取下镜头前确保先关闭Blackmagic 摄影机。 安装镜头步骤如下: 第一步: 将镜头的标志点与机身的镜头卡口标志点对齐。 一般镜头的标志点为蓝色、 红色、 白色或其他 标志。 第二步: 顺时针旋转镜头直至听到固定销到位的声音。 第三步: 取下镜头前, 先按住锁定按钮, 同时逆时针旋转镜头直至其标志点朝向摄影机顶部, 然后小心 将镜头取下。 在没有安装镜头时, 请务必使用镜头卡口的防尘盖, 以免灰尘进入机身, 影响传感器。 启动摄影机 Studio Camera内置电池, 可使用内附电源适配器充电。 连接外接电源时, 可操作摄影机并为电池充电, 无需断电即可在不同电源之间切换。 在Studio Camera上安装和取下镜头 第一步: 按下LCD屏幕下方的电源按钮。 然后LCD屏幕会即刻显示摄影机的实时拍摄画面。... -
Page 173: 接口
接口 接口 Blackmagic Studio Camera - 左侧接口 LANC遥控控制 使用兼容的镜头时, 您可通过摄影机上的遥控端口来遥控调节镜头对焦、 光圈和变焦功能。 该端口为2.5mm 立体声插孔, 使用标准LANC协议。 使用主动式MFT镜头时, 可以通过LANC控制器来操控伺服变焦。 目前支持以下几款镜头: ‚ 松下Lumix G X Vario PZ 14-42mm f/3.5-5.6 Power O.I.S.镜头 ‚ 松下Lumix G X Vario PZ 45-175mm f/4.0-5.6 Zoom O.I.S.镜头 ‚ 奥林巴斯12-50mm f/3.5-6.3 ED M.Zuiko EZ Micro 4/3镜头... -
Page 174: Blackmagic Studio Camera - 右侧接口
光纤输入和输出使用的是工业标准LC接头, 在Studio Camera HD型号上支持3G-SDI; 在Studio Camera 4K型号上支持6G-SDI。 光纤线缆用途广泛, 因为电脑网络使用的也是此类线缆。 光纤布线可长达28英里, 约45公里, 这样的长度即使要求再高的外景拍摄任务也绰绰有余。 当光纤和SDI输入同时连接时, 设备会 使用其第一个连接的输出口输出。 SDI输出 SDI Out输出接口可将10-bit 4:2:2视频输出到矩阵、 监视器、 SDI采集设备和广播级切换台等专业SDI视频 设备上。 Blackmagic Studio Camera HD支持3G-SDI, Studio Camera 4K支持12G-SDI。 SDI输入 摄影师可使用SDI输入接口查看PGM节目输出。 只需按下按钮便可在摄影机实时拍摄画面和来自控制室切 换台的节目输出画面之间切换。 当光纤和SDI输入同时连接时, 设备会使用其第一个连接的输出口输出。 如 果您使用Blackmagic Hyperdeck Shuttle等设备录制Studio Camera上的视频, 那么Hyperdeck的输出 可以连接到摄影机的SDI输入, 以便您回放录制的内容。... -
Page 175: 摄影机设置
Studio Camera设置 Studio Camera设置 摄影机设置 请按MENU按钮调整Blackmagic Studio Camera的各项设置。 使用方向按钮在选项间导航, 并使用SET按钮确认选择。 Video Format ( 视频格式) 选择输出的视频格式。 支持的格式详见左边的列表。 Gain (增益) 增益设置在低光照环境下拍摄时十分有用。 默认设置是0dB, 增益可以6dB为单位增加到18dB。 White Balance (白平衡) 有六种白平衡预设, 用于各类色温条件。 ‚ 3200K钨丝灯模式 ‚ 4500K荧光灯模式 ‚ 5000K、 5600K、 6500K和7500K用于一天不同时段等各种日光条件。 Shutter Speed (快门速度) Camera摄影机设置 快门速度和ISO设置相结合可合理控制传感器的曝光值。 有15种快门速度可选, 范围在1/50秒到1/2000秒... -
Page 176: 音频设置
Studio Camera设置 音频设置 如果需要调整Blackmagic Studio Camera的音频输入和音频监听设置, 请按MENU按钮, 并选择位于显 示屏左侧的麦克风图标。 Audio Input ( 音频输入) 可使用来自摄影机的内部麦克风输入或来自XLR接口的音频。 Microphone Level ( 麦克风电平) 麦克风输入可调节内置麦克风的录音电平。 左右移动音频滑块可增减音量电平。 Studio Camera内置一个 立体声麦克风。 当摄影机没有连接外部音频源时, 内置麦克风会使用1号和2号通道录音。 Input Level ( 输入电平) 外部音频接口支持麦克风输入或线路输入。 连接调音台和功率放大器等外部音频设备时, 请选择Line设 置。 连接麦克风时, 请根据信号强度选择Mic Low或Mic High设置。 为防止外部音频音量过低或过高以致 失真, 请将音量电平调到合适的范围。... -
Page 177: 监看设置
Studio Camera设置 监看设置 如要调节LCD屏幕的显示设置, 请按MENU按钮, 再选择监视器图标。 Brightness (亮度) 左右移动滑块来调节LCD屏幕亮度设置。 默认设置为60%。 Zebra (斑马纹) Blackmagic摄影机系列具有斑马纹功能, 该功能可显示曝光度。 视频中超过斑马纹曝光度的部分会出现 对角线。 开启斑马纹功能并通过向左向右箭头图标选择所需的斑马纹警戒水平。 默认设置为Medium (中) 。 Focus Peaking (峰值对焦) 可更改峰值对焦值。 设置包括: Off ( 关闭) 、 Low (低) 、 Medium (中) 和High (高) 。 使用高锐度镜头时, 整幅画面可能会出现太多焦点, 因此请适当调整这项设置。 默认设置为Medium (中) 。 Tally Brightness (Tally灯亮度)... -
Page 178: 演播室设置
Studio Camera设置 演播室设置 如要调节该设置, 请按MENU按钮, 再选择耳麦图标。 Camera Number ( 摄影机号) 如果您希望您的Studio Camera接收来自ATEM切换台的Tally信号, 请在摄影机上设置摄影机号码, 以便 切换台可以顺利将信号发送到正确的摄影机上。 摄影机号可在1到99之间选择。 默认设置为1号 Reference Source (同步信号源) 用来选择同步锁相信号源。 Studio Camera可锁定节目SDI输入或外部同步锁相信号源。 如果使用外部同 步锁相信号, 那么一旦该信号发生变化就极有可能导致跳屏, 因为摄像机需要重新锁定到新的同步信号。 Reference Timing (同步时间校准) 可以扫描线或像素为单位手动调整同步时间。 Headset Level ( 耳麦音量电平) 左右移动音量滑块可增减音量监听电平。 默认设置为50%。 Headset Mic Level ( 耳机麦克风音量电平) Studio演播室设置... - Page 179 Studio Camera设置 调整设置 Blackmagic Studio Camera支持电子镜头控制, 以便您调整光圈和自动对焦等镜头设置。 峰值对焦功能 可在画面中最清晰的物体加上绿色边缘, 以便您明确对焦对象。 峰值对焦只出现在LCD屏幕, 不会影响 SDI输出。 FOCUS对焦按钮 FOCUS IRIS DISPLAY MENU 如果您在Studio Camera上使用带有自动对焦功能的镜头, 请按FOCUS按钮获得峰值对焦或自动对焦功能。 按FOCUS按钮一次是自动对焦, 连按FOCUS按钮两次可开启峰值对焦。 使用手动镜头时, 按此FOCUS按钮一次可获得峰值对焦。 FOCUS IRIS DISPLAY MENU IRIS光圈按钮 使用Video (视频) 动态范围模式时, 按IRIS按钮后, 摄影机会根据画面中的亮部和暗部情况设置平均曝光值。 按FOCUS按钮一次是自动对焦。 连按FOCUS按钮两次可开启峰 值对焦。 使用Film (电影) 动态范围模式时, 按IRIS按钮后, 摄影机会根据画面中最亮的部分设置曝光值。...
- Page 180 Studio Camera设置 其他设置 PTT (对讲) 从事现场制作时, 摄影师和位于控制室的导演以及其他工作人员之间的沟通是至关重要的。 只需按住按钮 说话便可。 连按两次可开启免提通信。 再次按下按钮可回到默认状态。 FOCUS IRIS DISPLAY MENU PGM (节目) 除了查看自己的摄影机画面外, 摄影师有时也需要查看节目输出画面。 只需按下这一按钮便可在摄影机实 时拍摄画面和来自控制室切换台的节目输出画面之间切换。 您可以使用SDI或光纤输入接口连接您的外部 视频源。 FOCUS IRIS DISPLAY MENU LUT (查找表) Studio Camera具有PTT和PGM设置, 这些功能对于现场制作 暂时不可使用。 来说十分重要。 左、 上、 下、 右 这些按钮用于菜单导航。 该按钮用来确认菜单选项。 DISPLAY (显示)...
- Page 181 摄影机视频输出 摄影机视频输出 连接视频切换台 Blackmagic Studio Camera输出的是10-bit 4:2:2视频, 因此您可以连接广播级切换台和其他SDI视频设备。 摄影机配备光纤输入和输出接口, 因此摄影机本身不需要使用ATEM Camera Converters转换器。 将Studio Camera的SDI或光纤输入接口连接切换台后, 您就可以查看切换台的节目输出画面了 。 同时, Studio Camera还具备同步输入, 可使用BB或三电平同步信号将多部摄影机信号集中同步。 将多 部摄影机、 VTR以及其他设备与外部同步信号进行同步锁相可以避免因设备不同步导致画面切换时出现 画面跳屏的现象。 连接录机 如果您只是录制Studio Camera输出上的内容, 您可以将摄影机的SDI输出和Blackmagic Hyperdeck Shuttle等SSD录机的SDI输入连接即可。 而Hyperdeck上的SDI输出又可以再连接到Studio Camera上的 SDI输入, 这样您就可以在摄影机的LCD屏幕上查看录制内容。 使用SDI或光纤线缆将Studio Camera和制作切换台或其他设备 连接。 +12V POWER HDMI IN...
- Page 182 Blackmagic Camera Utility Blackmagic Camera Utility 如何在Mac OS X操作系统下更新摄影机软件 下载了Blackmagic Camera Utility软件并解压缩后, 请打开下载磁盘图标查看内容。 运行Blackmagic Camera Installer安装程序, 根据屏幕提示完成安装。 如何在Windows操作系统下更新摄影机软件 下载了Blackmagic Camera Utility软件并解压缩后, 您会看到一个名为 “Blackmagic Camera Utility” 的 文件夹, 文件夹中含有PDF版操作手册以及Blackmagic Camera Utility安装程序。 双击该安装程序, 并根据屏幕提示完成安装。 如何更新摄影机软件? 在您的电脑上安装了最新版Blackmagic Camera Utility软件后, 请使用USB连接线将电脑和摄影机连接。 Mini B USB 2.0端口位于摄影机底部。 Blackmagic Camera Utility软件...
- Page 183 安装配件 安装配件 遮光罩 Studio Camera自带折叠式遮光罩, 在明亮条件下使用可防止LCD屏幕反光, 时刻保证最清晰观看效果。 第一步: 准备好6颗Studio Camera附带的拇指螺丝。 第二步: 将遮光罩上的螺孔对准摄影机上的安装孔, 在机身顶部及两侧的螺孔分别各拧入2颗拇指螺丝, 并旋紧以固定遮光罩。 其他配件 如果在演播室内播报新闻, 您可能需要将摄像机安装到台座上, 并安装用于大型广播级镜头的轨道和提 词器。 如果在室外进行播出制作, 则可能需要连接麦克风、 外接电池或LANC遥控装置。 摄影机底部设有 两个⅜英寸安装孔, 顶端和两侧另设有十个¼英寸安装孔。 这样的设计为自定义装备提供了灵活性, 以便 用于各类规模的制作。...
-
Page 184: 入门
STEREO IN PUSH PUSH PUSH SD, HD and Ultra HD switchable unless indicated SD, HD and Ultra HD switchable unless indicated 第三步: 按Blackmagic Studio Camera的MENU菜单键。 到Studio Settings>Camera Number路径下, LOCK TO TALK LOCK TO TALK TROL CONTROL 将摄影机编号设置为和切换台输入对应的数字。 例如, 如果1号Studio Camera连接到ATEM切换... - Page 185 使用ATEM Software Control软件控制面板 使用摄影机控制 启动ATEM Software Control, 点击位于软件窗口底部的Camera摄影机按钮后, 系统会显示一排有标签 的摄影机控制窗口, 窗口内包含各类工具, 可用来调节和美化每台摄影机的画面。 这些控制窗口使用起来 十分简单。 只需以鼠标点击某个按钮, 或点击并拖动来调节即可。 点击齿轮图标为摄影机控制选择Aux辅助输出。 摄影机控制选择 摄影机控制窗口的上方有一排按钮, 可用来选择您想要控制的摄影机所对应的机位编号。 如果您的窗口无 法显示所有的摄影机控制窗口, 或者您在使用调色窗口界面, 那么您可以使用这些按钮来快速选择您想要 控制的机位。 如果您将一路Aux辅助输出用于监看摄影机控制, 那么您通过这些按钮在不同机位间切换摄 影机进行控制的同时, 也可将该摄影机的视频输出到切换台系统偏好设置中所选择的Aux辅助输出上。 通道状态 通道状态位于每个摄影机控制窗口的顶部, 可显示摄影机标签、 On Air提示灯以及锁定按钮。 按锁定按钮 可锁定某台摄影机的所有控制。 正在播出时, 通道状态会亮起红色, 并显示On Air提示。 色轮...
- Page 186 使用ATEM Software Control软件控制面板 光圈/黑电平控制 光圈/黑电平控制位于每个摄影机控制窗口内的十字标交点上。 当某台摄影机处于直播状态时, 对应的控 制按钮会亮起红色。 要控制光圈大小, 请上下拖动该控制按钮。 如只需调整光圈, 请按住Shift键后拖动该按钮。 要降低或升高黑电平, 请左右拖动该控制按钮。 如只需调整黑电平, 请在Mac电脑上按住command键, 或 在Windows电脑上按住Control键后, 再拖动该按钮。 Coarse设置 Coarse设置位于光圈/黑电平控制按钮左侧, 可限制光圈范围。 这一功能可防止直播画面出现过曝现象。 要设置Coarse阈值, 请使用光圈控制按钮将光圈打开到最大, 然后上下拖动Coarse滑块设置合适的最大 曝光值。 Coarse阈值设置完成后, 当您再次调整光圈时, 光圈值就不会超过预先设定的最大曝光值了 。 光圈指示灯 光圈指示灯位于光圈/黑电平控制按钮的右侧, 可直观地显示镜头的光圈大小。 光圈指示灯可反映Coarse 设置。 自动对焦按钮 自动对焦按钮位于摄影机控制窗口内左下角的位置。 按下此按钮后, 可在支持电子对焦的主动式镜头上使 用自动对焦功能。...
- Page 187 白平衡设置位于快门速度控制旁边, 可通过点击色温指示器两侧的向左或向右箭头来进行调整。 不同光源 会发出暖色或冷色的色调, 您可通过调整白平衡来加以补偿。 这样可确保白色的部分在拍摄到的画面中依 然为白色。 DaVinci Resolve Primary Color Corrector 如果您具备一定的调色功底, 那么您可以将摄影机控制界面从切换台CCU风格更改为和后期调色系统相 似的一级调色界面。 您的Blackmagic Studio Camera摄影机自带DaVinci Resolve Primary Color Corrector一级调色工 具。 Blackmagic Studio Camera摄影机内的调色界面和DaVinci Resolve完全相同, 因此如果您使用过 DaVinci Resolve, 那么您就能将丰富的调色经验运用到现场制作了 。 您可从任何摄影机控制窗口中展开这一调色面板, 展开后可获得一个完整的一级调色界面, 可为摄影机提 供更多调色控制和设置项。 该界面包含色轮组和饱和度等不同设置, 您可以同时查看暗部、 中间调和亮部的设置。 请使用窗口顶部的...
- Page 188 使用ATEM Software Control软件控制面板 色轮 Lift/Gamma/Gain控制可对特定色调进行调整, 但三者之间会相互影响。 在摄影摄像专业领域 中, Lift、 Gamma和Gain分别代表暗部、 中间调和亮部。 使用色轮可进行不同幅度的调整, 具体操作方法如下: 在色轮内任意位置点击并拖动: 您并不一定要点中色彩平衡图标并拖动方可执行此操作。 色彩平衡图标移动时, 下方对应的三个RGB参数会相应变化, 反映所做的调整对各个色彩通道 产生的变化。 在色轮内按Shift键并点击鼠标: 可直接将色彩平衡图标移动到鼠标指针所指的精确位置, Lift、 Gamma和Gain三个色轮以及调色面板。 可快速实现大幅度调整。 在色轮内双击鼠标: 重置调色设置, 该项控制的主滚轮保持不变。 点击色轮右上方的重置控制: 可重置色彩平衡控制及其对应的主滚轮。 主滚轮 色轮下方的主滚轮用于单独调整每个YRGB通道的Lift、 Gamma和Gain控制项。 使用主滚轮进行调整方法如下: 向左或向右拖动主滚轮: 向左拖动可使所选的画面参数变深, 向右拖动可使该参数变浅。 进行调 整时, 下方的各项YRGB参数会根据所做的调整发生相应变化。 如只需对Y通道进行调整, 请按 住ALT键或Command键并左右拖动鼠标即可。...
- Page 189 使用ATEM Software Control软件控制面板 Hue色相设置 Hue色相设置可用来将整幅图像的色彩按照色轮最边缘的色相依次调整。 默认设置为180度, 显示的是原 始色相分布。 增加或减少这一参数可沿色轮最边缘分布的色相前进或后退。 Lum Mix亮度混合设置 Contrast ( 对比度) 、 Saturation (饱和度) 、 Hue (色相) 和Lum Blackmagic Studio Camera摄影机自带基于DaVinci Resolve一级调色系统的调色工具。 DaVinci早在20 Mix (亮度混合) 设置。 世纪80年代起就开始制造调色工具, 大部分好莱坞电影都选择使用DaVinci Resolve进行调色。 这意味着您的Blackmagic Studio Camera摄影机所带的是一款有着独特创意的强大调色工具, 而YRGB 处理便是其中一项强大的功能。 调色时, 您可以选择使用RGB或YRGB处理方式。 高端调色师选择YRGB处理方式, 是因为这种处理方式能...
- Page 190 Developer Infor- mation Developer Information Blackmagic Video Device Embedded Control Protocol Version 1.0 If you are a software developer you can use the Video Device Embedded Control Protocol to construct devices that integrate with our products. Here at Blackmagic Design our approach is to open up our protocols and we eagerly look forward to seeing what you come up with! Overview This document describes an extensible protocol for sending a uni-directional stream of small control...
- Page 191 Developer Information Abstract Message Packet Format Every message packet consists of a three byte header followed by an optional variable length data block. The maximum packet size is 64 bytes. Destination device (uint8) Device addresses are represented as an 8 bit unsigned integer. Individual devices are numbered 0 through 254 with the value 255 reserved to indicate a broadcast message to all devices.
- Page 192 Developer Information Defined Commands Command 0 : change configuration Category (uint8) The category number specifies one of up to 256 configuration categories available on the device. Parameter (uint8) The parameter number specifies one of 256 potential configuration parameters available on the device. Parameters 0 through 127 are device specific parameters.
- Page 193 Developer Information 128: signed 5.11 fixed point Data elements are signed 16 bit integers representing a real number with 5 bits for the integer component and 11 bits for the fractional component. The fixed point representation is equal to the real value multiplied by 2^11. The representable range is from -16.0 to 15.9995 (15 + 2047/2048).
- Page 194 Developer Information Group Parameter Type Index Minimum Maximum Interpretation Lens Focus fixed16 0.0=near, 1.0=far Instantaneous autofocus void trigger instantaneous autofocus Aperture (f-stop) fixed16 -1.0 16.0 Aperture Value (where fnumber = sqrt(2^AV)) Aperture (normalised) fixed16 0.0=smallest, 1.0=largest Aperture (ordinal) int16 Steps through available aperture values from minimum (0) to maximum (n) Instantaneous auto void...
- Page 195 Developer Information Group Parameter Type Index Minimum Maximum Interpretation Audio Mic level fixed16 0.0=minimum, 1.0=maximum Headphone level fixed16 0.0=minimum, 1.0=maximum Headphone program mix fixed16 0.0=minimum, 1.0=maximum Speaker level fixed16 0.0=minimum, 1.0=maximum Input type int8 0=internal mic, 1=line level input, 2=low mic level input, 3=high mic level input Input levels fixed16...
- Page 196 Developer Information Group Parameter Type Index Minimum Maximum Interpretation Configuration Real Time Clock int32 [0] time BCD - HHMMSSFF [1] date BCD - YYYYMMDD Reserved Reserved Colour Correction Lift Adjust fixed16 [0] red -2.0 default 0.0 [1] green -2.0 default 0.0 [2] blue -2.0 default 0.0...
- Page 197 Developer Information Example Protocol Packets Operation Packet Byte Length header command data trigger instantaneous auto focus on camera 4 turn on OIS on all cameras set exposure to 10 ms on 0x10 0x27 0x00 0x00 camera 4 (10 ms = 10000 us = 0x00002710) add 15% to zebra level 0x33...
- Page 198 ‚ 在Mac OS X系统下, 请到 “应用程序” 文件夹下打开Blackmagic Camera Utility。 点击文件夹中的 About Blackmagic Camera Utility后即可查看版本号。 ‚ 在Windows系统下, 请到开始菜单打开Blackmagic Camera Utility。 点击Help (帮助) 菜单并 选择About Blackmagic Camera Utility即可查看版本号。 如何获得更新 检查完您电脑上安装的Blackmagic Camera Utility软件版本号之后, 请登录网址www.blackmagicdesign. com/support访问Blackmagic Support Center支持中心查看最新版本。 请关注版本更新, 但请勿在工作 过程中升级软件。 更换电池 用户无法自行更换Studio Camera的内置电池。 如需更换内置电池, 请联系就近的Blackmagic Design服...
- Page 199 保修 保修 12个月有限保修 Blackmagic Design保证本产品自购买本产品之日起12个月内不会有材料和工艺上的缺陷。 若本产品在保 修期内出现质量问题, Blackmagic Design可选择为产品提供免费修理或更换零部件, 或者更换缺陷产品。 为确保消费者有权享受本保修条款中的服务, 如遇产品质量问题请务必在保修期内联系Blackmagic Design 并妥善安排保修事宜。 消费者应将缺陷产品包装并运送到Blackmagic Design的指定服务中心进行维修, 运费由消费者承担并预先支付。 若消费者因任何原因退货, 所有运费、 保险费、 关税等各项税务以及其他费 用均由消费者承担。 本保修条款不适用于任何因使用、 维护不当或保养不周造成的缺陷、 故障或损坏。 根据本保修服务, Blackmagic Design的保修服务范围不包括以下内容: 1. 对由非Blackmagic Design专门人员进行的安装、 维修或保养所造成的损坏进行维修, 2. 对因使用不当或连接到不兼容设备所造成的损坏进行维修, 3. 对 因使用了非Blackmagic Design生产的零部件所导致的损坏或故障进行维修, 及 4. 对经过改装或和其他 产品进行组装的产品进行保养维修...
- Page 200 설치 및 사용 설명서 Blackmagic Studio Camera Mac OS X ™ Windows ™ 한국어 2014 11 월...
- Page 201 Blackmagic Studio Camera 가 개발되었습니다 ! 넓은 뷰파인더로 더욱 정확한 포커싱과 프레이밍 기능을 손쉽게 사용할 수 있습니다 ! Blackmagic Studio Camera 는 탈리 장치 , 토크백 , 대형 내장 배터리는 물론 , 유연한 MFT 렌즈 마운트까지 지원하는 놀라운 품질의 카메라입니다 . 필요한...
- Page 202 목차 Blackmagic Studio Camera 시작하기 ATEM 소프트웨어 컨트롤 사용하기 Blackmagic Studio Camera 제품 소개 카메라 컨트롤 렌즈 장착하기 카메라 컨트롤 사용하기 카메라 전원 켜기 DaVinci Resolve 프라이머리 컬러 커렉터 동기화 설정 연결 Developer Information Blackmagic Studio Camera - 좌측 Blackmagic Studio Camera - 우측...
-
Page 203: Blackmagic Studio Camera 제품 소개
시작하기 시작하기 Blackmagic Studio Camera 제품 소개 기능 1. 전면 탈리표시 장치 연기자에게 현재 어떤 카메라가 " 라이브 " 상태 인지를 나타내는 기능입니다 . 210 페이지 참조 . 2. LANC 원격 제어 조리개 , 줌 , 포커싱 제어를 위한 LANC 원격 제어용 2.5mm 스테레오 단자 . 206 페이지 참조 . - Page 204 LCD 상에 나타나는 메뉴에 접속합니다 . 213 페이지 참조 . OPTICAL OUT 22. 전원 버튼 (POWER) OPTICAL IN 전원 버튼을 누르면 Blackmagic Studio Camera 의 전원이 켜집니다 . 전원 버튼을 길게 누르면 카메라 SDI OUT 전원이 꺼집니다 . 205 와 213 페이지 참조 . SDI IN 23.
-
Page 205: 렌즈 장착하기
시작하기 렌즈 장착하기 렌즈를 장착하고 카메라를 켜기만하면 Blackmagic Studio Camera 의 사용 준비가 완성됩니다 . 카메라의 잠금 버튼을 누르고 커버를 시계 반대 방향으로 돌리면 렌즈 마운트의 커버를 쉽게 열 수 있습니다 . Blackmagic Camera 에 렌즈를 장착 및 분리하기 전에 , 항상 카메라 전원을 꺼주시기 바랍니다 . -
Page 206: 연결
연결 연결 Blackmagic Studio Camera - 좌측 LANC 원격 제어 호환 렌즈를 사용할 경우 , 카메라에 탑재된 원격 포트를 통해 렌즈의 포커스 , 조리개 , 줌을 조정할 수 있습니다 . 이 포트는 2.5mm 크기의 스테레오 단자이며 표준 LANC 프로토콜을 사용합니다 . -
Page 207: Blackmagic Studio Camera - 우측
SDI 출력 커넥터를 사용하여 10 비트 4:2:2 비디오를 라우터 , 모니터 , SDI 캡쳐 장비 , 방송용 스위처 등 전문가용 SDI 비디오 장비에 출력할 수 있습니다 . Blackmagic Studio Camera HD 는 3G-SDI 를 지원하고 Studio Camera 4K 는 12G-SDI 를 지원합니다 . -
Page 208: 카메라 설정 (Camera Settings)
Studio Camera 설정 Studio Camera 설정 카메라 설정 (Camera Settings) MENU 버튼을 누르면 Blackmagic Studio 의 환경 설정을 변경할 수 있습니다 . 내비게이션 버튼을 사용하여 메뉴를 선택한 뒤 SET 버튼을 눌러 설정을 실행합니다 . Video Format 출력을 원하는 비디오 포맷을 선택합니다 . 지원 포맷 리스트는 본 페이지 왼 편에 있습니다 . Gain 게인... -
Page 209: 오디오 설정 (Audio Settings)
Studio Camera 설정 오디오 설정 (Audio Settings) Blackmagic Studio Camera 에서 오디오 입력 및 오디오 모니터링 설정을 변경하려면 , MENU 버튼을 누른 후 화면 왼쪽에 위치한 마이크 아이콘을 선택하세요 . Audio Input 카메라에 내장된 마이크와 XLR 오디오 커넥터의 오디오 전환이 가능합니다 . -
Page 210: 모니터링 설정 (Monitoring Settings)
Studio Camera 설정 모니터링 설정 (Monitoring Settings) LCD 화면 설정을 조절하기 위해서는 MENU 버튼을 누른 뒤 모니터 아이콘을 선택하세요 . Brightness 슬라이더 아이콘을 좌 / 우로 이동하여 LCD 의 밝기를 조절합니다 . 기본 설정은 60% 입니다 . Zebra Blackmagic Cameras 는 노출 수준을 나타내는 지브라 기능을 지원합니다 . 지브라 노출 수준을 초과하는 비디오... -
Page 211: 스튜디오 설정 (Studio Settings)
Studio Camera 설정 스튜디오 설정 (Studio Settings) MENU 버튼을 누른 뒤 헤드폰 아이콘을 선택하면 , LCD 화면 설정을 조절할 수 있습니다 . Camera Number ATEM 스위처로부터 전송되는 탈리 신호를 Studio Camera 에 전송하려면 카메라 번호를 설정해야 합니다 . 이 기능은 스위처가 올바른 카메라에 탈리 신호를 전송하도록 해줍니다 . 카메라 번호는 1-99 로 설정 가능합니다... -
Page 212: 설정 변경 (Adjusting Settings)
Studio Camera 설정 설정 변경 (Adjusting Settings) Blackmagic Studio Camera 는 전자식 렌즈 컨트롤을 지원하므로 조리개 및 자동 초점과 같은 렌즈 설정을 사용할 수 있습니다 . 포커스 피킹 기능은 이미지의 가장 선명한 부분에 노란 테두리를 만들어 정확하게 초점을 맞출 수 있습니다 . 포커스 피킹은 LCD 에서만 사용할 수 있으며 , SDI 출력에는 적용되지 않습니다 . -
Page 213: 추가 설정 (Additional Settings)
프레임 가이드 및 배터리 상태 표시를 LCD 화면에 나타내거나 사라지게 하는 버튼입니다 . SDI 출력에는 오버레이가 전송되지 않습니다 . Menu Menu 버튼을 눌러 화면에 메뉴를 불러온 뒤 화살표 버튼으로 이동합니다 . Power Blackmagic Studio Camera 를 작동 시키는 전원 버튼입니다 . 전원 버튼을 길게 누르면 카메라 전원이 꺼집니다 . -
Page 214: 카메라의 비디오 출력
카메라의 비디오 출력 카메라의 비디오 출력 비디오 스위처에 연결 Blackmagic Studio Cameras 는 10 비트 4:2:2 비디오를 출력하므로 방송용 스위처 및 다양한 SDI 비디오 장비에 카메라를 연결할 수 있습니다 . 광섬유 입 / 출력이 탑재되어 ATEM Camera Converter 를 카메라에 연결할... -
Page 215: Blackmagic Camera Utility
Blackmagic Camera Utility Blackmagic Camera Utility Mac OS X 에 카메라 소프트웨어 설치하기 Blackmagic Camera Utility 소프트웨어를 다운로드한 뒤 파일의 압축을 해제합니다 . 완성된 디스크 이미지를 열어 컨탠츠를 확인합니다 . Blackmagic Camera 설치 프로그램을 시작하고 화면에 나타나는 지시에 따릅니다 . Windows 에... -
Page 216: 악세사리 장착
악세사리 장착 악세사리 장착 선셰이드 Studio Camera 에 장착된 접이식 선셰이드는 LCD 에 그림자를 드리워 밝은 환경에서도 항상 최적의 모니터링 환경을 제공합니다 . 1 단계 . Studio Camera 에 포함된 6 개의 나사를 끼웁니다 . 2 단계 . 선셰이드의 홈과 카메라의 마운팅 포인트를 맞춘 뒤 카메라의 윗부분과 옆면 부분에 각각 두 개의... -
Page 217: 시작하기
ANALOG AUDIO OUT 광섬유로 연결하기 Blackmagic Studio Camera 를 ATEM 스위처의 SDI 입력에 1 단계 . Blackmagic Studio Camera 의 광섬유 입 / 출력을 ATEM Studio Converter 의 광섬유 입 / 출력에 연결합니다 . 연결하세요 . 2 단계 . ATEM Studio Converter 의 알맞은 SDI 출력을 ATEM 스위처의 SDI 입력에 연결하세요 . -
Page 218: 카메라 컨트롤 사용하기
ATEM 소프트웨어 컨트롤 사용하기 카메라 컨트롤 사용하기 ATEM Software Control 을 실행한 뒤 소프트웨어 창의 하단에 위치한 카메라 아이콘을 클릭하세요 . 그러면 각 카메라의 이미지를 조정 및 개선할 수 있는 도구와 함께 카메라 제어 장치가 라벨 순으로 나타납니다 . 카메라 제어 장치의 사용법은 간단합니다 . 마우스로 해당 버튼을 클릭하거나 클릭한 뒤 드래그하여... - Page 219 ATEM 소프트웨어 컨트롤 사용하기 조리개 / 페디스털 컨트롤 조리개 및 페디스털 컨트롤은 각 카메라 제어 장치의 십자선 중앙에 위치해있습니다 . 이 컨트롤에 빨간불이 들어오면 해당 카메라가 온에어 상태임을 나타냅니다 . 컨트롤을 위 / 아래로 드래그하면 조리개를 열거나 닫을 수 있습니다 . SHIFT 키를 누른 채 드래그하면 조리개만...
-
Page 220: Davinci Resolve 프라이머리 컬러 커렉터
있습니다 . Blackmagic Studio Camera 에는 DaVinci Resolve 프라이머리 컬러 커렉터가 내장되어 있습니다 . DaVinci Resolve 를 사용해본 경험이 있다면 , 같은 방식으로 Blackmagic Studio Camera 에서 그레이딩 작업을 할 수 있으므로 라이브 프로덕션에서 컬러 그레이딩 실력을 발휘할 수 있습니다 . - Page 221 ATEM 소프트웨어 컨트롤 사용하기 컬러휠 리프트 / 감마 / 게인 컨트롤을 사용하면 색조를 정확히 조절할 수 있지만 모든 컨트롤이 서로 연결되어 모든 적용마다 서로 영향을 줍니다 . 사진 용어에서 리프트 , 감마 , 게인은 각각 섀도 , 미드톤 , 하이라이트와 상응합니다 . 다음과...
-
Page 222: 동기화 설정
Lum Mix 설정 색대비 , 채도 , 색조 , 휘도 혼합 설정 Blackmagic Studio Camera 에 내장된 컬러 커렉터는 DaVinci Resolve 프라이머리 컬러 커렉터에 기반을 둔 것입니다 . DaVinci 는 1980 년대 초반부터 컬러 커렉터를 개발해왔으며 , 대부분의 할리우드 영화들은... -
Page 223: Developer Information
Developer Information Developer Information Blackmagic Video Device Embedded Control Protocol Version 1.0 If you are a software developer you can use the Video Device Embedded Control Protocol to construct devices that integrate with our products. Here at Blackmagic Design our approach is to open up our protocols and we eagerly look forward to seeing what you come up with! Overview This document describes an extensible protocol for sending a uni-directional stream of small control... - Page 224 Developer Information Abstract Message Packet Format Every message packet consists of a three byte header followed by an optional variable length data block. The maximum packet size is 64 bytes. Destination device (uint8) Device addresses are represented as an 8 bit unsigned integer. Individual devices are numbered 0 through 254 with the value 255 reserved to indi- cate a broadcast message to all devices.
- Page 225 Developer Information Defined Commands Command 0 : change configuration Category (uint8) The category number specifies one of up to 256 configuration categories available on the device. Parameter (uint8) The parameter number specifies one of 256 potential configuration parameters available on the device. Parameters 0 through 127 are device specific parameters.
- Page 226 Developer Information 128: signed 5.11 fixed point Data elements are signed 16 bit integers representing a real number with 5 bits for the integer component and 11 bits for the fractional component. The fixed point representation is equal to the real value multiplied by 2^11. The representable range is from -16.0 to 15.9995 (15 + 2047/2048).
- Page 227 Developer Information Group Parameter Type Index Minimum Maximum Interpretation Lens Focus fixed16 0.0=near, 1.0=far Instantaneous autofocus void trigger instantaneous autofocus Aperture (f-stop) fixed16 -1.0 16.0 Aperture Value (where fnumber = sqrt(2^AV)) Aperture (normalised) fixed16 0.0=smallest, 1.0=largest Aperture (ordinal) int16 Steps through available aperture values from minimum (0) to maximum (n) Instantaneous auto ap- void...
- Page 228 Developer Information Group Parameter Type Index Minimum Maximum Interpretation Audio Mic level fixed16 0.0=minimum, 1.0=maximum Headphone level fixed16 0.0=minimum, 1.0=maximum Headphone program mix fixed16 0.0=minimum, 1.0=maximum Speaker level fixed16 0.0=minimum, 1.0=maximum Input type int8 0=internal mic, 1=line level input, 2=low mic level input, 3=high mic level input Input levels fixed16...
- Page 229 Developer Information Group Parameter Type Index Minimum Maximum Interpretation Configuration Real Time Clock int32 [0] time BCD - HHMMSSFF [1] date BCD - YYYYMMDD Reserved Reserved Colour Correction Lift Adjust fixed16 [0] red -2.0 default 0.0 [1] green -2.0 default 0.0 [2] blue -2.0 default 0.0...
- Page 230 Developer Information Example Protocol Packets Operation Packet Byte Length header command data trigger instantaneous auto focus on camera 4 turn on OIS on all cameras set exposure to 10 ms on cam- 0x10 0x27 0x00 0x00 era 4 (10 ms = 10000 us = 0x00002710) add 15% to zebra level 0x33...
- Page 231 가장 빠른 지원 방법은 Blackmagic Design 온라인 고객지원 페이지에 접속하여 최신 카메라 관련 지원 정보를 이용하는 것입니다 . Blackmagic Design 온라인 고객지원 페이지 Blackmagic 고객지원 센터 (www.blackmagicdesign.com/kr/support) 에서 최신 사용 설명서 , 소프트웨어 , 지원 노트를 이용하실 수 있습니다 . Blackmagic Design 고객 지원에 문의하기...
- Page 232 보증 보증 12 개월 제한 품질 보증 Blackmagic Design 은 본 제품의 부품 및 제조에 어떠한 결함도 없음을 제품 구매일로부터 12 개월 동안 보증합니다 . 보증 기간 내에 결함이 발견될 경우 , Blackmagic Design 은 당사의 결정에 따라 무상 수리 또는...
- Page 233 Руководство по установке и эксплуатации Blackmagic Studio Camera Mac OS X ™ Windows ™ Русский ноябрь 2014 г...
- Page 234 производства . При ее разработке мы стремились добиться портативности и вместе с тем избежать такого недостатка , как маленький экран . В результате на свет появилась Blackmagic Studio Camera — самая компактная вещательная камера с большим видоискателем , который обеспечивает...
- Page 235 Blackmagic Studio Camera ATEM Software Control Blackmagic Studio Camera DaVinci Resolve Primary Color Corrector Developer Information Blackmagic Studio Camera — Blackmagic Studio Camera — Blackmagic Video Device Embedded Control Protocol Overview Studio Camera Assumptions Blanking Encoding Message Grouping Blackmagic Camera Utility...
- Page 236 Подготовка к работе Подготовка к работе Blackmagic Studio Camera Показывает ведущему программы , сигнал какой камеры передается в эфир . См . стр . 243. LANC Стереоразъем диаметром 2,5 мм для дистанционного управления диафрагмой , масштабированием и фокусом по протоколу LANC. См . стр . 239.
- Page 237 Вывод меню на ЖК - дисплей . См . стр . 246. OPTICAL OUT OPTICAL IN Нажмите кнопку питания , чтобы включить Blackmagic Studio Camera. Нажмите и удерживайте , чтобы SDI OUT выключить камеру . См . стр . 238 и 246.
- Page 238 Подготовка к работе Для начала работы с достаточно установить объектив и включить камеру Blackmagic Studio Camera Чтобы снять пылезащитную крышку с байонета нажмите фиксирующую кнопку и поверните крышку против часовой стрелки Перед установкой и снятием объектива рекомендуется всегда выключать камеру...
- Page 239 Разъемы Разъемы Blackmagic Studio Camera — LANC Порт LANC используется для удаленного управления фокусом объектива , установки диафрагмы и масштабирования , если объектив поддерживает данные функции . Порт представляет собой стереоразъем диаметром 2,5 мм и работает по стандартному протоколу LANC.
- Page 240 Выход SDI используется для вывода 10- битного 4:2:2 видео на оборудование с SDI- интерфейсом , такое как коммутаторы , мониторы , устройства захвата и вещательные микшеры . Blackmagic Studio Camera поддерживает работу с сигналом 3G-SDI, а Studio Camera 4K — с 12G-SDI.
- Page 241 Настройки Studio Camera Настройки Studio Camera Для настройки Blackmagic Studio Camera нажмите кнопку MENU. Для выбора отдельных параметров используйте кнопки навигации , а для подтверждения настройки нажмите кнопку SET. Video Format ( Выберите необходимый формат для вывода видео . Перечень поддерживаемых форматов приведен слева .
- Page 242 Настройки Studio Camera Чтобы настроить параметры аудиовхода и мониторинга звука на Blackmagic Studio Camera, нажмите кнопку MENU и выберите значок с изображением микрофона слева от дисплея . Audio Input ( Переключение звука между встроенным микрофоном камеры и аудиоразъемами XLR. Microphone Level ( Используется...
- Page 243 Настройки Studio Camera Чтобы установить настройки ЖК - дисплея , нажмите кнопку MENU и выберите значок с изображением монитора . Brightness ( Для настройки яркости ЖК - дисплея передвиньте ползунок влево или вправо . По умолчанию установлено значение 60%. Zebra ( «...
- Page 244 Настройки Studio Camera Чтобы выполнить настройку ЖК - дисплея , нажмите кнопку MENU и выберите значок с изображением наушников . Camera Number ( Чтобы передавать сигналы индикации с видеомикшера ATEM на Studio Camera, используемой камере необходимо присвоить номер . В этом случае сигнал микшера будет поступать на нужную камеру . Номер камеры...
- Page 245 Настройки Studio Camera Blackmagic Studio Camera поддерживает функцию электронного управления объективом , которая позволяет изменять такие настройки , как диафрагма и автоматический фокус . Функция выделения контуров создает зеленую кромку вокруг наиболее резких элементов изображения , помогая правильно установить фокус . Контуры выделяются только на ЖК - дисплее и не выводятся с SDI- сигналом .
- Page 246 Включение и отключение рамки кадрирования и индикатора заряда батареи на ЖК - дисплее . Выводимая информация отсутствует в выходном сигнале SDI. Menu Нажмите для вызова меню и используйте кнопки со стрелками для навигации . Нажмите кнопку питания , чтобы включить Blackmagic Studio Camera. Нажмите и удерживайте , чтобы выключить камеру .
- Page 247 Выходной сигнал камеры Выходной сигнал камеры Blackmagic Studio Camera выводит 10- битное 4:2:2 видео , что позволяет подключаться к вещательным видеомикшерам и другому оборудованию с SDI- интерфейсом . Благодаря оптическому входу / выходу отпадает необходимость в использовании ATEM Camera Converter вместе с камерой .
- Page 248 Black magic Camera Utilit y Blackmagic Camera Utility Mac OS X После загрузки Blackmagic Camera Utility и распаковки файла выберите соответствующий диск для просмотра его содержимого . Запустите Blackmagic Camera Installer и следуйте инструкциям на экране . Windows После загрузки Blackmagic Camera Utility и распаковки файла будет отображаться папка , содержащая данное...
- Page 249 Установка аксессуаров Установка аксессуаров Studio Camera комплектуется складной солнцезащитной блендой для установки на ЖК - дисплей при съемке в условиях яркого освещения . Подготовьте шесть винтов , входящих в комплект поставки Studio Camera. Совместив отверстия на бленде с точками крепления на камере , закрутите по два винта на верхней...
- Page 250 видеовходом камеры , она начнет получать эти пакеты и будет выполнять необходимые действия в режиме удаленного контроля . Управлять камерой можно как через обычный SDI-, так и через оптический порт . Соедините SDI- выход (Out) на Blackmagic Studio Camera с любым SDI- входом (In) на видеомикшере ATEM.
- Page 251 Работа с ATEM Software Control Запустите панель ATEM Software Control и нажмите кнопку Camera в нижней части программного интерфейса . На экране будут отображаться окна управления камерами , которые содержат мощные инструменты для корректировки параметров изображения . В работе с этими инструментами используются кнопки...
- Page 252 Работа с ATEM Software Control Для управления диафрагмой / уровнем черного используется вкладка на пересечении двух линий в окне . Когда сигнал камеры выводится в эфир , она становится красной . Чтобы открыть или закрыть диафрагму , перетащите вкладку вверх или вниз при помощи кнопки мыши . Если...
- Page 253 Blackmagic Studio Camera имеет инструмент первичной цветокоррекции DaVinci Resolve. Те , кто знаком с DaVinci Resolve, могут привычным способом выполнять грейдинг в Blackmagic Studio Camera при работе в прямом эфире . Панель цветокоррекции раскрывается из любого окна управления камерой и дает возможность выполнять...
- Page 254 Работа с ATEM Software Control Инструменты Lift/Gamma/Gain позволяют изменить взаимосвязанные между собой параметры цвета в изображении . В терминах фотографии эти инструменты соответствуют областям тени , полутона и света . Порядок работы с цветовыми кругами для внесения небольших или масштабных изменений Обратите...
- Page 255 и Lum Mix Lum Mix В Blackmagic Studio Camera предусмотрена функция первичной цветокоррекции на основе DaVinci Resolve. Системы DaVinci используются с начала 80- х гг . ХХ века , и именно их чаще всего выбирают крупные голливудские студии для постобработки своих фильмов .
- Page 256 Developer Information Developer Information Blackmagic Video Device Embedded Control Protocol Version 1.0 If you are a software developer you can use the Video Device Embedded Control Protocol to construct devices that integrate with our products. Here at Blackmagic Design our approach is to open up our protocols and we eagerly look forward to seeing what you come up with! Overview This document describes an extensible protocol for sending a uni-directional stream of small control...
- Page 257 Developer Information Abstract Message Packet Format Every message packet consists of a three byte header followed by an optional variable length data block. The maximum packet size is 64 bytes. Destination device (uint8) Device addresses are represented as an 8 bit unsigned integer. Individual devices are numbered 0 through 254 with the value 255 reserved to indicate a broadcast message to all devices.
- Page 258 Developer Information Defined Commands Command 0 : change configuration Category (uint8) The category number specifies one of up to 256 configuration categories available on the device. Parameter (uint8) The parameter number specifies one of 256 potential configuration parameters available on the device. Parameters 0 through 127 are device specific parameters.
- Page 259 Developer Information 128: signed 5.11 fixed point Data elements are signed 16 bit integers representing a real number with 5 bits for the integer component and 11 bits for the fractional component. The fixed point representation is equal to the real value multiplied by 2^11. The representable range is from -16.0 to 15.9995 (15 + 2047/2048).
- Page 260 Developer Information Group Parameter Type Index Minimum Maximum Interpretation Lens Focus fixed16 0.0=near, 1.0=far Instantaneous autofocus void trigger instantaneous autofocus Aperture (f-stop) fixed16 -1.0 16.0 Aperture Value (where fnumber = sqrt(2^AV)) Aperture (normalised) fixed16 0.0=smallest, 1.0=largest Aperture (ordinal) int16 Steps through available aperture values from minimum (0) to maximum (n) Instantaneous auto void...
- Page 261 Developer Information Group Parameter Type Index Minimum Maximum Interpretation Audio Mic level fixed16 0.0=minimum, 1.0=maximum Headphone level fixed16 0.0=minimum, 1.0=maximum Headphone program mix fixed16 0.0=minimum, 1.0=maximum Speaker level fixed16 0.0=minimum, 1.0=maximum Input type int8 0=internal mic, 1=line level input, 2=low mic level input, 3=high mic level input Input levels fixed16...
- Page 262 Developer Information Group Parameter Type Index Minimum Maximum Interpretation Configuration Real Time Clock int32 [0] time BCD - HHMMSSFF [1] date BCD - YYYYMMDD Reserved Reserved Colour Correction Lift Adjust fixed16 [0] red -2.0 default 0.0 [1] green -2.0 default 0.0 [2] blue -2.0 default 0.0...
- Page 263 Developer Information Example Protocol Packets Operation Packet Byte Length header command data trigger instantaneous auto focus on camera 4 turn on OIS on all cameras set exposure to 10 ms on camera 0x10 0x27 0x00 0x00 (10 ms = 10000 us = 0x00002710) add 15% to zebra level 0x33 0x01...
- Page 264 и проверить наличие последних справочных материалов по камере . Blackmagic Design Последние версии руководства по эксплуатации , программного обеспечения и дополнительную информацию можно найти в Центре поддержки Blackmagic на странице www.blackmagicdesign.com/ support. Blackmagic Design Если при помощи доступных справочных материалов решить проблему не удалось , воспользуйтесь...
- Page 265 Гарантия Гарантия Компания гарантирует отсутствие в данном изделии дефектов материала и Black magic Design производственного брака в течение месяцев с даты продажи Если во время гарантийного срока будут выявлены дефекты по своему усмотрению выполнит ремонт неисправного , Blackmagic Design изделия без оплаты стоимости запчастей и трудозатрат или заменит такое изделие новым Чтобы...
Need help?
Do you have a question about the Blackmagic Studio Camera and is the answer not in the manual?
Questions and answers