Table of Contents
Advertisement
Advertisement
Table of Contents

Related Manuals for Kärcher K 3.000


Summary of Contents for Kärcher K 3.000
- Page 1 ® K 3.000 English Español Français 8.753-336.0 08/13...
-
Page 2: Table Of Contents
In the U.S. or Canada, please call K 3.000 1-800-537-4129 for warranty issues and visit Operating Pressure 1800 PSI www.karcher-help.com for technical support and product assistance. Water Volume 1.3 GPM Please take a moment to register your pressure Amp Draw 13 AMPS washer online at www.karcher-register.com. -
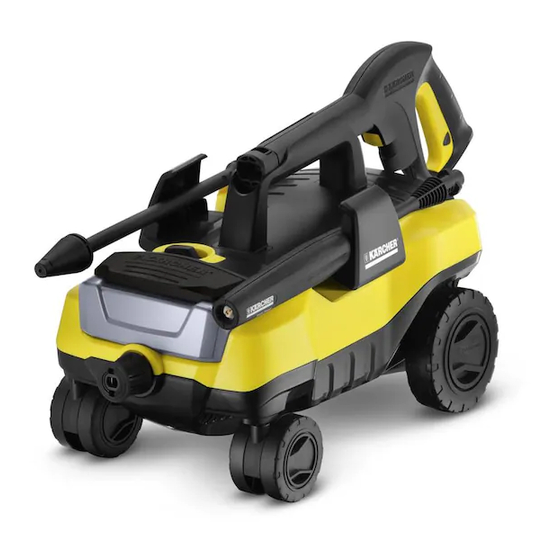
Page 3: Model Overview
MODEL OVERVIEW Swivel casters 10 Power cord with Ground Fault Circuit Inter- rupter (GFCI) ON/OFF switch 11 Wheels Detergent tank (removable) 12 Trigger gun High pressure outlet 13 Trigger gun safety lock Handle 14 Quick connect for high pressure hose Spray wand and Hp-hose storage 15 High pressure hose Water inlet... -
Page 4: Important Safety Instructions
IMPORTANT SAFETY INSTRUCTIONS SAVE THESE INSTRUCTIONS WARNING WARNING Risk of Electrocution When using this product, basic precautions ■ Inspect cord before using – Do not use if cord should always be followed, including the fol- is damaged. lowing: ■ Keep all connections dry and off the ground. ■... -
Page 5: Assembly Instructions
WATER SUPPLY SERVICING OF A (COLD WATER ONLY) DOUBLE-INSULATED PRODUCT In a double-insulated product, two systems of CAUTION insulation are provided instead of grounding. No When connecting the water inlet to the water sup- grounding means is provided on a double-insulated ply mains, local regulations of your water company product, nor should a means for grounding be must be observed. - Page 6 ASSEMBLY INSTRUCTIONS Hardware (included) Item Description Purpose Illustration Garden Hose Water Inlet Connec- Connector tion Assembly Spray Gun Assembly High Pressure Spray Gun Assembly Hose Vario Power Spray Gun Assembly Spray Wand Dirtblaster ® Spray Gun Assembly Assembling STEP 3: STEP 1: Install the supplied adaptor to the unit’s water Insert rear wheels into the body of the unit.
-
Page 7: Operating Instructions
Assembling Disconnect: STEP 4: Press the disconnect key on the trigger gun Push the high pressure hose into the trigger and remove the high pressure hose from the gun until it locks audibly. trigger gun. Note: Make sure the connection nipple is aligned correctly. -
Page 8: Using The Accessories
OPERATING INSTRUCTIONS STEP 5: Note: The actual appearance of the GFCI may be different from this illustration. Connect garden hose to the cold water source and turn water on completely. STEP 7: Unlock the trigger gun safety lock. Trigger the gun to eliminate trapped air, then wait for a steady fl... -
Page 9: Working With Detergents
USING THE ACCESSORIES Not recommended for soft materials, sid- Dirtblaster® ing, painted surfaces, decks or autos. ■ This nozzle features a 0º pencil jet which rotates 360º for maximum dirt cutting action, effectively increasing cleaning performance up to 50%. This nozzle combines the cleaning perfor- mance of a 0º... -
Page 10: Taking A Break
TAKING A BREAK ... fi ve minutes or more STEP 1: STEP 2: Release trigger and engage gun safety lock. Turn pressure washer to 0/OFF position SHUTTING DOWN & CLEAN-UP STEP 1: STEP 5: Turn the switch to 0/OFF position and unplug Disconnect the garden hose from the water cord from outlet. -
Page 11: Winterizing And Long-Term Storage
WINTERIZING AND LONG-TERM STORAGE Store the machine and accessories in a room Disconnect all water connections. which does not reach freezing temperatures. Turn the machine on for a few seconds, until DO NOT store near furnace or other sources the water which had remained in the pump of heat as it may dry out the pump seals. -
Page 12: Cleaning Tips
CLEANING TIPS CAUTION Cement Patios, Brick and Stone ■ Before cleaning any surface, an inconspicu- (with or without detergent) Pre-rinse cleaning ous area should be cleaned to test spray surface with fresh water. If using detergent or pattern and distance for maximum cleaning degreaser, apply to surface at low pressure. -
Page 13: Optional Cleaning Accessories
CLEANING TIPS Patio and Lawn Furniture use rotating wash brush (not included) to remove stubborn dirt. Rinse at high pressure in a sweeping (with or without detergent) Pre-rinse furniture motion, keeping the spray nozzle approximately and surrounding area with fresh water. If using 3-6 in. - Page 14 OPTIONAL CLEANING ACCESSORIES Wet Sandblasting Kit T 250 Deck/Driveway Cleaner Why spend hours stripping old paint and rust by For cleaning surfaces such as patios, terraces and hand using harsh chemicals? Let the Kärcher ® driveways without splashback, there is no better Wet Sandblasting Kit do the work! Attach the kit solution than the Kärcher ®...
-
Page 15: Troubleshooting
TROUBLESHOOTING WARNING Disconnect the unit from the power source before making any repair. Symptom Cause Solution Motor will not On/Off switch is in the Turn switch to the “ON” (I) position start “OFF” (0) position. Power cord is not plugged Plug in power cord. - Page 16 Call Customer Support or worn. is permissible) Oil drip Oil seals are damaged or Call Customer Support worn. If you encounter any additional diffi culties not listed, please visit our website. USA / Canada: www.karcher-help.com Mexico: www.karcher.com.mx 16 English...
Need help?
Do you have a question about the K 3.000 and is the answer not in the manual?
Questions and answers