
Related Manuals for Kärcher K 3


Summary of Contents for Kärcher K 3
- Page 1 OPERATOR MANUAL High-Pressure Washer ..2 MANUEL D’UTILISATION Nettoyeur haute pression ..17 MANUAL DE USUARIO Limpiador de alta presión ..34 59669400 (2015.12)
-
Page 2: Table Of Contents
In the U.S. or Canada, please call WARNING 1-800-537-4129 for warranty issues and indicates “a potentially hazardous situa- visit www.karcher-help.com for techni- tion which, if not avoided, could result in cal support and product assistance. death or injury.” Please take a moment to register your... -
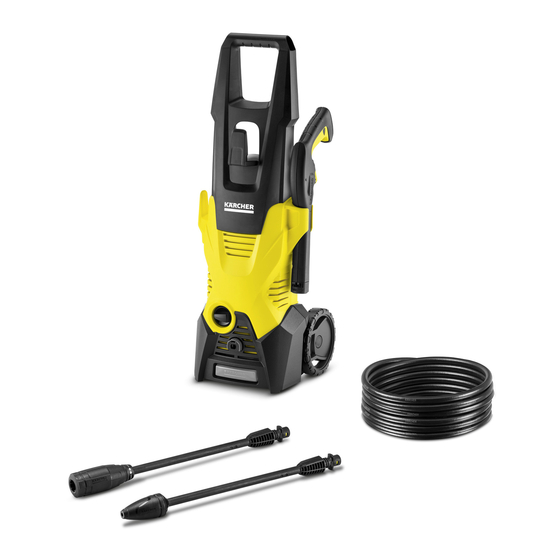
Page 3: Model Overview
MODEL OVERVIEW 1 Garden hose connector (female) 11 Power cord with Ground Fault Circuit 2 Water inlet connector Interrupter (GFCI) 3 Water inlet with filter 12 Wheels 4 Quick connect high-pressure outlet 13 Trigger gun 5 High-pressure outlet 14 Trigger gun safety lock 6 ON/OFF switch 15 Key to detach high-pressure hose 7 Detergent tank (removeable) -
Page 4: Important Safety Instructions
IMPORTANT SAFETY INSTRUCTIONS WARNING WARNING – Risk of Electrocution When using this product basic precau- Inspect cord before using – Do not tions should always be followed, includ- use if cord is damaged. ing the following: Keep all connections dry and off the ... -
Page 5: Grounding Instructions
SPRAY GUNS, HOSE AND HOSE WATER SUPPLY CONNECTIONS). (Cold Water Only) BEFORE SERVICING, CLEANING OR CAUTION REMOVING ANY PARTS, SHUT OFF When connecting the water inlet to the POWER AND RELIEVE PRESSURE. water supply mains, local regulations of IF CONNECTION IS MADE TO A PO- ... -
Page 6: Assembly Instructions
STEP 4: ASSEMBLY INSTRUCTIONS Fasten the quick connect to the high- pressure outlet. Required tools Philips Screwdriver, me- dium size (not supplied) for final assembly Assembly STEP 1: STEP 5: Install the water inlet connector to the unit’s water inlet. -
Page 7: Operating Instructions
STEP 4: OPERATING Push the garden hose connector on INSTRUCTIONS to the water inlet connector and make sure you hear it click into place STEP 1: before proceeding. Insert one end of the high-pressure hose tightly into the quick connect on the unit, it will lock in audibly. -
Page 8: Using The Accessories
STEP 7: Not recommended for soft materials, Unlock the trigger gun safety lock. siding, painted surfaces, decks or Trigger the gun to eliminate trapped autos. air, wait for a steady flow of water to emerge from the spray nozzle. Vario Power Spray Wand STEP 8: ... -
Page 9: Working With Detergents
STEP 2: WORKING WITH Fill the Detergent Tank with the se- DETERGENTS lected detergent. For best results see Cleaning Tips for specific information on how to clean different surfaces. Always Use Kärcher ® Detergent for Best Results Kärcher biodegradable detergents are ®... -
Page 10: Taking A Break
STEP 2: TAKING A BREAK ... five Turn off the water source. minutes or more STEP 3: Press trigger to release water pres- STEP 1: sure. Release trigger and engage gun safety lock. STEP 4: Release trigger and engage gun STEP 2: ... -
Page 11: Winterizing And Long-Term Storage
WINTERIZING AND CARE AND MAINTENANCE LONG-TERM STORAGE INSTRUCTIONS 1 Disconnect all water connections. Cleaning the water inlet filter 2 Turn on the machine for a few sec- onds, until the water which had re- STEP 1: mained in the pump exits, turn off Pull out water inlet filter with flat-nose immediately. -
Page 12: Cleaning Tips
from bottom to top). Allow detergent to CLEANING TIPS remain on surface 1-3 minutes. Do not CAUTION allow detergent to dry on surface, if sur- Before cleaning any surface an in- face appears to be drying, simply wet conspicuous area should be cleaned down surface with fresh water. -
Page 13: Optional Cleaning Accessories
surfaces). Always clean from top to bot- OPTIONAL CLEANING tom and from left to right. For best re- ACCESSORIES sults, wipe surface dry with a chamois or soft dry cloth. Optional accessories are available to further enhance your cleaning capabili- Barbecue Grills, Outdoor Power ties. - Page 14 Rotating Wash Brush (bayonet) Wet Sandblasting Kit (bayonet) For more effortless cleaning of all Why spend hours stripping old paint and smooth surfaces (painted, glass and rust by hand using harsh chemicals? Let plastic) try the Kärcher ® Rotating Wash the Kärcher ®...
-
Page 15: Troubleshooting
TROUBLESHOOTING WARNING Disconnect the unit from the power source before making any repair. Issue Cause Solution Motor will not start On/Off switch is in the “OFF” Turn switch to the “ON” (I) po- (0) position. sition Power cord is not plugged in. Plug in power cord. Electrical outlet does not sup- Try a different outlet. - Page 16 Call Customer Support drops per minute is worn. permissible). Oil drip. Oil seals are damaged or Call Customer Support worn. If you encounter any additional difficulties not listed, please visit our website. USA / Canada: Mexico: www.karcher-help.com www.karcher.com.mx 16 English...
Need help?
Do you have a question about the K 3 and is the answer not in the manual?
Questions and answers