Table of Contents
Advertisement
Advertisement
Table of Contents

Related Manuals for Formax FD 150


Summary of Contents for Formax FD 150
- Page 1 FD 150 Document Signer OPERATOR MANUAL FIRST EDITION...
- Page 2 Thank you for purchasing the Formax FD 150 Document Signer The FD 150 has been tested and found to comply with the limits for a Class A digital device pursuant to Part 15 of FCC Rules. These limits are designed to provide reasonable protection against harmful interference when this equipment is operated in a commercial environment.
-
Page 3: Table Of Contents
Operating Manual TABLE OF CONTENTS 1. INTRODUCTION ....................1.1 FD 150 D ..................1 ESCRIPTION 1.2 I ....................1 TEMS NCLUDED 1.3 O ..............2 PERATING ANUAL AFETY ERMS 1.4 S ..................3 AFETY RECAUTIONS 1.5 F ................3 REQUENTLY ERMS 1.6 L... - Page 4 Operating Manual 5.10 M ................. 21 EMORY MPRINT OSITIONS 5.10.1 Positions 1 - 4 .........................21 5.10.2 Store Position ........................21 5.11 P ..................... 21 APER EIGHT 5.12 P .................... 22 OWER WITCH 5.13 R ..................22 EADY NDICATOR 5.14 S ....................22 EPARATORS 6.
-
Page 5: Introduction
Operating Manual 1. INTRODUCTION This manual shows you how to use the FD 150. It presents information about the FD 150’s specifications, physical features and operation. FD150 Description The FD 150 is a document imprinter used for signing, endorsing and validating cut-sheet documents. Documents to be imprinted are stacked in the feed tray. -
Page 6: Operating Manual Safety Terms
Operating Manual The accessories carton includes the following items: • ink roll (with rubber gloves) • power cord • document stops (wrapped in foam) • log book • allen wrench • warranty cards Operating Manual Safety Terms The following highlighted blocks are used throughout this manual to emphasize important information. -
Page 7: Safety Precautions
Please observe the following safety precautions and warnings at all times while operating, cleaning or repairing the FD 150. Failure to so may result in physical injury or damage to the FD 150. Neither Formax nor the manufacturer assumes any liability for your failure to comply with these requirements. -
Page 8: Log Book
After imprinting, record the new number displayed on the non-resettable counter. Service If any problems occur with the FD 150 or if you need assistance installing or operating your FD 150, contact your Formax dealer. 1/97... -
Page 9: Repacking Instructions
2. Use a heavy duty, double-walled container of 350- pound test material. 3. Surround the FD 150 on ALL sides with at least 4 to 5 inches of shock absorbing packaging material. This will provide firm cushioning and prevent movement inside the container. -
Page 10: Specifications
Operating Manual 2. SPECIFICATIONS This section contains specifications of the FD 150. Specifications Size 19½" (49.53 cm) W x 10" (25.43 cm) H x 19" (48.26 cm) D The receiving tray is not measured. Weight Machine alone: 50 pounds (22.68 kg ) Shipping weight: 57 pounds (25.85 kg) -
Page 11: Assembly
Operating Manual 3. ASSEMBLY This section shows you how to assemble the FD 150. WARNING DO NOT PLUG THE FD 150 POWER CORD INTO AN ELECTRICAL OUTLET UNTIL ASSEMBLY IS COMPLETE AND YOU HAVE READ SECTION 4, POWER CONNECTION. 3.1 Key Positions Use the following instructions to open the FD 150 COVER. -
Page 12: Ink Roll Installation
Use the following instructions to install the INK ROLL. (Refer to Figure 3.2.) Figure 3.2 -- Ink Roll Installation NOTE The FD 150 comes with one black INK ROLL. Formax offers a tri-color INK ROLL. To order INK ROLLS, call your Formax dealer. NOTE Use care when handling the ink roll. -
Page 13: Receiving Tray, Temporary Installation
(Refer to Figure 3.3.) Figure 3.3 -- FD 150 Receiving Tray Installation 1. Place the FD 150 on a table or work surface about 2" from the straight edge. 2. Slide the NOTCHES in the tray up under the MOUNTING STUDS on the output end of the FD 150. -
Page 14: Receiving Tray, Permanent Installation
1. Remove the MOUNTING STUDS with a " allen wrench. 2. Place the FD 150 on a table or work surface about 2" from the straight edge. 3. Place the NOTCHES in the RECEIVING TRAY against the machine so they surround the holes left after the MOUNTING STUDS were removed. -
Page 15: Optional Feed Tray Extension
Tray Extension The FEED TRAY EXTENSION which comes with the FD 150 is used to help feed documents longer than 9”. Keep it in a place you’ll remember, as you may need it in the future. Refer to Section 6.2 for installation details. -
Page 16: Power Connection
European IT Power System. Because the European IT Power System does not have a grounded neutral leg, the FD 150 uses protective fusing in both the neutral and hot supply lines of power. Both LINE FUSES must be in place for the FD 150 to operate properly. -
Page 17: Line Voltage
Operating Manual Line Voltage The FD 150 is rated for continuous operation using a variety of supply voltages. Possible line voltages are 240V, 220V, 120V and 100V at 50 to 60 Hz. The manufacturer configures the FD 150 to operate with the voltage requested by the customer. -
Page 18: Line Fuses
The FUSE DRAWER, located on the input end, contains two LINE FUSES. (Refer to Figure 4.1.) The neutral and hot lines of power are fused. Both LINE FUSES must be in place for the FD 150 to operate properly. CAUTION VERIFY THAT THE LINE FUSE VALUE IS CORRECT FOR THE VOLTAGE SETTING. -
Page 19: Power Cord
0.5A (250V time delay) 240V (or 230V) 0.5A (250V time delay) 5. Replace the LINE FUSE if necessary. Both LINE FUSES must be in place for the FD 150 to operate properly. 6. Install the FUSE DRAWER in the POWER ENTRY CASING. -
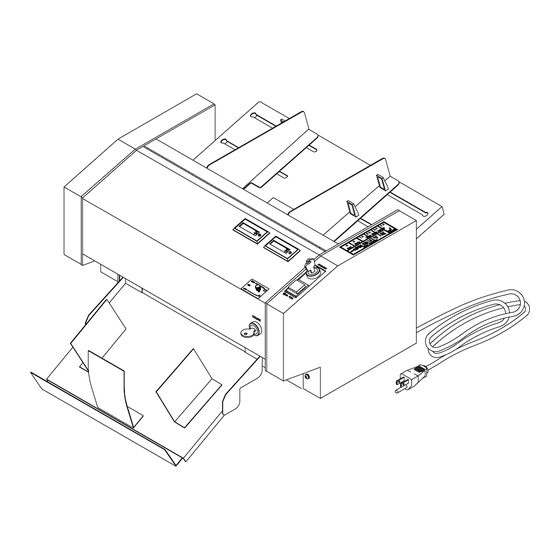
Page 20: Controls & Indicators
Operating Manual 5. CONTROLS & INDICATORS This section lists the FD 150 controls and indicators in alphabetical order. Refer to Figure 5.1 throughout this section. Figure 5.1 -- FD 150 Controls Counter, Non-Resettable The NON-RESETTABLE COUNTER counts and displays the total number of imprinted documents for the life of the FD 150. -
Page 21: Counter, Resettable
Reset this counter at the beginning of each run by pressing the red button. Executive Key Two brass EXECUTIVE KEYS come with the FD 150. The EXECUTIVE KEY can be set in two positions: LOCKED and UNLOCKED. 5.3.1 UNLOCKED... -
Page 22: Imprint Indicator
INDICATOR turns ON, the NON-RESETTABLE and RESETTABLE COUNTERS both increment. Imprint Key Two silver IMPRINT KEYS are shipped with the FD 150. The IMPRINT KEY has two positions: ON and OFF. (Refer to Figure 5.2.) Turn the IMPRINT KEY to the ON position to start imprinting prior to feeding documents. -
Page 23: Imprint Positioning
Operating Manual Imprint Positioning The IMPRINT POSITIONING controls, located on the CONTROL PANEL include: LIGHT, ↑UP and ↓DOWN. To activate one of these functions, press to the lower left of the LED. Use these controls to set imprint positions. (Refer to Figure 5.2.) Figure 5.2 -- Control Panel 5.8.1 LIGHT ON / OFF... -
Page 24: Up / Down
Operating Manual ↑UP / ↓DOWN 5.8.2 Press ↑UP to move the imprint position toward the trailing edge of the document. Press ↓DOWN to move the imprint position toward the leading edge of the document. The ↑UP and ↓DOWN lights illuminate with each selection. -
Page 25: Memory Imprint Positions
Operating Manual 5.10 Memory Imprint Positions Set and store up to four imprint positions using the MEMORY IMPRINT POSITIONS controls. (Refer to Figure 5.2.) 5.10.1 POSITIONS 1 - 4 Press the MEMORY IMPRINT POSITIONS 1 - 4 to recall a stored imprint position (which is measured from the leading edge of the document). -
Page 26: Power Switch
The POWER SWITCH is located on the input end next to the POWER ENTRY CASING. Turn the POWER SWITCH ON to supply power to the FD 150. 5.13 Ready Indicator The READY INDICATOR is a red light that turns on when the POWER SWITCH is ON and the EXECUTIVE KEY is in the LOCKED position. -
Page 27: Operation
Operating Manual 6. OPERATION This section shows you how to operate the FD 150. Follow the step-by-step instructions in the order they are presented. Before operating the FD 150, please review Section 4, Power Connection. WARNING KEEP LOOSE CLOTHING, TIES, SCARVES, JEWELRY AND HAIR AWAY FROM ALL MOVING PARTS. - Page 28 6. Close the COVER. Turn the EXECUTIVE KEY slowly to index the SADDLE HOLDER which inks the IMPRINT SADDLE. 7. To load the second saddle, repeat steps 1-6. To order SADDLES, contact your Formax dealer. Always order SADDLES in pairs. NOTE Two SADDLES are always necessary for proper imprinting.
-
Page 29: Loading Documents
1. Press the MEDIA FEED button so its light turns OFF. 2. Lift up and lock the PAPER WEIGHT. 3. With the FD 150 turned ON, center the document in the FEED TRAY. 4. Lift up the PAPER GUIDE CAMLOCKS and slide the PAPER GUIDES to fit the document. - Page 30 9" (22.86 cm): • If necessary, install the FEED TRAY EXTENSION by attaching it to the input end of the FD 150 FEED TRAY with the knobs provided. • Feed the top of the document first. • Install the REVERSE IMPRINT SADDLES.
-
Page 31: Feeding Documents
Operating Manual Feeding Documents Use the following instructions to feed documents through the FD 150. (Refer to Figure 6.3.) NOTE Smooth feeding is necessary for accurate imprinting. Figure 6.3 -- FD 150 Components 1. Turn the POWER SWITCH ON. 2. Turn the IMPRINT KEY OFF. -
Page 32: Setting Imprint Position Up / Down
SEPARATOR while tightening the FEED ADJUST KNOB. If the FD 150 feeds with difficulty, re-adjust the gap between the SEPARATOR and the FEED ROLL by tightening the SEPARATOR using the thickness of two documents instead of one. - Page 33 Operating Manual 3. Press the MEDIA FEED button so its light turns ON. 4. Feed one test document to determine the imprint position. 5. If the imprint position is not in the desired position, re-adjust it using the IMPRINT POSITIONING controls.
-
Page 34: Imprint Position Example
6. Press the ↑UP LED three times to move the imprint an additional of an inch (i.e., three " increments). 7. Press the MEDIA FEED button so its light turns on. 8. Feed a test document through the FD 150 to verify and fine tune the imprint position. 1/97... -
Page 35: Storing An Imprint Position
Operating Manual Storing An Imprint Position Use the following procedure to STORE an imprint position. 1. Using the IMPRINT POSITIONING controls, set the imprint to the desired position. 2. Select a MEMORY IMPRINT POSITION (1-4) in which to store the current imprint position. 3. -
Page 36: Setting Imprint Position Left / Right
Operating Manual Setting Imprint Position LEFT / RIGHT Use the following instructions to move the imprint position left and right on the document. (Refer to Figure 6.4.) Figure 6.4 -- Setting Imprint Position Left / Right 1. Turn the POWER SWITCH OFF. 2. - Page 37 Operating Manual NOTE When using ENDORSING SADDLES, remove the saddle to find the SADDLE HOLDER SCREW. 6. Using the supplied allen wrench, loosen the SADDLE HOLDER SCREW. NOTE Only loosen this screw 1-2 turns, or until the SADDLE HOLDER will slide. The SADDLE HOLDER SCREW must stay in the IMPRINT SHAFT GROOVE.
-
Page 38: Imprinting Documents
Operating Manual Imprinting Documents Use the following instructions to imprint documents. 1. Turn POWER SWITCH ON. 2. Turn the EXECUTIVE KEY slowly to the LOCKED position. (Refer to Figure 6.1.) NOTE If the SADDLE HOLDER does not index, turn the key slower. -
Page 39: Feeding Various Sized Documents
Operating Manual Feeding Various Sized Documents Use the following procedures to imprint various sized documents at one time. 1. Place the documents between the PAPER GUIDES. Justify the documents to the right with the leading edge as shown in Figure 6.5. Figure 6.5 -- Right Justified Documents 1/97... -
Page 40: Maintenance
Operating Manual 7. MAINTENANCE Clean and inspect your FD 150 regularly. WARNING ALWAYS UNPLUG THE POWER CORD BEFORE CLEANING OR SERVICING THE FD 150. 7.1 Pressure Tire Shaft Removal & Installation In case of jams or when cleaning, you’ll need the following instructions to remove and install the PRESSURE TIRE SHAFT. -
Page 41: Cleaning
Cleaning Use the following instructions to clean the exterior and paper path of the FD 150. Refer to Figure 7.2 throughout this procedure. Figure 7.2 -- Under Cover View of the FD 150 with the Tire Pressure Shaft Removed 1/97... -
Page 42: Replacinga Fuse
Fuse When one or both FUSES are blown, the FD 150 will appear to have no power. If the FD 150 has blown a FUSE, replace the fuse. The FUSE DRAWER is located on the input end of the machine. Use the following instructions to replace one or both FUSES. - Page 43 5. Pull the blown FUSE from its slot. 6. Place a new FUSE into the same slot. Both fuses must be in place for the FD 150 to operate properly. 7. Install the FUSE DRAWER in the POWER ENTRY CASING.
-
Page 44: Troubleshooting
Operating Manual 8. TROUBLESHOOTING This section helps you identify and correct machine and operator errors. 8.1 Improper Imprinting This section lists the different circumstances that prevent or interrupt proper imprinting and explains the solution to each problem. Each circumstance is on the far left with an explanation on the right. -
Page 45: Imprint Is Too Light
INK ROLL. 1. Open the COVER. 2. Pull out the COTTER PIN. 3. Hold the INK ROLL currently installed in the FD 150. 4. Pull out the AXLE. 5. Discard the used INK ROLL. 6. Hold the new INK ROLL between the sides of the INK ROLL CARRIAGE. -
Page 46: Document Jam
9. Push the COTTER PIN until the AXLE is secured between the two CLIPS on the COTTER PIN. 8.1.4 Document Jam If the FD 150 stops feeding, there may be one or more documents jammed inside the machine. To clear a jam, follow this procedure: 1. - Page 47 Operating Manual WARNING DISCONNECT THE POWER CORD BEFORE CLEANING, CLEARING OR REPAIRING THE FD 150. Troubleshooting Chart trouble cause remedy POWER SWITCH is Turn POWER SWITCH 1. Nothing works. turned OFF. POWER CORD is Inspect the POWER damaged CORD and plug into the...
- Page 48 INK ROLL is out of ink. Install a new INK ROLL. To order a new INK ROLL, call your Formax Dealer. IMPRINT SADDLES are Install new IMPRINT worn. SADDLES. To order a new pair, call your Formax Dealer.
Need help?
Do you have a question about the FD 150 and is the answer not in the manual?
Questions and answers