Table of Contents
Advertisement
Quick Links
Advertisement
Table of Contents

Related Manuals for Formax FlashCard


Summary of Contents for Formax FlashCard
- Page 1 FlashCard Business Card Cutter OPERATOR MANUAL FIRST EDITION 11/2020...
-
Page 3: Table Of Contents
TABLE OF CONTENTS SUBJECT PAGE DESCRIPTION SPECIFICATIONS SAFETY NOTES UNPACKING & SETUP CONTROL PANEL STANDARD OPERATION REGISTRATION MARK DETECTION MODE PRE-PROGRAMMED JOB OPTIONS INDIVIDUAL PRE-SET JOB PROGRAM ADJUSTMENTS GLOBAL JOB PROGRAM ADJUSTMENTS AND USER OPTIONS PROGRAMMING A CUSTOM JOB CHANGING BLADE CASSETTES PREPARING OPTIONAL BLADE CASSETTES FOR INSTALL TROUBLESHOOTING SERVICE/BLADE ASSEMBLY REPLACEMENT RECOMMENDATIONS... -
Page 5: Description
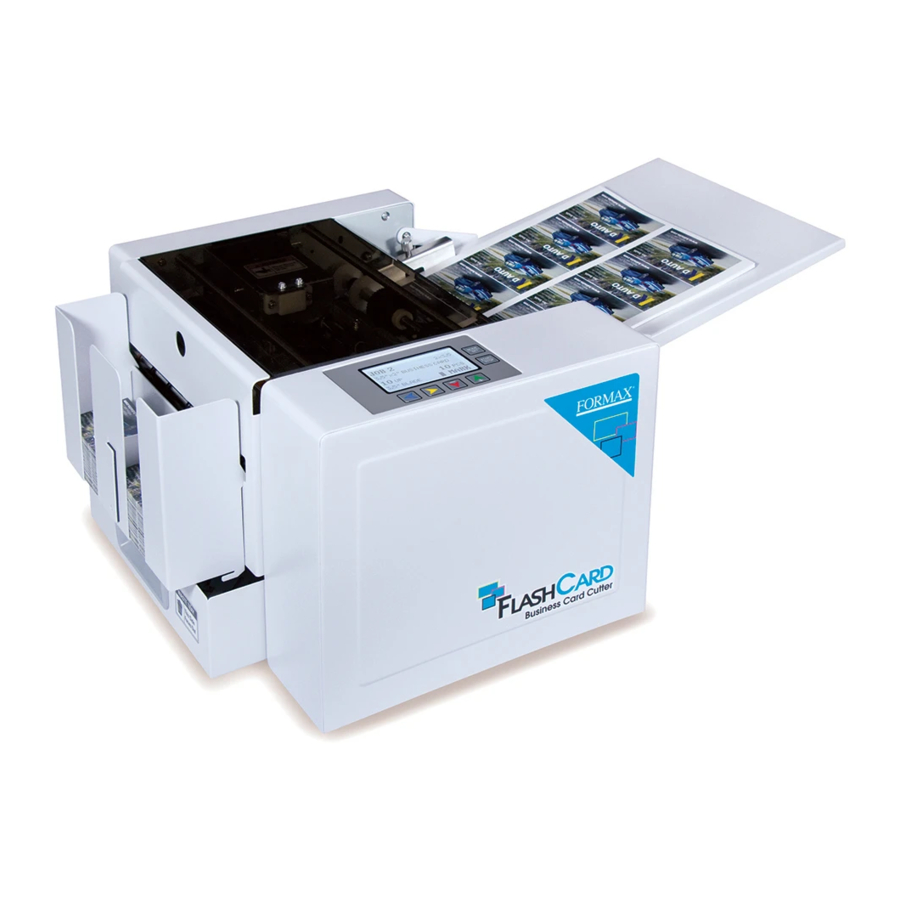
Infeed Table Catch Tray Control Panel Operator Side Cover Waste Bin FUNCTION The FlashCard Business Card Cutter is designed to transform printed sheets into professional-quality cards, with crisp accurate cuts. SPECIFICATIONS Speed: Up to 144 business cards per minute Cutting Tolerance: 0.1mm... -
Page 6: Safety Notes
* Do not touch the cutter with wet hands. * When the FlashCard is not in use, shut off the power with the power switch. * In case of a malfunction, shut off the power directly buy unplugging the power cord. -
Page 7: Unpacking & Setup
UNPACKING & SET-UP Remove the FlashCard, operator manual, catch tray, waste paper bin, and power cord from the box. Place the machine on a sturdy surface. Insert the waste paper bin, with the handle facing outward. Waste Bin Insert the catch tray on the outfeed side of the machine. - Page 8 Flip the infeed tray extension to the open position. Slot Be sure the top safety cover is in place. It only fits in one direction, so be sure to align the pin on the underside, with the slot on the machine. A magnet holds the cover in place. Insert the power cord into the inlet, and plug into an appropriate outlet.
-
Page 9: Control Panel
CONTROL PANEL The control panel has an LCD screen and six buttons for operation. Operators can select from 5 programmed cut settings or create up to 11 custom cuts. The four color buttons at the bottom perform different functions depending on mode. Card dimensions Job # Job description... -
Page 10: Standard Operation
STANDARD OPERATION NOTE: • Do not place more than the recommended number of sheets of card stock on the infeed at one time. • Do not use different thicknesses of card stock in a single stack, as this will affect the accuracy of the automatic friction feeder. -
Page 11: Registration Mark Detection Mode
REGISTRATION MARK DETECTION MODE A registration mark can be used to compensate for any variance in the printing process. The Cutter will detect the mark and begin cutting ensuring consistent cuts between print runs. When Mark Detection mode is engaged, the cutter will use an optical sensor to find the registration mark on the printed page. -
Page 12: Pre-Programmed Job Options
PRE-PROGRAMMED JOBS Pre-programmed jobs are listed numerically, with each representing a product that can be cut from a sheet of card stock. The machine has five (5) pre-programmed jobs. The Job #s and item details are listed below. In addition, users can program and save up to 11 custom jobs, the details of which can be written in the list for reference: Job Template Mode # of Pieces/ Blade... -
Page 13: Individual Pre-Set Job Program Adjustments
INDIVIDUAL PRE-SET JOB PROGRAM ADJUSTMENTS The Pre-set programs can be adjusted to compensate for printing variances. Adjustments can be made to the First Cut, Mark Position, Card Length, and Groove/Gutter Width. To Adjust a pre-set job, select the job to be adjusted and press and hold the “Mode/Set”... -
Page 14: Global Job Program Adjustments And User Options
GLOBAL JOB PROGRAM ADJUSTMENTS AND USER OPTIONS Global program adjustments can be made to apply to every job. By accessing the System Option menu, compensations can be made to the System Accuracy, First Cut, Mark Position, Groove/Gutter Width, Last Card, Second From Last Card, and Third From Last Card. - Page 15 Groove (Gutter) Width Compensation: Adjusts the cut length between cards 1. Use the Blue or Yellow arrow buttons to advance to Groove (Gutter) Width Compensation screen. 2. Adjust the value using the Green [+] or Red [-] arrow buttons (Select from -3.0 to +3.0mm) 3.
-
Page 16: Programming A Custom Job
PROGRAMMING A CUSTOM JOB Eleven custom jobs can be programmed into the Flashcard. The Jobs can be written in the spreadsheet on page 8 for quick reference. Follow the steps below to program a custom Job. - Page 17 Card Rows: Enter the number of rows based on the sheet size and cut length. 1. Use the Blue or Yellow arrow buttons to advance to Card Rows screen. 2. Enter the number of rows using the Green [+] or Red [-] arrow buttons 3.
-
Page 18: Changing Blade Cassettes
CHANGING BLADE CASSETTES Follow these steps to change a blade cassette. CAUTION: To avoid injury, do not touch the cutting blades. NOTE: Be sure the machine is switched off, and that the power cord is unplugged. 1. - 4. Remove the catch tray, waste bin, and top safety cover, then lower the outfeed rear cover. -
Page 19: Preparing Optional Blade Cassettes For Install
PREPARING OPTIONAL BLADE CASSETTE FOR INSTALL The installation bracket on the optional cassettes is reverse mounted for shipping purposes (below, left). To set for instal- lation, remove the two screws holding the bracket in place. Rotate the bracket around 180 degrees, and reattach the bracket with the two screws, as shown below. -
Page 20: Service/Blade Assembly Replacement Recommendations
5mm, and an attempt must be made to flatten the curl. SERVICE / BLADE ASSEMBLY REPLACEMENT There are no user-serviceable parts within the machine. For service, please contact your authorized Formax Dealer. Recommended Blade Replacement Schedule: LONG/GUILLOTINE BLADE ASSEMBLY: Recommend replacement after performing approximately 1,000,000 cuts. -
Page 21: Templates
Job 1 Template Full Bleed B-Card with Mark (Without Mark, set first cut at 6mm from top edge of sheet) Sheet Size: 8.5” x 11” Card Size: 3.5” x 2” / 88.9mm x 50.9mm Use 3.5” blade .197” / 5mm from top of mark to rst cut Mark Size: 1.96”x .12”... - Page 22 Job 2 Template B-Card with Mark (Without Mark, set first cut at 6mm from top edge of sheet) Sheet Size: 8.5” x 11” Card Size: 3.5” x 2” / 88.9mm x 50.9mm Use 3.5” blade First Cut .472” / 12mm Mark Size: 1.96”x .12”...
- Page 23 Job 3 Template Full Bleed Post Card Sheet Size: 8.5” x 11” Card Size: 3.5” x 5” / 88.9mm x 127mm Use 3.5” blade First Cut .472” / 12mm from edge Card Size .5” / 12.7mm Groove/Gutter 3.5” / 88.9mm 5”...
- Page 24 Job 4 Template Full Bleed Photo Greeting Card Sheet Size: 8.5” x 14” Card Size: 8” x 4” / 88.9mm x 101.6mm Use 8” blade First Cut .472” / 12mm from edge Card Size 7” / 177.8mm 5” / 127mm .512”...
- Page 25 Job 5 Template Full Bleed Greeting Card Sheet Size: 8.5” x 11” Card Size: 7” x 5” / 177.8mm x 127mm Use 7” blade First Cut .472” / 12mm from edge Card Size 7” / 177.8mm 5” / 127mm...
Need help?
Do you have a question about the FlashCard and is the answer not in the manual?
Questions and answers