Table of Contents
Advertisement
Advertisement
Table of Contents

Related Manuals for Mio MiVue 6 series


Summary of Contents for Mio MiVue 6 series
- Page 1 Series...
-
Page 2: Table Of Contents
Table of Contents Getting to know the dash cam ...................... 2 Power button ..........................3 Event/Share button ........................3 LED indicators ..........................3 Setting up the device ........................4 Using your recorder in a vehicle ....................4 Inserting a memory card......................6 Connecting to your computer ....................7 Operating basics ..........................8 Turning the recorder on ......................8 Using the touch screen ......................8... -
Page 3: Getting To Know The Dash Cam
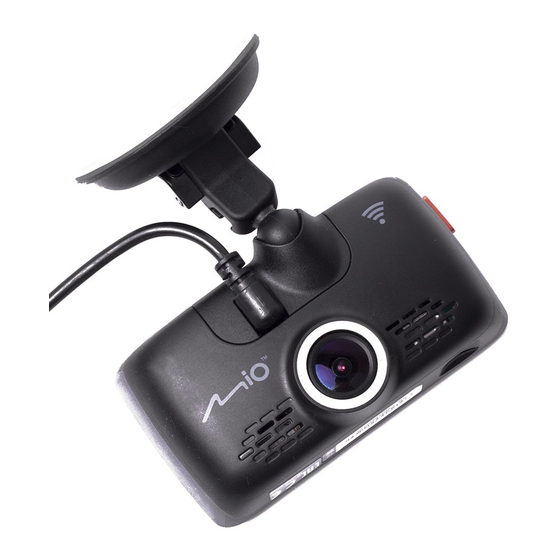
Getting to know the dash cam Note: The screenshots and other presentations shown in this manual may differ from the screens and presentations generated by the actual product. MiVue 658 WIFI MiVue 638/658 Touch Power button Touch screen Speaker Device mount Microphone Parking indicator System indicator... -
Page 4: Power Button
Power button ƒ Press and hold for 2 seconds to manually turn the recorder on and off. ƒ When the recorder is turned on, press to switch the LCD screen on and off. Event/Share button ƒ Press to manually start an event recording. ƒ... -
Page 5: Setting Up The Device
Setting up the device Using your recorder in a vehicle 1. Make sure that your car is parked on level ground. 2. Follow the instructions below to securely mount your recorder in a vehicle. 3. Connect the car charger to the cigarette lighter. Route the cables through the top ceiling and the A-pillar so that it does not interfere with driving. - Page 6 4. When adjusting the angle of mounting, make sure that the camera’s view is parallel with the level ground, and the ground/sky ratio is close to 6/4. Note: ƒ To ensure the highest quality recordings, you are advised to place the recorder near the rear view mirror.
-
Page 7: Inserting A Memory Card
Inserting a memory card You must insert a memory card (not supplied) before you can start recording. The recorder supports memory cards with up to 128GB capacity. The recorder provides two memory card slots on MiVue 638/658 Touch model. In this case, always insert the primary memory card into Slot 1 and then the second card (if available) into Slot 2. -
Page 8: Connecting To Your Computer
Connecting to your computer You can connect the recorder to your computer to access data on the memory card. Disassemble the back cover to locate the Mini-USB connector on the rear side of the device. Follow the instruction below to connect the recorder to the computer via the USB cable (not supplied). -
Page 9: Operating Basics
Operating basics Turning the recorder on Complete the installation according to the instructions in the “Using your recorder in a vehicle” section. Once the vehicle engine is started the recorder automatically turns on. Note: Occasionally you may need to perform a hardware reset when the recorder stops responding or if it appears to be “frozen”... -
Page 10: Setting The Date And Time
Example: Recording screen 9 10 11 not recording recording in progress ƒ Button ƒ Icon Adds a custom safety Recording indicator (speed) camera Time display Opens the Menu screen Recording with sound is disabled Starts recording WIFI signal* Takes a photo GPS signal Enters Parking mode Battery power... -
Page 11: Setting Up A Wifi Connection
to adjust the value of the selected field; tap and repeat the step until all fields have been changed. When completed, tap Setting up a WIFI connection MiVue 658 WIFI features the WIFI function that allows you to connect the recorder to your smartphone. -
Page 12: Recording In Driving Mode
: WIFI is turned on but the recorder is not connected to the smartphone. : WIFI is turned on and the recorder is connected to the smartphone but not paired with MiVue app yet. 3. By starting the MiVue app on your smartphone the recorder will be ready to transfer video files by simply pressing the Event/Share button. -
Page 13: Recording In Parking Mode
(e.g. an uninterruptible power cable like Mio Smart Box which is sold separately) to record the video during Parking mode. ƒ The Parking mode function is disabled by default. You have to enable the function by tapping >... -
Page 14: Camera Mode
Camera mode You can take a photo by: - tapping while the recording is in progress; or - tapping > > ƒ The photos can be found in the “Photo” category for file playback. Playback mode To select a video or photo for playback: 1. -
Page 15: Safety Camera Alerts
Safety camera alerts Caution: For legal reasons the safety camera function is not available in all countries. You can receive alerts to warn you about the locations of safety (speed) cameras which will enable you to monitor your speed through these areas. -
Page 16: Adding A Safety Camera
ƒ You can change the settings about how you want to receive the safety camera alerts. See the “System settings” section for information. Adding a safety camera Note: You can add a custom safety camera only when a GPS fix is established. Your recorder allows you to customise the safety camera database. -
Page 17: System Settings
System settings The Menu screen to access the Menu screen that includes the following functions: Button Description Plays the recorded videos and photos. File Playback For more information on playback see the "Playback mode" section. Camera Tap to enter Camera mode. Sets if you want to include sounds in the recordings. -
Page 18: Advanced Settings
Advanced settings The Settings option in the Menu allows you to change the system settings of the device including: SafetyCam - Alert Sound: The options are Beep, Voice and Mute. - Alert Distance: The options are Short, Medium and Long. - Alert Method: The options are By Driving Speed and By Speed Limit. - Page 19 Video Recording - Video Clip Length: Sets the length of each video clip for a continuous recording (1 min, 3 min or 5 min). - Video Resolution: Sets the resolution of the video. - EV: Sets the proper exposure level (-1 ~ +1) to adjust the brightness of the image. The default setting is 0.
- Page 20 - Storage Allocation: The system provides 3 default memory configurations to store the videos (including continuous recordings, event recordings and parking recordings) and photos. Select the proper configuration based on your usage. - Restore to Defaults: Restores system settings to factory defaults. - Version: Displays the software information.
-
Page 21: Mivue Manager
Installing MiVue Manager Download MiVue Manager from the Support page of our website (www.mio.com/support) and follow the on-screen prompts to install it. Make sure to download the correct software version (Windows or Mac) according to your computer's operating system. - Page 22 Note: ƒ The Map screen may not display when the computer is not connected to the Internet or when your MiVue model does not support the GPS function. ƒ G sensor chart displays data in 3-axis waveform about the car’s shift forward/ backward (X), to the right/left (Y) and upward/downward (Z).
- Page 23 : Mutes or unmutes the volume. ƒ : Adjusts the volume level. ƒ : Plays the video in full screen. Click to return to the normal view. ƒ : Displays the playback progress. You can click on a point along ƒ...
-
Page 24: For More Information
For more information Caring for your device Taking good care of your device will ensure trouble-free operation and reduce the risk of damage. ƒ Keep your device away from excessive moisture and extreme temperatures. ƒ Avoid exposing your device to direct sunlight or strong ultraviolet light for extended periods of time. -
Page 25: Precautions And Notices
Precautions and notices ƒ For your own safety do not operate the controls of the product while driving. ƒ A window mount is needed when using the recorder in a car. Make sure that you place the recorder in an appropriate place, so as not to obstruct the driver’s view or deployment of airbags. -
Page 26: About Gps
About the battery CAUTION! This unit contains a non-replaceable internal Lithium Ion battery. The battery can burst or explode, releasing hazardous chemicals. To reduce the risk of fire or burns do not disassemble, crush, puncture or dispose of in fire or water. ƒ... -
Page 27: Regulatory Information
Regulatory information For regulatory identification purposes, Mio™ MiVue™ 6 series is assigned a model number of N484. Products with the CE marking comply with the Electromagnetic Compatibility Directive (2004/108/EC) - issued by the Commission of the European Community. Compliance with these directives implies conformity to the following European Standards: ETSI EN 301 489-1 V1.9.2 (2011) - Page 28 Do not operate the device while driving. Using this product does not change the requirement for a driver to take full responsibility for his or her behavior. This responsibility includes observing all traffic rules and regulations in order to avoid accidents, personal injury or property damage. MiTAC Europe Ltd www.mio.com...
Need help?
Do you have a question about the MiVue 6 series and is the answer not in the manual?
Questions and answers
Как включить русский язык в приложении