Table of Contents
Advertisement
Quick Links
Advertisement
Table of Contents

Subscribe to Our Youtube Channel
Related Manuals for Art SDA-1


Summary of Contents for Art SDA-1
- Page 1 SDA-1 STUDIO DIGITAL AMPLIFIER USER’S GUIDE...
-
Page 2: Table Of Contents
The ART SDA-1 Studio Digital Amplifier TABLE OF CONTENTS IMPORTANT SAFETY INSTRUCTION – READ FIRST ............... 3 INTRODUCTION ..........................4 ADVANTAGES ..........................4 FEATURES ............................5 INSTALLATION ............................ 6 AC POWER HOOKUP ........................6 AUDIO CONNECTIONS ........................6 OPERATION PRECAUTIONS ......................6 CONTROLS &... -
Page 3: Important Safety Instruction - Read First
IMPORTANT SAFETY INSTRUCTION – READ FIRST This symbol, whenever it appears, alerts you This symbol, wherever it appears, alerts to the presence of uninsulated dangerous you to important operating and maintenance voltage inside the enclosure-voltage that instructions in the accompanying literature. may be sufficient to constitute a risk of shock. -
Page 4: Introduction
INTRODUCTION Thank you for purchasing an ART SDA-1 Studio Digital Amplifier - and congratulations: you now own one of the most versatile amplifiers available. Offering a superb level of sound quality, the SDA-1’s clean and powerful circuitry combined with a straightforward user interface quickly and easily delivers the power you need for professional and project studio monitoring. -
Page 5: Features
Features • Studio Digital Audio Amplifier • High Efficiency Switching Amplifier and Power Supply • Lighter and Cooler than Conventional Audio Amplifiers • Extremely Low Noise and Distortion Design • 140 Watts/Channel @ 8 Ohms • 200 Watts/Channel @ 4 Ohms •... -
Page 6: Installation
INSTALLATION The SDA-1 may be used in a wide variety of project and professional studio environments. Self-contained in a steel and aluminum enclosure, the unit is designed for many years of use. For greater reliability, we recommend that you not place the unit directly under or on top of other sources of heat. -
Page 7: Controls & Indicators - Front Panel
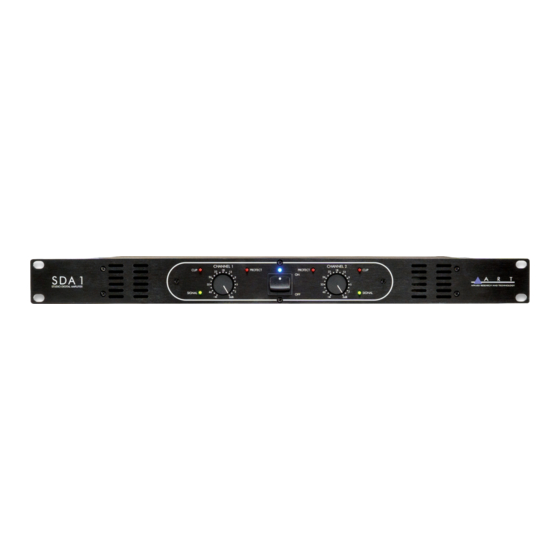
CONTROLS & INDICATORS – FRONT PANEL Power Switch The Power Switch is located on the front of the unit, directly in the center. During initial installation, make sure the attenuators for each channel are set to a low volume level before applying power. Channel Attenuators The dials for channel one and channel two’s volume attenuators are located to the left and right of the Power Switch. -
Page 8: Rear Panel Connections
REAR PANEL CONNECTIONS It is easy to interface the SDA-1 with a wide variety of equipment. All inputs and outputs are located on the rear panel. Standard ¼” and XLR inputs and binding post outputs make patching simple. Inputs The SDA-1 has two styles of input connections: XLR and ¼”. Use these connections to connect the output signal from a mixer, preamplifier, crossover, or EQ to the amplifier. -
Page 9: Output Binding Post
Fuse The SDA-1 utilizes a (T7A 250v 20mm) 7Amp fuse (USA version). Be sure to replace any blown fuses with a fuse of equal rating only. AC Power Input The SDA-1 features an internal switching power supply. -
Page 10: Operation
OPERATION The main application of the SDA-1 is as a studio power amplifier for powering monitors. Plug audio source material directly into the inputs and set the output controls to provide an appropriate level into the next stage of your system. - Page 11 The SDA-1’s heatsinks do most of the work in getting heat away from the amplifier. If, in the unlikely event the heatsink should reach 85 degrees Celsius, the amplifier will mute and disconnect the outputs, until it cools down enough for safe operation. Make sure there is adequate ventilation around the heatsinks if you plan on rack mounting the SDA-1 in an enclosed space.
-
Page 12: Warranty Information
This warranty is void if the serial number is altered, defaced, or removed. ART reserves the right to make changes in design or make additions to or improvements upon this product without any obligation to install the same on products previously manufactured. -
Page 13: Service
You may want to consult with your dealer for assistance in troubleshooting or testing your particular configuration. 2) If you believe that the ART unit is at fault, go to www.artproaudio.com. Select “Support”, then “Return Authorization Request” to request a return authorization number. -
Page 14: Sda-1 Specifications
Export units configured for country of destination. ART maintains a policy of constant product improvement. ART reserves the right to make changes in design or make additions to or improvements upon this product without any obligation to install same on products previously manufactured. Therefore, specifications are subject to change without notice. - Page 15 - 15 -...
- Page 16 www.artproaudio.com E-mail: support@artproaudio.com © 2013 Applied Research & Technology 156D5004101 - 16 -...
Need help?
Do you have a question about the SDA-1 and is the answer not in the manual?
Questions and answers