Advertisement
Table of Contents
- 1 Table of Contents
- 2 Safety Instruction
- 3 Installation of Your Oven
- 4 Electrical Installation
- 5 Instructions for Use
- 6 Oven Racks
- 7 Cooking Functions
- 8 Electronic Control
- 9 Timer
- 10 Oven Functions
- 11 Error Code Table
- 12 Oven Door Removal
- 13 Replacement of Oven Light
- 14 Guidance Temperature an Time Schedule for Cooking
- Download this manual
Advertisement
Table of Contents

Subscribe to Our Youtube Channel
Related Manuals for Omega OO747X


Summary of Contents for Omega OO747X
- Page 1 Instruction Manual for Electric Ovens OO757X OO986X...
-
Page 3: Table Of Contents
DEAR CUSTOMER, We thank you and congratulate you on your choice. This new carefully designed product, manufactured with the highest quality materials, has been carefully tested to satisfy all your cooking demands. We would therefore request you to read and follow these easy instructions, which will allow you to obtain excellent results right from the start. -
Page 4: Safety Instruction
SAFETY INSTRUCTIONS Important - When you receive the appliance, unpack it or have it unpacked immediately. Give it an overall inspection. Make note of any concerns or reservations on the delivery slip and make sure to keep a copy of this form. Keep this user guide with your appliance. If the appliance is ever sold or transferred to another person, ensure that the new owner receives the user guide. - Page 5 SAFETY INSTRUCTIONS Cont. Maintenance and cleaning - Do not use a steam cleaner. - For any cleaning operation inside the oven cavity, the oven must be switched off. - Before unclipping the glass, allow the appliance to cool. - Before removing the back, ensure that the appliance is powered down. After cleaning, the back should be replaced in accordance.
-
Page 6: Installation Of Your Oven
INSTALLATION OF YOUR OVEN To install the oven into the kitchen a cut out should be made in accordance with the dimensions shown in below. The apparatus is to be fastened to the top by means of the two screws provided in the kit through the holes made on the oven uprights. - Page 7 OO986X Built Under Type Vertical type...
-
Page 8: Electrical Installation
ELECTRICAL INSTALLATION WARNING This apparatus must be earthed. The oven is only for domestic use. The feed voltage and the absorbed power are as indicated on the data plate attached to the left-hand side upright, which can be seen when the oven door is open. Connecting must be carried out by qualified personnel and in accordance with the regulations currently in force. -
Page 9: Instructions For Use
INSTRUCTIONS FOR USE Oven Racks There are 9 oven rack positions available within the oven. This allows food to be positioned at various levels for even cooking. (OO655X has 5 oven rack positions) The racks can easily be removed to allow you to clean the oven cavity. Gently Push the wire rack down Gently lift and remove... -
Page 10: Cooking Functions
INSTRUCTIONS FOR USE Cont. Cooking Functions Each type of oven is provided for various cooking systems. A system can be selected by bringing the pointer of knob to the relating symbol. Symbol Description Light Conventional Top and bottom elements Traditional ( Fan with top and bottom elements) -
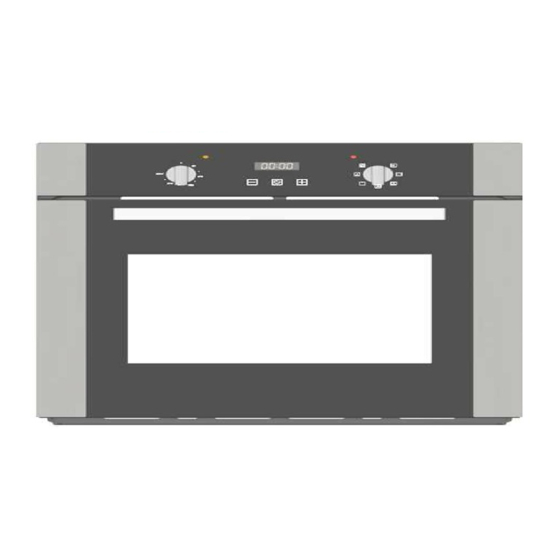
Page 11: Electronic Control
INSTRUCTIONS FOR USE Cont. Electronic Control Control Panel Description The oven control panel is made with one display and two knobs. - Time & Temperature display. - Time & Temperature knob (Push & Shuttle). - Mode (oven functions) knob. Programming time functions At every power-up, the control shows the time of day blinking, set at 12:00 as the initial value. -
Page 12: Timer
Cooking time Fig. 3 This is a semi-automatic cooking function. It can be used to set cooking times. This function automatically switches the oven off after the duration is complete. Firstly your cooking mode and temperature should be set. Press the central button for 3 seconds. Then press it again until “dur” appears (fig. 3). Press “+” and “-” to set the required cooking timer. - Page 13 Adjusting beep volume To adjust beep volume, press “+” and “-” together. Then press the central button and wait for “ton1” (high volume) to flash. Press “-” to select “ton2” (medium volume) or “ton3” (low volume). Press the central button to set the selected volume. INSTRUCTIONS FOR USE Cont.
-
Page 14: Oven Functions
- Push the knob to switch back and forth between hours and minutes or wait a few seconds until the minutes flash. - Modify the flashing minutes value the knob left/right. - Wait until the new End of Cooking time value stops flashing. The display will flash End and its value alternatively for a few seconds then it will show the time of day, the symbol and the letter to indicate that a timed cooking is active. -
Page 15: Error Code Table
Error code table... -
Page 16: Oven Door Removal
Oven door removal WARNING Make sure that: • The oven is cool and power to the oven has been turned off before removing the door. Failure to do so could result in electrical shock or burns. • The oven door is heavy and fragile. Use both hands to remove the oven door. The door front is Glass. -
Page 17: Replacement Of Oven Light
INSTRUCTIONS FOR USE Cont. Replacement of the oven light WARNING Make sure that: • The oven and lights are cool and power to the oven has been turned off before replacing the light bulb(s). Failure to do so could result in electrical shock or burns. •... -
Page 18: Guidance Temperature An Time Schedule For Cooking
GUIDANCE TEMPERATURE AN TIME SCHEDULE FOR COOKING Warning for hot-air cooking - Position of pans: - For cooking on 1 plane make use on 2nd holder from the bottom - For cooking on 2 planes make use of 2nd - 4th holders from the bottom - For cooking on 3 planes make use of 2nd - 3th and 4th holders from the bottom - (4) The time depends of poultry dimension, (40 ÷... - Page 20 We appreciate your feedback. Please review our products on www.omegaappliances.com.au...
Need help?
Do you have a question about the OO747X and is the answer not in the manual?
Questions and answers