Advertisement
Advertisement
Table of Contents

Related Manuals for Krups XP1000


Summary of Contents for Krups XP1000
- Page 1 XP1000 www.krups.com...
-
Page 2: Important Safeguards
IMPORTANT SAFEGUARDS When using electrical appliances, basic safety precautions should always be followed to reduce the risk of fire, electric shock, and/or injury to persons including the following: 1. Read all instructions prior to first use. 2. Do not touch hot surfaces. Always use handles or knobs. - Page 3 14. Do not let cord hang over edge of table or counter, or touch hot surfaces. 15. The use of accessory attachments not recommended by Krups may result in fire, electric shock or injury to persons. 16. Do not use outdoors.
- Page 4 CAUTION This machine is intended for household use only. Any servicing other than cleaning and user maintenance should be performed by the nearest authorized Krups Service Center. Visit our website at www.krupsusa.com in the USA or www.krups.ca in Canada or contact your respective country's Consumer Service department for the service center nearest to you.
-
Page 5: Short Cord Instructions
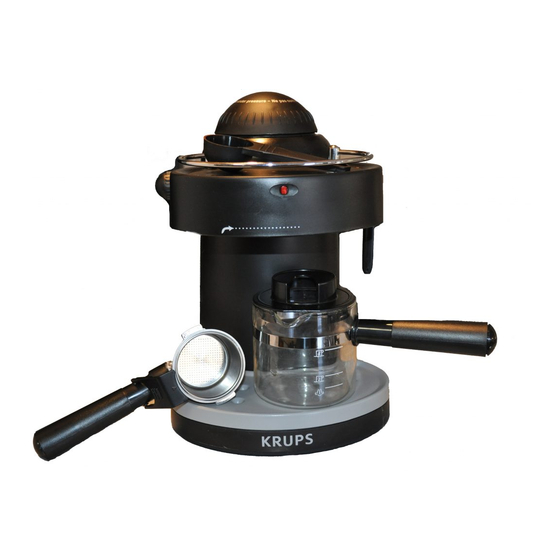
If the plug does not fit fully into the outlet, reverse the plug. If it still does not fit, contact a qualified electrician. Do not attempt to modify the plug in any way. In the interest of improving products, Krups reserves the right to change specifications without prior notice. - Page 9 DESCRIPTION ON/OFF Pilot light d Measuring spoon b Selector knob e Carafe Off position f Removable drip tray grid Espresso-coffee making g Cappuccino accessory position h Steam nozzle Hot steam position i Boiler cap for water tank c Filter-holder Removable filter for 1 to 4 cups Filter locker AUTHENTIC ESPRESSO...
-
Page 10: Before First Use
CAUTION – PRESSURE Never open boiler cap (i) or remove filter holder (c) while your appliance is turned “on” or while there is still pressure in the boiler container. To check for pressure: Turn the selector knob (b) to the “Off” position. Fig. 1. Turn the selector knob to the steam position (b3) Fig. -
Page 11: Making Espresso
Insert the filter holder in the appliance. Turn it firmly from left to right to put it into the “locked” position. Fig. 6. Place the carafe or a cup under the filter holder. Plug in the appliance. Fig. 7. Turn the selector knob to the “Espresso” position (b2). Fig. 8. The ON/OFF pilot light will light up. -
Page 12: Making Cappuccinos
espresso. Using a tamper or the back of the measuring spoon tamp down the coffee. Remove any excess coffee on the edge of the filter-holder. ATTENTION! Do not over fill or pack coffee too tightly. Fit the filter-holder into the appliance turning it from left to right and locking it firmly into place. - Page 13 The milk will froth better in a cold pitcher. The pitcher should fit underneath the cappuccino nozzle. We recommend using 1 or 2% milk for a stiff, dense froth. Use whole milk if you prefer a creamy froth. Turn the knob to the “Steam” position (b3). Fig. 10. When the steam starts coming out of the nozzle, immerse the nozzle in the pitcher of milk and make circular movements going up and down to froth the milk.
- Page 14 Check that the appliance is unplugged and that there is no contained pressure. (See CAUTION-PRESSURE). Measure out a small amount of water and pour into tank. For example: 2 oz (50 ml) of water to heat 4 oz (100 ml) of liquid. Important: for maximum efficiency, avoid putting more than 4 oz (100 ml) of water into the tank.
-
Page 15: Cleaning And Servicing
CLEANING AND SERVICING Unplug the appliance and let it cool down completely before you clean it. Occasionally wipe the outside of the appliance with a damp cloth. Regularly wash and dry the drip tray and its grid. Do not use alcohol-based or abrasive cleaning products or solvents. -
Page 16: Decalcifying The Espresso Side
2. Remove the plastic housing of the cappuccino nozzle (g). As a descaling agent we recommend the use of Krups descaling solution F054 available at authorized Krups retailers and Service Centres or by contacting your respective countries Customer Service Department. -
Page 17: Troubleshooting
TROUBLESHOOTING Problems Probable Causes Solutions Espresso The coffee drips The coffee is ground Use more coarsely too slowly. too fine. ground coffee. Filter blocked. Clean it with a brush. Water passage grid is Clean the appliance clogged. when cold. Presence of scale. De-Scale the appliance. -
Page 18: Limited Warranty
The manufacturer's warranty by Krups is an extra benefit which does not affect consumer's Statutory Rights. The Krups warranty covers all costs related to restoring the proven defective product so that it conforms to its original specifications, through the repair or replacement of any defective part and the ne- cessary labor. - Page 19 (www.krups.com) or by calling the appropriate telephone number listed below to request the appropriate postal address. Krups shall not be obliged to repair or replace any product which is not accompanied by a valid proof of purchase. This warranty will not cover any damage which could occur as a...
- Page 20 The Krups guarantee does not apply in case of non confor- mity of the purchased product with the local standards, such as voltage, frequency, power plugs, or other local technical specifications c) The repair process for products purchased outside the coun-...
- Page 22 ..p. 2 - 21 ..p. 22 - 41 ..p. 42 - 61 Ref. 8080011304...
Need help?
Do you have a question about the XP1000 and is the answer not in the manual?
Questions and answers