Honeywell Marathon User Manual
Hide thumbs
Also See for Marathon:
- User manual (286 pages) ,
- Reference manual (146 pages) ,
- Programming manual (104 pages)

Related Manuals for Honeywell Marathon


Summary of Contents for Honeywell Marathon
- Page 1 Marathon Hand-Held Computer Microsoft® Windows® Embedded Standard Operating System Microsoft® Windows® 7 Professional Operating System Microsoft® Windows® XP® Professional Operating System User's Guide...
-
Page 2: Limited Warranty
Disclaimer Honeywell International Inc. (“HII”) reserves the right to make changes in specifications and other information contained in this document without prior notice, and the reader should in all cases consult HII to determine whether any such changes have been made. The information in this publication does not represent a commitment on the part of HII. - Page 3 Li-Ion Battery When disposing of the lithium-ion battery, the following precautions should be observed: The battery should be disposed of properly. The battery should not be disassembled or crushed. The battery should not be heated above 212°F (100°C) or incinerated. CAUTION - RISK OF EXPLOSION IF BATTERY IS REPLACED BY AN INCORRECT TYPE.
-
Page 5: Table Of Contents
Components Front View Rear View Bottom View Right Side View Left Side View Chapter 2: Set Up A New Marathon Hardware Setup Software Setup Battery Charge or Recharge the Main Battery Charge or Recharge the Extended Battery Tapping the Touchscreen with a Stylus... - Page 6 Place the Marathon in the Vehicle Dock 2-16 Removing the Marathon from the Vehicle Dock 2-16 Using the Desktop Dock 2-16 Place the Marathon in the Desktop Dock 2-16 Removing the Marathon from the Desktop Dock 2-16 Using a Dock and a Second Monitor...
-
Page 7: Chapter 1: Introduction
Available add on modules include a magnetic stripe card reader and a 2D imager. The Marathon provides the power and functionality of a desktop computer in a portable unit. The desktop dock, much like a docking port for a conventional laptop, provides provisions for an external monitor and USB connections for devices such as a USB keyboard and mouse. -
Page 8: Laser Warnings And Labels
Laser Warnings and Labels Note: A 2D Imager Add-on may be installed on the Marathon. Laser warnings and labels that follow are specifically for a Marathon with a 2D Imager. Do not look into the laser’s lens. Do not stare directly into the laser beam. -
Page 9: Label
Label... -
Page 10: Components
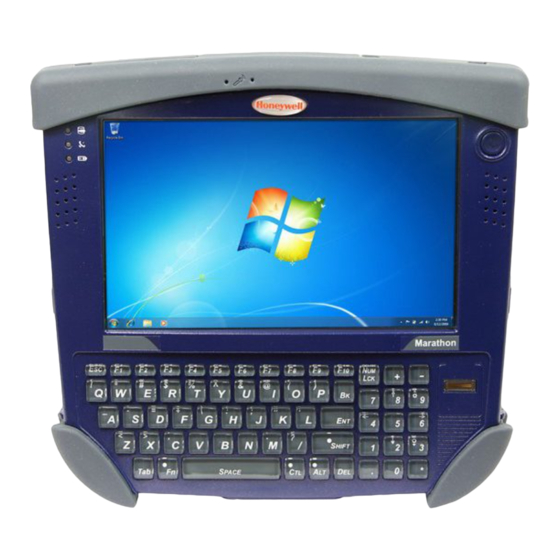
Components Front View Position Function Status Indicators Speakers Touch Screen / Display Microphone Power Button Biometric Mouse... -
Page 11: Rear View
Rear View Note: Extended battery is not attached in this image. Position Function Magnetic Stripe Card Reader Add-on Cover Camera Bar Code Imager Add-on Cover Tethered Stylus Extended Battery Connector Cover Internal Battery / SIM Card Cover Handstrap Connection... -
Page 12: Bottom View
External Antenna Signal Pathway (for use in vehicle mount dock only) Docking Connector (for use in desktop and vehicle mount docks) Right Side View The components are on the right side of the Marathon when viewed from the front. Position Function USB Port Cover Reset Button Two USB 2.0 Host Ports... -
Page 13: Left Side View
Left Side View The components are on the left side of the Marathon when viewed from the front. Position Function Power/Audio Port Cover Audio Jack Power Connector... -
Page 15: Chapter 2: Set Up A New Marathon
Chapter 2: Set Up A New Marathon This page lists a quick outline of the steps you might take when setting up a new Marathon. More instruction for each step is listed later in this guide. Please refer to the Marathon Reference Guide for additional information and instruction. -
Page 16: Battery
The Marathon contains an internal Lithium Ion battery that, once fully charged, powers the Marathon for a minimum of 3 hours and 30 minutes (when the unit is not mounted in a powered dock or connected to an AC/DC adapter or extended battery). -
Page 17: Tapping The Touchscreen With A Stylus
Tapping the Touchscreen with a Stylus Note: Always use the point of the stylus for tapping or making strokes on the touch screen. Never use an actual pen, pencil, or sharp/abrasive object to write on the touch screen. Hold the stylus as if it were a pen or pencil. Touch an element on the screen with the tip of the stylus then remove the stylus from the screen. -
Page 18: Using The Biometric Mouse
Using the Biometric Mouse The biometric mouse is located to the right of the keypad. Slide a finger over the biometric mouse to move the cursor in the direction the finger moves. Tapping the biometric mouse once generates a left-click, tapping twice rapidly generates a double-click. Tapping the biometric mouse and holding generates a right-click. -
Page 19: Led Indicators
LED Indicators Power Button The power button is backlit as follows: Off when not activated, Marathon is Off Solid blue when activated, Marathon is On Flashes blue when Marathon is in standby Status LEDs Status LED indicators are located next to the upper left hand corner of the display. -
Page 20: Adjust Display Brightness
Adjust Display Brightness The display can be lightened or darkened by using the Fn key and the keypad: 1. Hold the Fn key down for a few seconds until the Fn key remains illuminated (sticky). 2. Press the 9 (brightness up) key to brighten the display. 3. -
Page 21: Installing The Extended Battery Pack
Put the screws and cover aside in a safe place. 4. Line up the charging pins on the extended battery with the charging pins in the Marathon extended battery connector bay. - Page 22 One extended battery can be recharged in a powered desktop dock (See Marathon Dock Reference Guide) and four extended batteries can be recharged in the Marathon Battery Charger (See Marathon Battery Charger User Guide). An attached extended battery will begin to recharge when the Marathon is placed in a powered desktop dock or powered vehicle dock.
-
Page 23: Attaching The Hand Strap
Attaching the Hand Strap The hand strap is designed to be used with the Marathon with or without an extended battery attached. The hand strap is designed so the Marathon can be mounted in the desktop dock or the vehicle dock without removing the hand strap. - Page 24 Marathon. 9. Test the strap's connection making sure the Marathon is securely connected to each end of the strap connectors. Check the closed loop fastener and hand strap base connection frequently. If loose, they must be tightened or replaced before the Marathon is placed into service again.
-
Page 25: Attaching The Shoulder Strap
Attaching the Shoulder Strap The shoulder strap is designed to be used with the Marathon with or without an extended battery attached. The shoulder strap is designed so the Marathon can be mounted in the desktop dock or the vehicle dock without removing the shoulder strap. - Page 26 4. Insert the Strap Attaching Screws into the upper two holes. These screws have an eye to attach the strap. 5. Thread the longer nylon loop of one of the Shoulder Strap Adapters through one of the Strap Attaching Screws. Then thread the other end of the Shoulder Strap Adapter through the longer loop and pull tight.
-
Page 27: Marathon Configuration Options
Marathon Configuration Options Many configuration options are available via the Microsoft Windows Control panel. For additional information, please refer to Help and Support on the Start menu for configuration details. Date and Time Use the Windows interface to set date, time and time zone. Tap the time displayed in the task bar or tap: Start | Control Panel | Clock, Language and Region | Date and Time (Category view) -
Page 28: Restart/Shutdown
Restart/Shutdown Use the Windows interface to restart or shut down the Marathon. Tap Start | Shut Down | Restart Tap Start | Shut Down | Shut down Calibrate Touch Screen To calibrate the touch screen, tap Start | Programs | PenMount Universal Driver | Utility | PenMount Control Panel. -
Page 29: Marathon Desktop And Vehicle Dock
A serial, monitor, Ethernet and USB connection are available when the Marathon is mounted in a powered vehicle dock. When a headset is not attached to the mobile device mounted in a dock, the microphone and speakers on the Marathon are active. -
Page 30: Using The Vehicle Dock
Place the Marathon in the Desktop Dock Lower the Marathon straight down into the docking bay until it is seated and then let it fall back into the dock. If desired insert an extended battery in the spare battery charging bay. -
Page 31: Chapter 3: Connecting Cables To The Marathon
Chapter 3: Connecting Cables to the Marathon Connecting USB Devices The Marathon provides two Type A USB ports behind the access door on the right side of the device. Open the port cover on the right side of the Marathon. -
Page 32: Connecting An Ac/Dc Power Supply
3. Plug cordset into appropriate, grounded, electrical supply receptacle (AC mains). 4. The LED on the AC adapter illuminates. 5. Open the port cover on the left side of the Marathon. When the power connector is not used, keep the port cover door closed. -
Page 33: Connecting An Audio Device
Connecting an Audio Device The Marathon provides an external headset connection via an audio jack connector under the left-hand port cover. Position Function Power Connector / Audio Jack Cover Audio Jack Power Connector 1. Open the left-hand port cover. 2. Insert the speaker or headphone plug into the audio connector; making sure the plug is firmly seated in the jack. -
Page 34: Connecting A Usb Tethered Scanner
Connecting a USB Tethered Scanner The Marathon accepts only USB tethered scanners. The scanner is connected to one of the USB ports on the right side of the Marathon. If the tethered scanner does not have it's own power supply, e.g. installed rechargeable battery, the tethered scanner draws... -
Page 35: Connecting A Cigarette Lighter Power Adapter
1. Plug the lighter end of the cordset into an appropriate 12V DC automotive cigarette lighter receptacle. The LED on the cigarette lighter Power Adapter illuminates to indicate it is drawing power from the vehicle. 2. Open the port cover on the left side of the Marathon. When the power connector is not used, keep the port cover door closed. -
Page 36: Connect Power Supply To Vehicle Mounted Dock
The Power LED on the front of the vehicle dock illuminates when the dock is connected to vehicle power. The power LED on the Marathon illuminates when it is receiving external power from the vehicle dock. Refer to the Marathon Dock Reference Guide for further information and instruction. -
Page 37: Chapter 4: Product Agency Compliance - Marathon
Normal operation of this device is restricted to indoor used only to reduce any potential for harmful interference to co–channel MSS operations. Notice Changes or modifications made to this equipment not expressly approved by Honeywell may void the FCC authorization to operate this equipment. - Page 38 Li-Ion Battery When disposing of the Marathon main battery, the following precautions should be observed: The battery should be disposed of properly. The battery should not be disassembled or crushed. The battery should not be heated above 212°F (100°C) or incinerated.
- Page 39 R&TTE Directive Requirements Dealer License - Republic of Singapore Republic of Singapore - LXE Dealer License Number DA103458 complies with IDA Standards.
-
Page 40: Laser Light Safety Statement
Laser Light Safety Statement Warning: This product uses laser light. One of the following labels is provided on the scanner. Please read the Caution statement. (US) Mise én garde: Ce produit utilise un rayon laser. L’une des étiquettes suivantes est apposée sur le scanneur. Veuillez lire l’avertissement qu’elle contient. -
Page 42: Lithium Battery Safety Statement
Lithium Battery Safety Statement Caution: Lithium battery inside. Danger of explosion if battery is incorrectly replaced. Replace only with same or equivalent type recommended by battery manufacturer. (US) Attention: Contient une pile de lithium. Risque d’explosion dans le cas où la pile ne serait pas correctement remplacée. Remplacer uniquement avec une pile semblable ou equivalente au type de pile recommandé... - Page 43 Lithium Battery Safety Statement, continued Legend: Chinese – CN; Danish – DK; Dutch – NL; English – US; Finnish – FI; French- - FR; German – DE; Greek – GR; Italian – IT; Japanese – JP; Korean – KR; Norwegian – NO; Portuguese – PT; Spanish – ES; Swedish – SE; Turkish – TR.
-
Page 44: Vehicle Power Supply Connection Safety Statement
Vehicle Power Supply Connection Safety Statement Vehicle Power Supply Connection: If the supply connection is made directly to the battery, a 10A slow-blow fuse should be installed in the positive lead within 5 inches (12.7 cm.) of the battery positive (+) terminal. (US) Raccordement de l’alimentation du véhicule Si l’alimentation est raccordée directement à... -
Page 45: Chapter 5: Technical Assistance
Product Service and Repair: www.honeywellaidc.com Honeywell International Inc. provides service for all of its products through service centers throughout the world. To obtain warranty or non-warranty service, please visit www.honeywellaidc.com and select Support > Contact Service and Repair to see your region’s instructions on how to obtain a Return Material Authorization number (RMA #). You should do this prior to returning the product. - Page 46 Honeywell Scanning & Mobility 9680 Old Bailes Road Fort Mill, SC 29707 www.honeywellaidc.com E-EQ-MARATHONOGWW Rev C 4/12...
Need help?
Do you have a question about the Marathon and is the answer not in the manual?
Questions and answers