WePresent WiPG-1000 User Manual
Wireless interactive presentation gateway
Hide thumbs
Also See for WiPG-1000:
- User manual (46 pages) ,
- Quick installation manual (40 pages) ,
- Deployment manual (25 pages)

Related Manuals for WePresent WiPG-1000


Summary of Contents for WePresent WiPG-1000
- Page 1 Wireless interactive Presentation Gateway WiPG-1000 User’s Manual (Model Name: WiPG-1000) Version: 1.0 Date: Mar. 22, 2012...
-
Page 2: Table Of Contents
Package Contents ....................5 USB Token Contents ..................5 Physical Details ....................5 What You Might Need ..................7 Quick Installation ....................7 WiPG-1000 Receiver Device ................8 DoWiFi for Windows ..................10 Install the application ..................10 Start the application ..................11 Quick Connect....................11 Connect to WiFi Network ................12... - Page 3 Table of Contents DoWiFi for Mac ....................24 Install the application ..................24 Start the application ..................24 Quick Connect....................24 Connect to WiFi Network ................25 Connect to Receiver Device .................25 Login ........................26 Main User Interface ..................26 Screen Projection .....................26 Audio Projection ....................27 9.10 Menu ........................27 9.10.1 Show Receiver Information ................28...
-
Page 4: Overview
WiPG-1000 User Manual 1. Overview wePresent WiPG-1000 is professional wireless presentation gateway. By enabling the Revolutionary “interactive” and “wireless” functions, you can throw your presentations wirelessly from a PC, Mac, iPad, iPhone, or Android devices to a projector! And use your pad, tab or phone to control your PC/Mac, or view the presenting slides! • WiPG-1000 Features Highlight:... -
Page 5: Package Contents
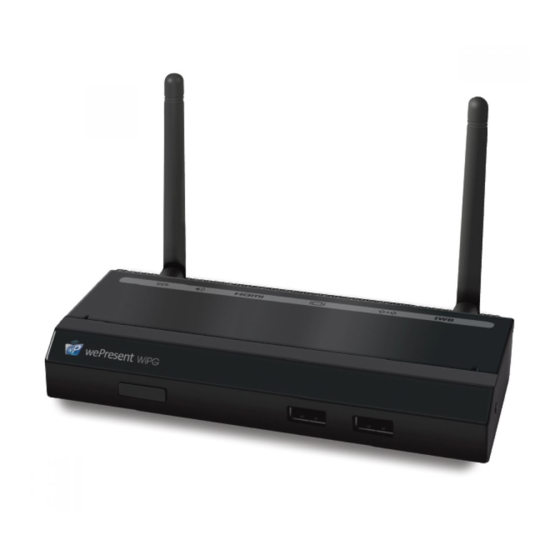
• 2 WiFi Antenna • Quick Installation Guide • Warranty Card 3. USB Token Contents • Windows Installer (WiPG-1000 Windows Installer) • MAC Installer (WiPG-1000 Mac Installer) • VAC Driver (For Windows XP Audio Projection) • VDD Driver (For Windows Virtual Extended Screen) •... - Page 6 WiPG-1000 User Manual • Rear Panel Audio Jack Antenna USB Port RJ-45 VGA Connector HDMI Power Jack Antenna Description Antenna WiFi Antenna USB Port (Rear) USB port for USB IWB device (HID type) RJ-45 10/100M RJ-45 port VGA Connector VGA connector...
-
Page 7: What You Might Need
• Speaker (Optional, for audio projection feature) • USB Mouse and Keyboard (Optional, for remote desktop feature) • USB HID IWB Device (Optional, for IWB over IP feature) 6. Quick Installation 1. Connect wePresent WiPG-1000 device to Projector through VGA port and turn on projector power. →Back... - Page 8 3. Attach the speaker cable to WiPG-1000 phone jack for audio output 4. Attach the USB mouse and keyboard to WiPG-1000 front USB port for OSD control and remote desktop control 5. Attach the USB IWB cable to WiPG-1000 rear USB port for IWB control...
-
Page 9: Wipg-1000 Receiver Device
2. It will show the Quick Guide Information, WiFi Network Name, IP Address and Code on standby screen. 3. If there is sender connected to WiPG-1000 device, it will show the PC-List on standby screen, conference moderator can use the USB mouse/keyboard to select the PC and control it remotely. -
Page 10: Dowifi For Windows
6. System will enter the Screen Saver mode if none is connected, it will restore to standby status immediately when there is any sender connected. 8. DoWiFi for Windows 8.1 Install the application 1. Make sure your PC WiFi is enabled already, and connect your PC to wePresent WiPG-1000 box through WiFi. →Back... -
Page 11: Start The Application
1. WiPG-1000 will memorize the last successful connection profile and open the quick connect dialog, you can enter the code and press the “Connect” button to connect this WiPG-1000 directly. 2. If you want to connect to another WiPG-1000 receiver, please press the “Rescan” button. →Back... -
Page 12: Connect To Wifi Network
WiPG-1000 User Manual 8.4 Connect to WiFi Network 1. WiPG-1000 will search the available WiFi Network and list the WiPG-1000 WiFi Device. You can select a network and press the “Connect” button to connect the selected WiFi Device. 2. You can press the “Refresh” button to search again or press the “All” button to list all available WiFi Network name. -
Page 13: Main User Interface
WiPG-1000 User Manual 2. If you want to connect to another receiver or cancel the login, please press the “Cancel” button. 8.7 Main User Interface Menu Area Control Area for Screen Projection Feature Status Indicator 8.8 Screen Projection 1. Click the “Play” button for full or split screen, you can project the main screen on to the display immediately, click the “Pause”... -
Page 14: Audio Projection
8.9 Audio Projection 1. When you are doing the full screen projection, you can also choose to project the audio to WiPG-1000 receiver for the multimedia or video scenario. 2. To enable or disable the audio projection feature, please change the setting from WiPG-1000 menu. -
Page 15: Show Receiver Information
WiPG-1000 User Manual 8.10.1 Show Receiver Information 1. Click “Show Receiver Information”, it will display the Receiver Information, such as WiFi Name, IP Address and code on the upper of desktop, it will close automatically after 30 seconds or you can also click on the area to close this window manually. -
Page 16: Search Receiver Device
8.10.3 Search Receiver Device 1. Click “Search Receiver Device”, it will disconnect from current receiver and search the receiver again. 8.10.4 Launch SidePad -> MirrorOp Receiver 1. Open the main menu of the WiPG-1000 application(Win/Mac), and choose the item, “Launch SidePad -> MirrorOp Receiver (SidePad)” have to download the “MirrorOp receiver” on your Android/iOS device, Note: You... -
Page 17: Enable Browserslides
WiPG-1000 User Manual 8.10.5 Enable BrowserSlides 1. Click the “Enable BrowserSlides”, it will start to broadcast your slides to the browser on connected mobile devices. Note: Audience need to connect to WiPG-1000 WiFi Network, open the browser and click the “BrowserSlides” button to start receiving the slides. 8.10.6 Select Projection Desktop (Win XP/Vista/7) 1. Click the “Select Projection Source” then you can select to project the main screen of desktop or the virtual extended screen. -
Page 18: Projection Quality
WiPG-1000 User Manual 8.10.7 Projection Quality 1. Click the “Projection Quality”, choose “Normal” for faster projection speed with lower screen image quality, and “Best” for clear screen image quality but slower projection speed. 8.10.8 Projection Latency Control 1. The Projection Latency Control provides the option to support “Auto” latency control and “Shortest (Application Mode)”. -
Page 19: Enable Usb Iwb Bridge
WiPG-1000 User Manual 8.10.9 Enable USB IWB Bridge 1. Click the “Enable USB IWB Bridge”, it will enable the USB IWB Bridge feature. 2. When you start the full screen projection, it will bridge the IWB device to your PC wirelessly. Note: You have to install the USBoIP driver first. You can find the driver from USB token. -
Page 20: Send Audio To Display
WiPG-1000 User Manual • Enable “Advanced Screen Capture”. Tip windows is shown in projector 8.10.11 Send Audio to Display 1. Click “Send Audio to Display” to start the audio projection feature. It will mute your local speaker during the projection and restore it when it closes the application. -
Page 21: Auto Power Manager
WiPG-1000 User Manual 8.10.12 Auto Power Manager 1. To make the highest projection performance, application will turn the PC’s windows power scheme from current settings to “highest performance”, however, you can click the “Auto Power Manage” to enable or disable this function and restore you power scheme immediately. -
Page 22: Make Wepresent Wipg-1000 Token
WiPG-1000 User Manual 8.10.14 Make wePresent WiPG-1000 Token 1. Click “Make wePresent WiPG-1000 Token” to make a USB wePresent WiPG- 1000 Token, you can insert a USB thumb drive and follows the wizard to make the Token. 8.10.15 Copy Application to desktop 1. Click the “Copy Application to desktop”, it will copy the application to your desktop immediately even you don’t have the system privilege... -
Page 23: About
WiPG-1000 User Manual 8.10.16 About 1. Click “About” to show system information. It includes product model name, Client version, IP address and other information. 8.10.17 Exit 1. Click “Exit” to exit this application. It will stop current playing status and close the application immediate. -
Page 24: Dowifi For Mac
2. It will start to search wePresent WiPG-1000 receiver automatically. 9.3 Quick Connect 1. WiPG-1000 will memorize the last successful connection profile and open the quick connect dialog, you can enter the code and press the “Connect” button to connect this WiPG-1000 directly. -
Page 25: Connect To Wifi Network
WiPG-1000 User Manual 2. If you want to connect to another WiPG-1000 receiver, please press the “Rescan” button. 9.4 Connect to WiFi Network 1. WiPG-1000 will search the available WiFi Network and list the WiPG-1000 WiFi Device. You can select a network and press the “Connect” button to connect the selected WiFi Device. -
Page 26: Login
WiPG-1000 User Manual 9.6 Login 1. When it connects to a “Code” protection enabled WiPG-1000 receiver, you have to enter the “Code” and press the “Connect” button to login the receiver. (You can find the CODE from the right-upper of OSD standby screen) 2. -
Page 27: Audio Projection
9.9 Audio Projection 1. When you are doing the full screen projection, you can also choose to project the audio to WiPG-1000 receiver for the multimedia or video scenario. 2. To enable or disable the audio projection feature, please change the setting from WiPG-1000 menu. -
Page 28: Show Receiver Information
WiPG-1000 User Manual Item Description Show Receiver Information Show Receiver Information on desktop Web Admin Open web admin page Search Receiver Search another receiver device Launch SidePad -> MirrorOp Receiver Launch SidePad sender Enable BrowserSlides Enable BrowserSlides feature Projection Quality Change projection quality Projection Latency Control Change projection latency option Send Audio to Display... -
Page 29: Search Receiver Device
9.10.3 Search Receiver Device 1. Click “Search Receiver Device”, it will disconnect from current receiver and search the receiver again. 9.10.4 Launch SidePad -> MirrorOp Receiver 1. Open the main menu of the WiPG-1000 application(Win/Mac), and choose the item, “Launch SidePad -> MirrorOp Receiver (SidePad)” Note: You have to download the “MirrorOp receiver” on your Android/iOS device, then connect the Android/iOS to WiPG-1000 device through WiFi and Launch “‘MirrorOp Receiver”. -
Page 30: Projection Quality
WiPG-1000 User Manual 9.10.6 Projection Quality 1. Click the “Projection Quality”, choose “Normal” for faster projection speed with lower screen image quality, and “Best” for clear screen image quality but slower projection speed. 9.10.7 Projection Latency Control 1. The Projection Latency Control provides the option to support “Auto” latency control and “Shortest (Application Mode)”. -
Page 31: About
10. Web Management 10.1 Home Page 1. Make sure your PC connect to wePresent WiPG-1000 box successfully. 2. Enter the receiver IP address on browser; you can find the IP address on the projector screen. (Default IP is 192.168.100.10) -
Page 32: Download
, Play Split #1 , Play Split #2 ,Play Split #3 , Play Split #4 and Stop 6. Uncheck the “Allow Control from this page only”, it will disable the centralized control and user can project the screen to WiPG-1000 freely. →Back... -
Page 33: Browserslides
WiPG-1000 User Manual 10.4 BrowserSlides 1. Press the “BrowserSlides” button to enter the BrowserSlides page. 2. Enter the password if necessary. (Default password: Same as Code) 3. Start to receive the projecting slides. →Back... -
Page 34: Admin
Versions: • Firmware version no.: Product firmware version number. Network Status: • IP address: IP address of WiPG-1000 device. • Subnet Mask: subnet mask • Default Gateway: default gateway • Wireless MAC address: wireless MAC address • Wire MAC address: wire MAC address Connection Status: • Projecting status: “Waiting for projecting” or “Projecting” • Total Users: It shows how many users login to wePresent WiPG-1000. →Back... -
Page 35: Device Setup
<Note: Auto-Configuration Network Setup on WiPG-1000> The default setting of the wePresent WiPG-1000 box is DHCP client. When the wePresent WiPG-1000 box is connected to a LAN that already has a DHCP server present, the wePresent WiPG-1000 box takes an IP address assigned to it by the server. When the wePresent WiPG- 1000 box is connected to a LAN that does not have a DHCP server, the wePresent WiPG-1000 box becomes the DHCP server in the network. - Page 36 • SSID Broadcast: The default value is “Enable” • Channel: to set fixed channel or Auto. The “Auto” means after power on wePresent WiPG-1000, it will scan all of wireless channel and select clear one channel automatically. • Encryption: you can select “Disable” or one of WEP/WPA/WPA2 64bit or 128bit in ASCII or HEX string.
-
Page 37: Osd Setup
WiPG-1000 User Manual 10.5.4 OSD Setup 1. Click [OSD Setup] button, you can change the standby Logo image Change Logo Image ▪ <Reset to default>: Restore to default Logo image. ▪ <Image File Upload>: Upload the customized Logo Image. →Back... -
Page 38: Change Passwords
WiPG-1000 User Manual 10.5.5 Change Passwords 1. Click [Change Password] button, you can change the password setting. (Length: up to 8 characters) • < Enter New Password>: enter new password you want to change for each category. • <Confirm New Password>: Confirm the new password again. -
Page 39: Reset To Default
B. Click <Browse> to specify file name you want to upgrade. C. Click <Upgrade> to start. D. A warning message shown and count down counter on the screen. E. After a few minutes, a complete message shown on the screen. F. Restart wePresent WiPG-1000 box to take effect. →Back... -
Page 40: Browserslides Setup
WiPG-1000 User Manual Warning: Don’t power off wePresent WiPG-1000 while firmware upgrade in progress, otherwise will cause your Box doesn’t work and have to return device to your vendor for fixing. 10.5.8 BrowserSlides Setup 1. Click [BrowserSlides Setup] button to setup the BrowserSlides Feature. -
Page 41: Reboot System
WiPG-1000 User Manual 10.5.9 Reboot System 1. Click [Reboot System] button, you can restart the system • <Reboot>: reboot system automatically. 10.5.10 Logout 1. Click [Reboot System] button, you can logout the WiPG-1000 →Back... -
Page 42: Appendix
WiPG-1000 User Manual 11. Appendix 11.1Wall-mount Instructions Mounting Screw X 2 Screw Washer X 2 Mounting Bracket Fix Screw X 4 Bracket Wall →Back...
Need help?
Do you have a question about the WiPG-1000 and is the answer not in the manual?
Questions and answers