Table of Contents
Advertisement
Available languages
Available languages
Quick Links
Advertisement
Table of Contents

Related Manuals for Mosquito Magnet Liberty Pluse


Summary of Contents for Mosquito Magnet Liberty Pluse
- Page 1 For Outdoor Use Only 1440-604 Rev. E...
-
Page 2: Table Of Contents
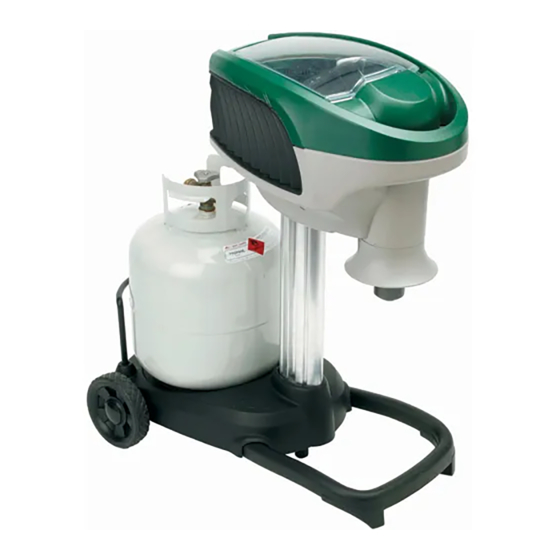
Safety Instructions Principal Parts Mosquito Magnet is the #1 mosquito trap in North America. Backed by 17 years of research and testing, Mosquito Assembly Instructions Magnet is scientifically proven to effectively reduce mosquitoes & other biting insects from your yard. -
Page 3: Safety Instructions
Safety Instructions Safety Instructions Note: • • Please read and follow all safety Maintain adequate clearances of 20”–24” around air The pressure regulator and hose assembly supplied with this Some or all of the following required safety openings into the combustion chamber, clearances from appliance must be used for connection to the LP-Gas instructions for propane powered devices may instructions and warnings. -
Page 4: Principal Parts
Base Support (1) Turn base and leg assembly right-side-up and place Bug bag locks into front of compartment support pole into cavity on base. Step 3 Parts Included Mosquito Magnet ® Octenol Biting Quick Clear Adapter Charging Adapter Insect Attractant EPA Reg. -
Page 5: Set-Up
7. For optimal trap placement in your yard, refer to the WITH THIS INSTRUCTION IS NOT COVERED instructional CD-ROM included with your Liberty Plus. UNDER WARRANTY. Charging your Mosquito Magnet ® Liberty Plus 1. Remove cover panel from rear of Power Head Unit (panel snaps off). -
Page 6: Using The Correct Attractant
If you live in the northern half of the U.S., or along any 4. Replace end cap on carrier compartment. Be sure to align coastal areas in the U.S., use a fresh Mosquito Magnet cap’s “feet” with groves inside carrier compartment. Secure Octenol cartridge every time you change the propane tank. -
Page 7: Instructions
4. Push ON/OFF switch to ON position. LED light will turn solid orange indicating warm-up. • Charge your Mosquito Magnet Liberty Plus for 24 hours at the After 15 to 25 min. trap LED light will turn solid green beginning of each season. -
Page 8: Easy Quick-Clear Valve
Liberty Plus, and a threaded Quick Clear 3. Regulator is not fully engaged. 3. See Tank Changing Tips on page 8. cartridge available on our website at: www.mosquitomagnet.com or at your local Mosquito Magnet ® Dealer. 1. Verify temperature is consistently over 50°F (10°C). -
Page 9: Limited Warranty
Frontgate In-Store Display Other the nature of the defect. products modified (including, but not limited to 3. In your household who decided to purchase the Mosquito Magnet? If Woodstream Corporation determines there modifications through the use of unauthorized Male Female... - Page 10 Manual de operación...
- Page 11 Parte principales Instrucciones de ensamblaje Mosquito Magnet es la primera trampa para mosquitos en Norteamérica. Con el apoyo de 17 años de investigación Instalación 7e-10e y pruebas, la trampa Mosquito Magnet está científicamente probada para reducir los mosquitos y otros insectos Ubicación de la trampa...
- Page 12 Instrucciones de seguridad Instrucciones de seguridad Nota: • Mantenga espacios libres adecuados de 51 a 61 cm alrededor de • Debe utilizarse el regulador de presión y el ensamblaje de Por favor, lea y siga las instrucciones Deberán seguirse algunas o todas las instrucciones las aberturas de aires que van hacia la cámara de combustión;...
- Page 13 La bolsa para insectos se asegura en la parte frontal del compartimiento. Partes incluidas Cebo atrayente para insectos que pican Adaptador Quick Clear Adaptador del cargador Mosquito Magnet ® a base de octenol Reg. EPA No. 72563-1 (Cebo atrayente de corto rango) Bolsa para insectos Batería recargable Coloque el cabezal de alimentación eléctrica del artefacto...
- Page 14 CUBIERTO POR LA GARANTIA. 7. Para lograr una ubicación óptima de la trampa en su patio o jardín, consulte el CD-ROM con instrucciones incluido con el artefacto Liberty Plus. Para cargar el artefacto Mosquito Magnet ® Liberty Plus Inserte y conecte la batería 1.
- Page 15 DE CAZA DE LA TRAMPA. 2. Ubique el compartimiento para portar octenol que está dentro del tubo pluma. Gire la tapa en dirección contraria a Octenol Mosquito Magnet ® las manecillas del reloj aproximadamente 1/8 de vuelta. Retire la tapa del extremo.
- Page 16 Cronograma de mantenimiento Possible Cause (la unidad debe funcionar durante 24 horas al día) que necesita en www.mosquitomagnet.com o en el distribuidor local de Mosquito Magnet o en el Centro de Servicios. Cuando no está en uso Ejemplo: Estación 1 Estación 2...
- Page 17 3. El regulador no está totalmente conectado. en la página 8. del distribuidor local de Mosquito Magnet ® 1. Verifique que la temperatura esté constantemente 1. Apague la trampa. Deje funcionar el ventilador hasta que por encima de 50°F (10°C).
- Page 18 Woodstream Corporation y el derechos legales específicos y también 11. ¿Estaría dispuesto a ofrecer un testimonio después de estar completamente convencido de la efectividad de la trampa Mosquito Magnet? único recurso que tiene usted bajo esta puede tener otros derechos legales que garantía se limitará...
Need help?
Do you have a question about the Liberty Pluse and is the answer not in the manual?
Questions and answers