
Related Manuals for BIOTRONIK CardioMessenger II-LLT


Summary of Contents for BIOTRONIK CardioMessenger II-LLT
- Page 1 CardioMessenger II-LLT Transmitter for BIOTRONIK Home Monitoring ® Technical Manual sbiotronik...
-
Page 2: Follow-Up Data
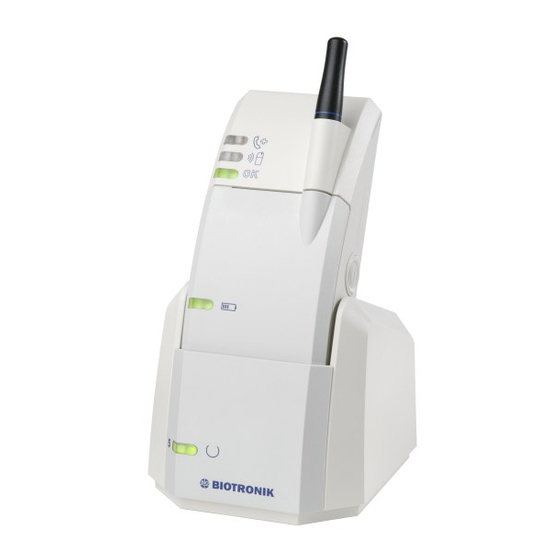
Overview Physician callback signal (1) Follow-up data transmission (2) Ready (CardioMessenger II) (3) Battery monitor light (4) Ready (charging station) (5) Data interface (6) A view of the rear side of the device can be found on the back cover. - Page 3 Overview Belt clip (1) On/off button (2) Telephone jack (3) Restart (4) Power supply port (5)
-
Page 4: Table Of Contents
Contents Contents ......1 How Do I Turn On the CardioMessenger? . 28 What is Home Monitoring? ... . 3 How Do I Turn Off the CardioMessenger? . - Page 5 Guidelines ......40 Electromagnetic emitted interference according to IEC 60601-1-2 ..47 USA .
-
Page 6: What Is Home Monitoring
What is Home Monitoring? Dear Patient: the CardioMessenger is needed to send the information to the BIOTRONIK Service You have received a BIOTRONIK pacemaker Center. or implantable cardioverter-defibrillator (ICD) with Home Monitoring function. At the Service Center, the data are processed and can be viewed only by your physician ... -
Page 7: Included Equipment
Included Equipment The set comes equipped with the following components: 1. Mobile unit 2. Charging station 3. Wall mounted power supply 4. Telephone cable 5. Belt clip (already affixed) 6. Carrying strap 7. Patient manual... - Page 8 Never use the CardioMessenger if it has been damaged; return it to your physician. Only use the following original BIOTRONIK devices, as other accessories can increase the interference emitted and the device's susceptibility to interference: – The CardioMessenger – The charging station with the wall mounted power supply (type: FW 7555 M/06)...
-
Page 9: How Do I Use The Cardiomessenger
2 The CardioMessenger is placed on How Do I Use the CardioMessenger? a solid base and cannot fall. The following section describes: Please also consider the following: 2 How to optimize CardioMessenger 2 Do not expose the device to moisture or placement heat;... - Page 10 Warning! The distance between the device and CardioMessenger must not be less than 20 centimeters (7 inches). Note: If the CardioMessenger is too close to a loudspeaker (or a radio alarm or TV), you may hear interference noises typical for mobile phones.
-
Page 11: How Do I Install The Cardiomessenger
How Do I Install the CardioMessenger? Insert the plug into a socket in your wall. Make sure you do not connect the Cardio- Messenger to a power outlet controlled by a light switch. Make sure that the socket to which the charging station is connected is easily accessible. - Page 12 Now, insert the small plug of the power supply cable into the charging station. Arrange power cable carefully to reduce the risk of entanglement or strangulation. The port for the small plug is situated on the rear side of the charging station and is marked with the following symbol:...
- Page 13 Light 5 is situated on the front side of the charging station. The charging station is operational when this light is illuminated. If this light is not illuminated, please refer to “How Do I Resolve Problems?” on page 32.
-
Page 14: Telephone Connection
Telephone connection Version A Version B You need a telephone connection so that your CardioMessenger can send the Home Monitoring data to your physician. You may operate your CardioMessenger with your existing telephone sharing one single telephone socket (version A) or connect it directly to a free telephone socket ... - Page 15 Note: The CardioMessenger is designed to operate with standard analog phone lines providing Plain Old Telephone Service (POTS). Compatibility with other phone lines or services (e.g., Voice over IP (VoIP) via analog or digital lines, cable TV phone lines or ISDN) is not guaranteed. In these cases compatibility testing at the patient’s home is recommended.
-
Page 16: Version A
Version A Unplug your telephone cable from your telephone socket in your wall. Remove the safety plug on port 1 on the rear side of the charging station. Keep the sealing plug of the telephone inlet out of the reach of children. - Page 17 Now insert the free end of your telephone cable into port 1 of the charging station.
- Page 18 Take the telephone cable that came with the CardioMessenger, remove the second safety plug from port 2 of the charging station. Keep the sealing plug of the telephone inlet out of the reach of children. Plug one end of the telephone cable into port 2.
- Page 19 Insert the other end of your telephone cable into the telephone socket in your wall. Arrange the telephone cable carefully toreduce the risk of entanglement or stran- gulation.
- Page 20 Now, place the CardioMessenger into the charging station. The CardioMessenger should switch itself on immediately, unless the batteries are completely depleted. A brief tone will sound when the Cardio- Messenger is switched on. If the batteries are completely depleted, then the CardioMessenger first charges itself and then switches itself on later (approximately after 30 minutes).
- Page 21 When you are finished, the connection should look like as follows:...
-
Page 22: Version B
Version B If you wish to set up the CardioMessenger close to a telephone outlet, but there is no telephone, you may connect the Cardio- Messenger directly to the telephone outlet. Please proceed as follows: Take the telephone cable that came with the CardioMessenger and ... - Page 23 Now insert one end of your telephone cable into port 1 of the charging station.
- Page 24 Insert the other end of your telephone cable into the telephone socket in your wall. Arrange the telephone cable carefully toreduce the risk of entanglement or strangulation.
- Page 25 Now, place the CardioMessenger in the charging station. The CardioMessenger should switch itself on immediately, unless the batteries are completely depleted. A brief tone will sound when the Cardio- Messenger is switched on. If the batteries are depleted, then the CardioMessenger first charges itself and then switches itself on later (approximately after 30 minutes).
- Page 26 When you are finished, the connection should look like as follows:...
-
Page 27: How Do I Understand The Lights Of The Cardiomessenger
How Do I Understand the Lights of the CardioMessenger? Your CardioMessenger has four lights and one light on the charging station. The lights numbered 1 – 3 represent the general functions of the CardioMessenger, light 4 is the battery monitor light, and light 5 shows the operational status of the charging station. -
Page 28: Light 2
Yellow flashing – When this light flashes Off – This is the normal status. yellow, your physician wants you to call. Yellow illumination – When the light is This situation may never occur. You will be illuminated yellow, the CardioMessenger informed by your physician if s/he will use is receiving a message. -
Page 29: Light 4
Green flashing – Yellow illumination – When the light is When the light single-flashes green repeat- illuminated yellow, the CardioMessenger edly, the CardioMessenger is operating is performing a self-test. properly. This is the normal status. This test should last no longer than 10 seconds after the CardioMessenger ... -
Page 30: Light 5
When this light is off but the Cardio- Messenger is in the charging station, please refer to “How Do I Resolve Problems?” on page 32. Red flashing – When the light flashes red, the CardioMessenger batteries are nearly depleted. Please place the CardioMessenger in the charging station. -
Page 31: How Do I Turn On The Cardiomessenger
How Do I Turn On the CardioMessenger? As soon as you place the CardioMessenger in the charging station, it is automatically switched on. You certainly may also switch on the CardioMessenger when it is not placed in the charging station; the On/Off button is located on the right side of the CardioMessenger. -
Page 32: How Do I Turn Off The Cardiomessenger
Press and hold the CardioMessenger CardioMessenger will try to connect to the On/Off button for at least two seconds. BIOTRONIK Service Center. A brief tone will sound and light 3 will After a successful connection to the ... -
Page 33: How Do I Charge The Cardiomessenger
How Do I Charge the CardioMessenger? The CardioMessenger has to be charged when the battery monitor light (light 4) flashes red. If you wish to use the Cardio- Messenger in mobile operation, you should charge it every 24 hours. It is recommended that you charge the CardioMessenger before you use it for ... -
Page 34: How Do I Turn Off The Charging Station
However, if the battery monitor light (light 4) How Do I Turn Off the Charging Station? is off even though the CardioMessenger is The charging station can remain perma- in the charging station, there might be a nently connected. This ensures that your problem. -
Page 35: How Do I Resolve Problems
How Do I Resolve Problems? Solutions – Check if the charging station is connected to the power supply and if Problems with your CardioMessenger are the cables from the charging station to easy to identify, and they are ususally easy the telephone wall outlet are loose. -
Page 36: Light 4
the system at the patient’s home may If light 4 is still off, inform your physician require installation of adapters and/or so that the device can be checked and the analog phone lines. Please contact your battery may be exchanged. telephone service provider for informa- Note: If you take the CardioMessenger ... -
Page 37: How Do I Reset The Cardiomessenger
How Do I Reset the CardioMessenger? You should reset your CardioMessenger by restarting it when light 3 is lit continuously in yellow and if this error could not be elimi- nated by turning the CardioMessenger off and on. The reset button is located on the back of the CardioMessenger, on the left towards the lower end of the belt clip. -
Page 38: How Do I Take Care Of The Cardiomessenger
Handle the CardioMessenger with care, so room temperature, since the resulting that you will be able to use it for a long time condensed water may harm the elec- and so that BIOTRONIK can guarantee its tronic circuit. proper operation: Return the CardioMessenger to your 2 Keep the CardioMessenger clean and physician if it no longer works. -
Page 39: How Do I Carry The Cardiomessenger
Note: Before use, make sure the Note: When authorized personnel change CardioMessenger, charging station, the battery, they should also check the power supply and cable are not visibly button cell. damaged. If you find damage, consult In particular, rechargeable lithium ion your physician. - Page 40 The carrying strap has a clip attached. Take the carrying strap and reattach the clip of the carrying strap. To do so, slide the clip upwards toward the antenna until the clip snaps in. Warning! When you use the clip with the carrying strap, make sure that ...
-
Page 41: Safety Precautions - What Should I Watch
Safety Precautions – What Should I Watch out For? The CardioMessenger and its components Warning! To avoid interference, maintain are medical devices and therefore comply a minimum distance of 20 centimeters with strict requirements for their develop- (7 inches) between the CardioMessenger ment, manufacture and testing. - Page 42 Warning! Keep the sealing plugs of the – Intensive light sources telephone inlet out of the reach of (direct sunlight, strong halogen emitters) children. - Solvents, acids, detergents, and lyes Warning! Arrange power and telephone Caution! Never use the CardioMessenger cables carefully to reduce the risk of if it has been damaged;...
-
Page 43: Guidelines
Although this transceiver has The CardioMessenger uses a GSM modem been approved by the Federal Communica- that connects to the mobile cellular tions Commission, there is no guarantee telephone service at 850/1900 MHz. BIOTRONIK uses the modem according to... -
Page 44: Fcc Rf Exposure Requirements
Underwriters Laboratories Inc. with RF exposure guidelines when used with respect to electric shock, fire, and mechan- BIOTRONIK accessories supplied or ical hazards only in accordance with UL designated for this product. Use of other 60601-1 and CAN/CSA-C22.2 No 601.1-M90. -
Page 45: Canada
4708A-CMII. the frequencies of 850/1900 MHz. The cable modem in the charging station is BIOTRONIK uses the modem in accordance registered at Industry Canada. Depending with the manufacturer’s specifications and on the embedded cable modem type the... -
Page 46: Electromagnetic Compatibility
Note: The CardioMessenger is protected The CardioMessenger and all original from disturbances resulting from components by BIOTRONIK are not subject electromagnetic interference, electro- to warranty when used improperly or stored static discharges, and other sources – and transported incorrectly. Use only the including interference induced by cables. -
Page 47: Technical Data
Technical Data 2 Altitude: Sea level up to 3000 m General (10,000 feet) 2 Class of protection: II 2 Operating mode: Continuous operation Shipping and storage 2 Temperature: Permissible Environmental Conditions -20°C (-4°F) to +60°C (140°F) During operation 2 Temperature: 2 Store in a dry place!... -
Page 48: Cardiomessenger Charging Station
2 Interfaces: CardioMessenger Charging Station Serial infrared port and IrDA1.0 standard 2 Dimensions (WxHxD): 90 x 82 x 105 mm 2 MedRadio: Modulation FSK 2 Input voltage: 6 V DC / 1 A 2 MedRadio frequencies: 2 Output voltage: 5.2 V DC / 1 A 402 –... -
Page 49: Rechargeable Battery (Integrated)
Rechargeable Battery (Integrated) 2 Type: Lithium ions (CGA 103460A) 2 Dimensions (WxHxD): approx. 36.5 x 64.5 x 12 mm 2 Operating voltage: 3.6 V (nominal) 2 Charging voltage: 4.1 V DC 2 Max. charging current: 2 A 2 Capacity: 1850 mAh or more Power Supply 2 Type: FW 7555M/06 2 Dimensions: 51.5 x 87.5 x 34 mm... -
Page 50: Appendix
Appendix Electromagnetic emitted interference according to IEC 60601-1-2 The CardioMessenger is suitable for operation in the indicated electromagnetic environment. The customer and/or operator of the CardioMessenger should make sure that it is used in an electromagnetic environment as described below. Measuring the interference Compliance Guidelines for the Electromagnetic Environment... -
Page 51: Electromagnetic Emitted Interference According To Iec 60601-1-2
Electromagnetic emitted interference according to IEC 60601-1-2 The CardioMessenger is suitable for operation in the indicated electromagnetic environment. The customer and/or operator of the CardioMessenger should make sure that it is used in an electromagnetic environment as described below. Testing resistance ... - Page 52 a. Field strengths from fixed transmitters, such as base stations for radio (cellular(/cordless) telephones and land mobile radios, amateur radio, AM and FM radio broadcast and TV broadcast cannot be predicted theoretically with accuracy. To assess the electromagnetic environment due to fixed RF transmitters, an electromagnetic site survey should be considered. If the measured field strength in the location in which the CardioMessenger is used exceeds the applicable RF compliance level above, the Cardio- Messenger should be observed to verify normal operation.
-
Page 53: Electromagnetic Emitted Interference According To Iec 60601-1-2
Electromagnetic emitted interference according to IEC 60601-1-2 The CardioMessenger is suitable for operation in the indicated electromagnetic environment. The customer and/or operator of the CardioMessenger should make sure that it is used in an electromagnetic environment as described below. Checking... - Page 54 Checking Test level according to Conformance level Guidelines for the electromagnetic environment immunity to noise IEC 60601-1-2 ‹ Voltage dips, brief 5% U for 1/2 cycle Same as the The quality of the supply voltage should correspond to ›...
-
Page 55: And Mobile Rf Communications Equipment And The Cardiomessenger
Recommended separation distances between portable and mobile RF communications equipment and the CardioMessenger Transmission 150 kHz to 80 MHz 80 MHz to 800 MHz 800 MHz to 2.5 GHz frequency Equation D= 1,17 D= 1,17 D= 2,34 Rated power Safe distance (m) Safe distance (m) Safe distance (m) - Page 56 © BIOTRONIK SE & Co. KG All rights reserved. Specifications subject to modification, revision and improvement. ® CardioMessenger is a registered trademark of BIOTRONIK SE & Co. KG. BIOTRONIK SE & Co. KG Woermannkehre 1 12359 Berlin · Germany Tel +49 (0) 30 68905-0...
Need help?
Do you have a question about the CardioMessenger II-LLT and is the answer not in the manual?
Questions and answers