Table of Contents
Advertisement
Quick Links
Today's Weather 24 Hour Forecaster
Get actual current temperatures and predict the weather
conditions for the next 24 hours as well as your local television
weatherperson! Taylor uses the temperature and changes in
relative humidity levels to forecast the upcoming day. Plan the
day with confidence with Taylor
Please read this instruction manual carefully before use and
keep these instructions handy.
1
To Power and Set Up the Weather Forecaster
Battery Power
2 AAA alkaline for base unit
2 AAA lithium for remote sensor
Remove the battery compartment cover on the back of the
base unit. Install 2 AAA batteries according to the polarity
markings in the compartment.
Replace the cover.
*Important:
the remote sensor batteries, for proper signal connection.
Instruction Manual
Install the base unit batteries first, before installing
Today's Weather.
®
.
(not included)
(recommended, not included)
1381
.
1
Advertisement
Table of Contents

Related Manuals for Taylor 1381


Summary of Contents for Taylor 1381
- Page 1 Get actual current temperatures and predict the weather conditions for the next 24 hours as well as your local television weatherperson! Taylor uses the temperature and changes in relative humidity levels to forecast the upcoming day. Plan the day with confidence with Taylor Today’s Weather.
- Page 2 Set Current Weather Conditions 1. After battery installation, the current weather icon flashes. 2. Press “Up” or “Down” to select the weather icon you believe most closely reflects the current conditions in your area. (Partly Cloudy is the default setting). 3.
- Page 3 4.The selected weather icon appears on all screens. (The temperature and forecast readings update after remote sensor is added.) Install Batteries into Remote Sensor *Important: Install the remote sensor batteries after installing the base unit batteries for proper signal connection. Remote sensor –...
-
Page 4: Set Up Remote Sensor
Set Up Remote Sensor 1. After installing the batteries into the base unit and the remote sensor, place the units close together for best setup connection. 2. Press the “SYNC” button on the back of the base unit to send a transmission signal to the remote sensor. - Page 5 Only the current temperature will update during first 6 hours Temperature forecasts and weather icons stay identical while analyzing 1st forecast. 5. When the units begin to forecast weather conditions, all tem- perature and weather screens will update with new forecasts. Temperature and Weather forecasts update 6.
-
Page 6: Additional Features
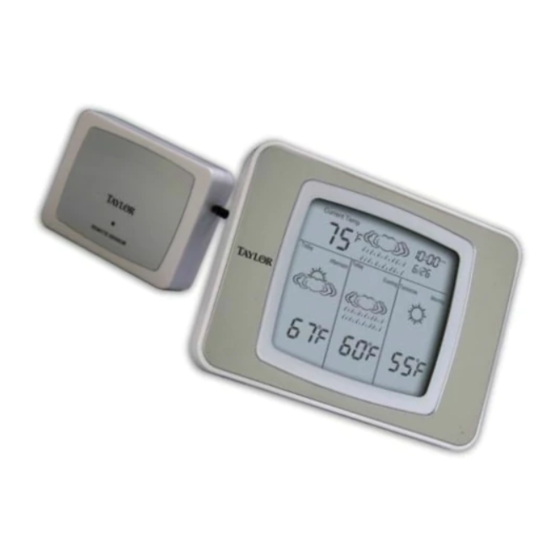
To Set Clock and Date 1. Press and hold “TIME/DATE” for 2 seconds, then release. 2. Press “UP” or “DOWN” to change the hours. Press “TIME/DATE”. 3. Press “UP” or “DOWN” to change the minutes. Press “TIME/DATE”. 4. Press “UP” or “DOWN” to switch between a 12 or 24 hour clock. Press “TIME/DATE”. - Page 7 Remote sensor – replace both batteries when the “ ” icon appears on the left side of the screen. To Read the Weather Forecaster (1) Current outdoor temperature (2) Transmission signal icon (3) Remote sensor low battery indicator (4) Current weather condition icon (5) Clock/Date (6) Base unit low battery indicator (7) 3 forecast displays over 24 hours:...
- Page 8 Tips Setup: Place the base unit as close as possible to the remote sensor dur- ing setup. This will ensure the best reception of signals as you set up your wireless forecaster. Location: Position the base unit and remote sensor within the effective transmission range of 100 feet (30 meters).
-
Page 9: Problem Solving
Batteries: Lithium batteries are recommended for the remote sensor, since alkaline batteries may freeze or otherwise become damaged in extreme temperatures. The sensor will function with alkaline batteries, but are best suited for milder climates. (See Specifications.) Problem Solving 1. If the LCD readout is faint, replace the batteries. 2. - Page 10 Over- or under- temperature range displays: If the temperature is outside the unit’s temperature range of -4°F to 158°F / -20°C to 70°C (with use of lithium batteries), the LCD will show “HH” (higher than the temperaturerange) or “LL” (lower than the temperature range).
- Page 11 television reception, which can be determined by turning the equipment off and on, the user is encouraged to try to correct the interference by one or more of the following measures: --Reorient or relocate the receiving antenna. --Increase the separation between the equipment and receiver. Modifications not authorized by the manufacturer may void user’s authority to operate this device.
-
Page 12: Specifications
For additional product information, or warranty information in Canada or elsewhere outside the USA, please contact us through www.taylorusa.com. Made to our exact specifications in China. © 2011 Taylor Precision Products and its affiliated companies, all rights reserved.
Need help?
Do you have a question about the 1381 and is the answer not in the manual?
Questions and answers