
Related Manuals for Taylor Leading the Way in Accuracy 1458


Summary of Contents for Taylor Leading the Way in Accuracy 1458
- Page 1 1458 Digital Wireless Weather System Thermometer, Hygrometer and Heat Index with Remote Sensor Leading the Way in Accuracy™ Instruction Manual...
-
Page 2: Description Of Parts
Congratulations on your purchase of the Taylor® Digital Wireless Weather System: Thermometer & Hygrometer with Remote Sensor. This state-of-the art measurement instrument is engineered and designed to meet the highest quality standards…to assure you uncompromising accuracy and consistently dependable, convenient performance. -
Page 3: Lcd Display
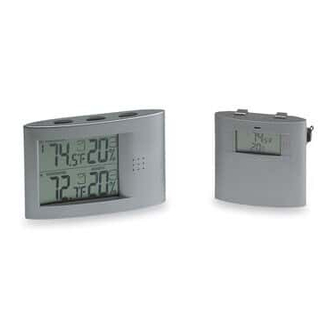
Main Features & How to Access Functions 1 - LCD Display Receiver unit displays the temperature, humidity and heat index readings of up to three remote sensors (with additional remote unit purchases - see How To Set Up Your Wireless Thermometer section of this manual) and indoor temperature and humidity at its location. - Page 4 Main Features (continued) 6 - Clear Button (Receiver Unit) To delete Max/Min Memory record, press while the respective values are displayed on the readout. 7 - F°/C° Button (Remote Unit) Press to select F° or C° temperature scale. Note: Temperature scale selected on receiver unit will control what is displayed.
-
Page 5: Display Information
Display Information (Receiver Unit) Current temperature / measurement Max / Min scale, humidity and heat index at Memory Mode remote location of icon selected channel TEMPERATURE MAX MIN Channel icon Temp Trend/ Humidity Indoor Trend graphs TEMPERATURE MAX MIN HUMIDITY icon Battery indicator icon... - Page 6 How To Set Up Your Wireless Thermometer • Place the receiver unit as close as possible to the remote unit. This will ensure easy synchron- ization between the transmission and reception of signals as you set up your wireless thermometer. After set up is completed, position the receiver unit and remote unit within effective transmission range which, in usual circumstances, is 100 feet.
- Page 7 Battery Installation For the initial installation, insert the batteries into the receiver unit first, then the remote unit: Receiver 1. Lift off the battery compartment cover, located on the back of the unit. 2. Insert 2 AA alkaline batteries as indicated by the polarity symbols marked inside the battery compartment.
- Page 8 (continued) Battery Installation CHANNEL 1 2 3 °F/°C Remote 1. Lift off the bracket stand, located on the back of the unit, to access the battery compartment cover. 2. Remove the 4 screws that secure the battery compartment cover and then remove the cover.
- Page 9 (continued) Battery Installation Important: When the temperature falls below freezing point, the batteries of outdoor units may freeze, lowering their voltage supply and effective range. Use Lithium batteries to insure operation below 10°F (-12° C). Press the F/C button to select the desired temperature measurement scale.
- Page 10 How to Read Temperatures and Other Displays (continued) •The bottom half of the receiver display will show indoor temperature and humidity at its location. •The Temp Trend/Humidity Trend graphs on top & bottom of the receiver unit display show an Up symbol when the temperature increases more than 1 degree (humidity 3%), a Steady symbol when temperature change is less than 1 degree...
-
Page 11: Troubleshooting
(continued) Battery Replacement • When the batteries on the receiver unit or the remote unit are low, the Low Battery Indicator icon will light up on the relevant displays. Follow the steps for Battery Installation in the How To Set Up Your Wireless Thermometer section of this manual. - Page 12 Trouble-Shooting (continued) Disconnected Signals (continued) Note: This equipment has been tested and found to comply with the limits for a Class B digital device, pursuant to Part 15 of the FCC Rules. These limits are designed to provide reasonable protection against harmful interference in a residential installation.
-
Page 13: Transmission Collision
Trouble-Shooting (continued) Transmission Collision Signals from other household devices, such as doorbells, home security systems and entry controls, may interfere. This is normal and does not affect the general performance of this product. The transmission will resume once the interference recedes. Precautions This Wireless Thermometer &... -
Page 14: Specifications
Specifications Range of temperature measurement: Receiver unit (indoor only): 32°F to 122°F (0°C to 50°C) Remote unit: -4°F to 140°F (-20°C to 60°C)* Using Sensor Probe Cable: -58°F to 158ºF (-50°C to 70ºC)** Humidity Range (1459 Only): 20% to 99% (if humidity drops below 20% the humidity display will stay at the last reading until the humidity rises within the mentioned range) - Page 15 Please pack the item carefully and return it prepaid, along with store receipt showing date of purchase and a note explaining reason for return to: Taylor Precision Products 2220 Entrada Del Sol Las Cruces, New Mexico 88001 www.taylorusa.com There are no express warranties except as listed above.
- Page 16 Made to our exact specifications in China. © 2005 Taylor Precision Group, LLC and its affiliated companies, all rights reserved. Taylor is a registered trademark of Taylor Precision Products Group, LLC and its affiliated companies. CP1458-7.05...
Need help?
Do you have a question about the Leading the Way in Accuracy 1458 and is the answer not in the manual?
Questions and answers