Table of Contents
Advertisement
Advertisement
Table of Contents

Related Manuals for Taylor 1528


Summary of Contents for Taylor 1528
- Page 1 1528 Instruction Manual WeatherGuide System with Remote Sensor ™ MOON PHASE...
-
Page 2: Table Of Contents
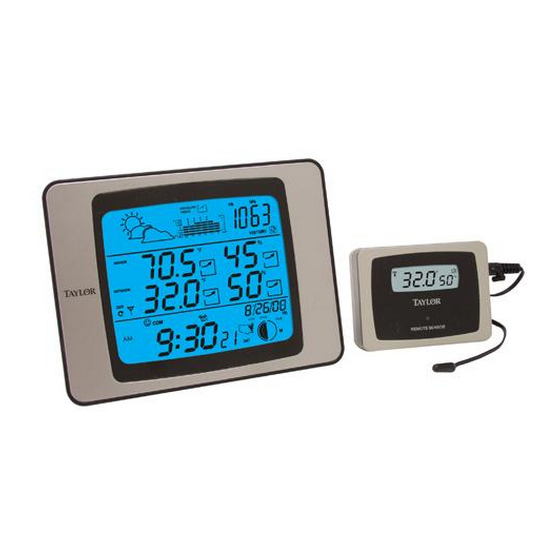
Table of Contents Welcome to theTaylor WeatherGuide System. Simple, reliable, ® accurate…it allows you to monitor indoor or outdoor locations from one room. The base unit reads indoor conditions, while the remote sensor wirelessly reports outdoor weather conditions back to the base unit for an all-in-one weather display. - Page 3 To Power your WeatherGuide ™ How to Set up Your WeatherGuide System ™ Base Unit Your WeatherGuide™ base unit may be powered by either an AC adaptor (included) or 2 AAA batteries (not included). Adaptor power – insert the connector end of the adaptor into the jack on the side of the base unit.
- Page 4 If the transmission is successful, the remote sensor readings and a “ ” icon will appear on the base unit. If dashes are still displayed on the receiver unit, press the Tx button Transmission successful again. To change the remote sensor’s tempera- ture display to Celsius, press the “+C/F”...
- Page 5 A maximum of 3 remote sensor units can be registered. One remote sensor is included.To purchase additional Remote Sensors (Taylor model 1536), please visit www.partshelf.com.
-
Page 6: Atomic Clock
Atomic Clock and Calendar Your WeatherGuide™ has a radio-controlled clock/calendar that sets itself to the radio signal transmitted by the U.S.Atomic Clock located in Colorado.To synchronize the atomic clock: 1. Press and hold the “-PMCE/RCC” button on the back of the base unit.The unit will beep.The antenna icon will Press and hold -PMCE/RCC to... - Page 7 How to Set the Clock Manually To manually set the clock: Press and hold SET/AL to start clock setting 1. Press and hold the “SET/AL” button. The unit will beep. 2. Press “+C/F” or “-PMCE/RCC” to set the seconds to zero. Press “SET/AL”...
- Page 8 How to Set the Alarm Press SET/AL after choosing 12/24 hour time. Tip: Hold down “+C/F” “-PMCE/RCC” buttons to advance the dig- its quickly. Clock is set Daylight Savings Time – to turn DST on, press “MODE” until “OFF” appears in the clock digits.
-
Page 9: Alarm
Press and hold SET/AL 2. Press and hold the “SET/AL” button.The unit will beep and the alarm’s hour digits will flash. Hour digits flash 3. Press “+C/F” or “-PMCE/RCC” to change the hours. Press “SET/AL” to enter. The minutes will flash. Press +C/F or -PMCE/RCC to change hours. -
Page 10: Snooze
To turn off the alarm: Press “MODE” until the Alarm display ap- pears. Press the “SET/AL” button. The alarm icon will disappear. The alarm is Press Mode then SET/AL to turn off alarm turned off. No alarm icon = alarm is off. Snooze feature Press the “Snooze/Light”... - Page 11 How to read your WeatherGuide™ The base unit displays indoor conditions from its location. The remote unit will transmit weather readings from its location back to the base unit. Alternately, the remote sensor’s probe cord may be used. Plug the probe cord into the rubber plug on the remote sensor.Allow the end to hang where you wish to measure temperatures (out of a window, aquariums, swimming pools, etc.)
-
Page 12: Temperature/Humidity Displays
Temperature/Humidity Readings Auto Scroll feature – the base unit can be set to automatically scroll through read- ings. To activate Auto Scroll, press the Auto scroll will toggle between “Channel” button on the back of the base different remote sensor readings unit until the auto scroll symbol appears on the LCD. - Page 13 To View Minimum/Maximum temperature/humidity readings Your WeatherGuide™ will store the last Current readings recorded high and low temperatures and humidity over a 24 hour period.The 24 hour period starts when the batteries are in- stalled. 1. Press the “Min/Max” button once to see Press MIN/MAX to see high and low daily temperature &...
- Page 14 Barometric Pressure Readings Barometric pressure refers to the pressure exerted by the atmosphere at a given altitude. It may be expressed in either millibars (mb)/hectopascals (hPa), or inches of mercury (inHg). A rising or falling barometric pressure reading indicates the likelihood of fair or poor weather conditions.
-
Page 15: Barometric Pressure
For the most accurate barometric pressure readings, you should program your current Altitude into your WeatherGuide™. If the current altitude is unknown, one reference Press and hold History to start altitude setting. for altitude maps in the US is: http://www.ngdc.noaa.gov/mgg/topo/state.html. To program altitude: Pressure units. -
Page 16: Comfort Level Readings
Comfort Level Readings Temperature Trend Indicators Your WeatherGuide™ combines temperature and humidity readings to determine an indoor comfort level. If the display shows WET or DRY conditions, you may wish to adjust indoor temperature or humidity conditions to reach a comfortable reading. One of these Comfort Level icons will appear above the clock display: Comfortable level, ideal range for both temperature &... -
Page 17: Weather Forecast
Humidity Trend Indicators 12-24 Hour Weather Forecast Your WeatherGuide™ will indicate if humidity levels are rising, falling, or steady. indicates Rising Humidity readings (humid- ity has gone up more than 2 degrees in an hour) indicates Steady Humidity readings indicates Falling Humidity (humidity has gone down more than 2 degrees in an hour) Humidity trending up... - Page 18 Moon Phase and Tide The Moon phase will automatically display according to the current calendar.Tide levels will display as High, Medium or Low based on the current Moon Phase. Moon phase Icons New Moon - The Moon's dark side is facing the Earth.The Moon is not visible (except during a solar eclipse).
-
Page 19: Backlight
Backlight Feature To Switch Between °F and °C Low Battery Indicator The base unit has a backlight for easy viewing of the screen. Press the “Snooze/Light” button to turn the backlight on for 3 seconds. Press SNOOZE/LIGHT for a 3 second backlight Press the “+C/F”... -
Page 20: Troubleshooting
Trouble-Shooting Disconnected Signals If the receiver unit does not receive a transmission from a remote chan- nel for 1 hour, the display will show dashes.To correct this problem: Check that the remote is properly positioned, within the appro- priate transmission range. Transmissions are vastly affected by building materials and where the receiver and remote units are positioned. -
Page 21: Transmission Collision
Problem Solving Transmission Collision Signals from other household devices, such as doorbells, home security systems and entry controls, may interfere.This is normal and does not affect the general performance of this product.The transmission will resume once the interference recedes. Note: This equipment has been tested and found to comply with the limits for a Class B digital device, pursuant to Part 15 of the FCC Rules. - Page 22 Precautions The receiver is intended for indoor use only. It is not sealed against moisture and could be damaged if used outdoors. Do not immerse the unit in water. If you spill liquid on it, dry im- mediately with a soft, lint-free cloth. Do not clean the unit with abrasive or corrosive materials.
-
Page 23: Specifications
Specifications Range of temperature measurement: Receiver unit (indoor only): 14°F to 158°F (-10°C to 70°C) Remote unit: -40°F to 158°F (-40°C to 70°C) Indoor Humidity: 20% - 99% RH Resolution: 0.1 degree for temperature, 1% for humidity Temperature/Humidity trends – rising, falling or steady Minimum/Maximum daily temperature/humidity records Weather Forecast –... - Page 24 USA, please contact us through www.taylorusa.com. Made to our exact specifications in China. © 2008 Taylor Precision Products and its affiliated companies, all rights reserved. Taylor® and Leading the Way in Accuracy® are registered trademarks of Taylor Precision Products and its affiliated companies.
Need help?
Do you have a question about the 1528 and is the answer not in the manual?
Questions and answers