Table of Contents
Advertisement
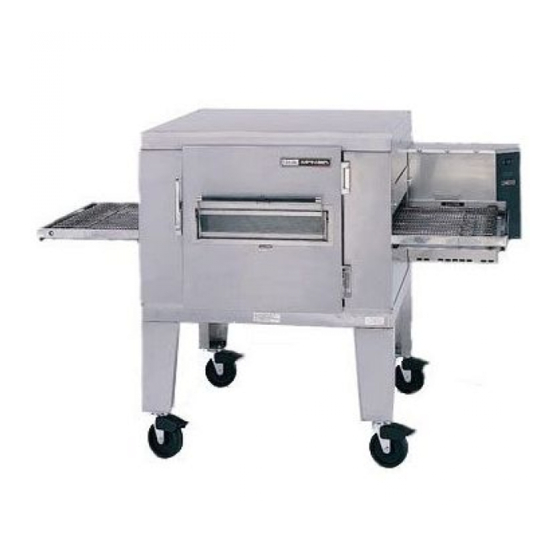
operator manual
Impinger
Conveyor Oven
®
Series 1400
This document includes:
• Safety Notices
• Specifications
• Installation Instructions
• Operating Instructions
• Cleaning Instructions
• Warranty Statement
Revision: G
P/N: 2810197
Lincoln Foodservice Products, LLC
1111 North Hadley Road
Fort Wayne, Indiana 46804
United States of America
Technical Support Hotline: (800) 678-9511
Telephone: (260) 459-8200
www.lincolnfp.com
Advertisement
Table of Contents

Subscribe to Our Youtube Channel
Related Manuals for Lincoln IMPINGER 1400


Summary of Contents for Lincoln IMPINGER 1400
- Page 1 • Installation Instructions • Operating Instructions • Cleaning Instructions • Warranty Statement Revision: G P/N: 2810197 Lincoln Foodservice Products, LLC 1111 North Hadley Road Fort Wayne, Indiana 46804 United States of America Technical Support Hotline: (800) 678-9511 Telephone: (260) 459-8200...
-
Page 2: Important Warning And Safety Information
· Obtain from your local gas provider and post in a prominent location instructions to be followed in the event gas odors are detected. · It is required that the oven be placed under a ventilation hood to provide for adequate air supply and ventilation. · Minimum clearances must be maintained from all walls and combustible materials. See “spacing requirements”... -
Page 3: Table Of Contents
PURCHASER’S RESPONSIBILITY It is the responsibility of the purchaser: 1. To see that the gas and electric services for the oven are installed on site in accordance with the manufacturers specification. 2. To unload, uncrate, and install the oven in its proper location; in accordance with this installation / operation manual. -
Page 4: Model Number Key
MODEL NUMBER KEY EXAMPLE: 1433-B00-E-K1801 14 33 - B 00 - E - K1801 Indicates change to base assembly (i.e. Natural Gas, 230V, 1 phase, 50 Hz) Oven Platform Size (i.e. Impinger I) CODE LANGUAGE English French German Italian Spanish... -
Page 5: Utility Specifications
UTILITY SPECIFICATIONS REQUIRED – ELECTRIC Model Energy Power *1421-xxx-E-Kxxx Electric 27 kW *1452-xxx-E-Kxxx Electric 27 kW *1453-xxx-E-Kxxx Electric 27 kW *1454-xxx-E-Kxxx Electric 27 kW *1455-xxx-E-Kxxx Electric 27 kW *1458-xxx-E-Kxxx Electric 27 kW UTILITY SPECIFICATIONS REQUIRED – GAS Model Energy Power *1433-xxx-E-Kxxx Nat. -
Page 6: Exterior Dimensions
EXTERIOR DIMENSIONS Impinger I – Operator Manual... -
Page 7: General Information
(4) times faster. Several factors may affect the cooking time of any special product such as: 1) oven temperature setting, 2) conveyor speed, 3) position of columnating plate in oven, and 4) adjustments of the 2 baffles on the conveyor openings. -
Page 8: Stand & Finger Assembly
(4) sides of the stand. To raise or lower the stand use the leg adjusters. Ovens on casters require a level floor. NOTE: The oven top is packed with oven stand. Remove top from stand before assembly. 4. Before installing the retaining brackets in... - Page 9 STAND AND FINGER ASSEMBLY (CONT’D) 10. Install finger in the oven by sliding it over the plenum flange and setting the front bracket. BE SURE THAT THE FINGER SETS SQUARELY OVER THE PLENUM FLANGES AND THE HOLES POINT IN THE PROPER DIRECTION.
-
Page 10: Spacing Requirements
Hood dimensions and the positioning of the hood over the oven will vary with hood manufacturers. NOTE: Lincoln can provide oven spec sheets that show the dimensions of the oven, KW or BTU ratings and other information that will be useful to both the ventilation hood supplier and the HVAC contractor. -
Page 11: Smoke Candle Test - Ventilation System Verification
3. The oven temperature must be set and operating at 550°F/288°C. TEST PROCEDURE: Note: Use Lincoln Smoke Candle #369361 (in Australia, an alternate method of coloring the air may be used). 1. Wear heat resistant gloves to prevent burns to your hands. -
Page 12: Manual Gas Valve Installation
MANUAL GAS VALVE INSTALLATION When installing the gas valve that is supplied with the oven, as shown in the drawing to the right, it is our suggestion that an elbow be placed on the oven pipe first. This will allow the flexible hose to be attached in a downward direction eliminating possible stress to the hose. -
Page 13: Restraint Requirements
PROGRAMMING (QUEST UNITS ONLY) Quest EMS Energy Management System by Lincoln Foodservice Products is a unique energy saving system designed to optimize the performance of a gas or electric powered burner focused to save 40% to 65% energy at idle conditions. Significant energy savings for accelerated impingement ovens are achieved through the complementary effects of reduced fan rpm, optimized burner or electric control settings, and reduced volume impingement air flow. -
Page 14: Functions
(ALL MODELS) INTRODUCTION – START-UP AND SUT DOWN For the operator, the panel has a power up, run, and program menu modes. To start the oven, turn the power switch on. To shut down the oven, turn the power switch off. -
Page 15: Conveyor Installation
4. Reassemble fingers in reverse order with the step of the columnating plate facing downward so it fits under the lip of the finger housing. 5. Re-install finger in oven. Be sure that they are fully seated over the plenum flanges and the holes are pointing toward the conveyor. -
Page 16: Operator Maintenance
3. Clean the interior by sweeping up all loose particles, then wash with a mild detergent solution and rinse with clean water. 4. Clean the conveyor belt by wiping with a clean cloth or brushing with a soft wire brush. Lincoln catalog #369217. -
Page 17: Preventive Maintenance
If the oven fails to operate, check the circuit breaker to be sure it is turned on (on a gas oven check the manual gas valve to insure it is in the ON position) and check the fuses on the back of the oven to be sure they are good before you call the Authorized Service Agency. -
Page 18: Appendix A - Label Definitions
APPENDIX A – LABEL DEFINITIONS CAUTION – HOT SURFACE CLOCK, TIME SWITCH, TIMER TRANSFORMER DANGEROUS VOLTAGE EQUIPOTENTIALITY GROUND PROTECTIVE EARTH GROUND EARTH GROUND CHANGE FUSES FUSE POWER OFF POWER ON DISCONNECT POWER TEMPERATURE, HEAT CONVEYOR BURNER HEAT CYCLE READY, TIMER INDICATOR RESET HIGH TEMPERATURE, HEAT Impinger I –... - Page 19 APPENDIX A – LABEL DEFINITIONS (CONT’D) AMPS VOLTS KILOWATTS / HR TYPE OF GAS ½ COOK TIME Impinger I – Operator Manual SERVICE ACCESSIBILITY, PROVIDE MINIMUM REAR AND SIDE CLEARANCE ORIFICE – MAIN ORIFICE – LOW FIRE MODEL SERIES 1400 NOTE: TO REVERSE DIRECTION OF CONVEYOR SWITCH...
-
Page 20: Warranty Statement
(ii) at Lincoln’s option, the refund of the amount paid for said equipment or services. Any breach by Lincoln with respect to any item or unit of equipment or services shall be deemed a breach with respect to that item or unit or service only... - Page 21 This page intentionally left blank. Impinger I – Operator Manual...
- Page 22 This page intentionally left blank. Impinger I – Operator Manual...
- Page 23 This page intentionally left blank. Impinger I – Operator Manual...
- Page 24 Impinger I – Operator Manual...
Need help?
Do you have a question about the IMPINGER 1400 and is the answer not in the manual?
Questions and answers