Advertisement
Quick Links
Download this manual
See also:
User Manual
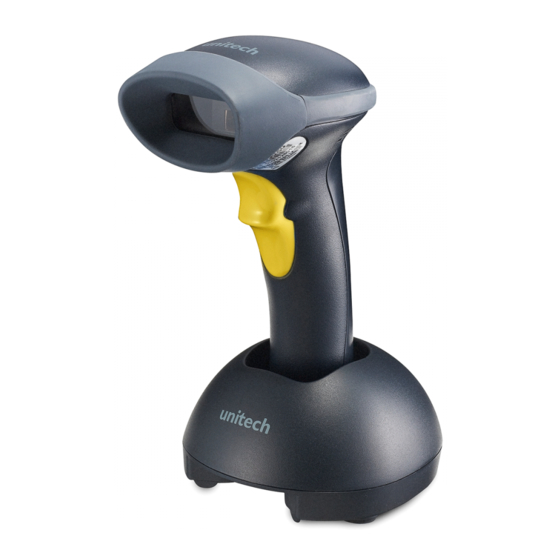
MS842P
Quick Start Guide
The Unitech MS842P Wireless Scanner
Installation Instructions & Popular Configuration Barcodes
Scan Dongle
Step 3:
Scan the barcode on the USB Dongle.
SETTINGS AND CONFIGURATION
The following section covers the most common
configuration settings for your MS842P scanner.
For additional configuration options please visit
unitechscanners.com/MS842P and select the
"Download" tab. You will find the User's Manual and a
variety of other resources.
SETUP AND INSTALLATION
The following steps will walk you through the installation process.
Connect dongle to host
Step 4:
Plug the USB Dongle to a free USB port of a host computer. The
MS842P is now ready to use.
Flash Mode
Flash Mode
Scan here to switch to Flash Mode from the default Trigger Mode. In
Flash mode, the MS842P will function automatically. It will scan at a
set interval.
Power On
Step 1:
Switch the power button to the on position.
Test & Finish
Open a word processing program such as Microsoft Word or
Notepad on your host. Now scan the following barcode:
If the word "Unitech" appears on the screen you have succesfully
installed your scanner. Congratulations!
Trigger Mode
Manual Trigger
Scan here to switch back to Trigger Mode. In Trigger Mode, the
MS842P will scan only when the scanner button is pressed.
ChargE
Step 2:
Connect the power supply cable to the bottom of the MS842P and to
an electrical outlet. Charge for at least 5 hours.
Tab Mode
Tab Mode
You may wish to set your scanner to "Tab Mode." In this mode, data
will tab over to the next column as you scan instead of jumping to
the next line. Scan here to switch to Tab Mode from the default Enter
Mode.
Advertisement

Related Manuals for Unitech MS842P


Summary of Contents for Unitech MS842P
-
Page 1: Quick Start Guide
The Unitech MS842P Wireless Scanner Switch the power button to the on position. Connect the power supply cable to the bottom of the MS842P and to Installation Instructions & Popular Configuration Barcodes an electrical outlet. Charge for at least 5 hours. - Page 2 How can we help you? How can we help you? The MS842P is a plug-and-play wireless laser scanner. It does not require a driver and should be recognized as a generic HID device by your computer, similar to a standard keyboard. This allows you to scan into any field that you could normally type into.
Need help?
Do you have a question about the MS842P and is the answer not in the manual?
Questions and answers