Table of Contents
Advertisement
Quick Links
KA_TechniStar S1_International_2233660001900_EN:TECHNISTAR S1 22/12/2010 11:52 Página 1
Instruction manual
TechniStar S1
TechniStar S1
Digital HD Receiver
With CONAX card reader and a
PCMCIA interface for reception via CI / CI+ modules
and DVR recording function via USB interface.
For reception of free-to-air and encrypted
(e.g. VIACCESS, CONAX, IRDETO, SECA etc.)
HD satellite channels.
DiSEqC
1.2
Advertisement
Table of Contents

Related Manuals for TechniSat S1


Summary of Contents for TechniSat S1
- Page 1 KA_TechniStar S1_International_2233660001900_EN:TECHNISTAR S1 22/12/2010 11:52 Página 1 Instruction manual TechniStar S1 TechniStar S1 Digital HD Receiver With CONAX card reader and a PCMCIA interface for reception via CI / CI+ modules and DVR recording function via USB interface. For reception of free-to-air and encrypted (e.g.
-
Page 2: Table Of Contents
KA_TechniStar S1_International_2233660001900_EN:TECHNISTAR S1 22/12/2010 11:52 Página 2 1 Contents 1 Contents ..........2 2 Safety advice . - Page 3 KA_TechniStar S1_International_2233660001900_EN:TECHNISTAR S1 22/12/2010 11:52 Página 3 6.5.4.1 LNB type ............18 6.5.4.2 User LNB .
- Page 4 KA_TechniStar S1_International_2233660001900_EN:TECHNISTAR S1 22/12/2010 11:52 Página 4 7.11 Switching between TV/radio ..........29 7.12 Transponder information .
- Page 5 KA_TechniStar S1_International_2233660001900_EN:TECHNISTAR S1 22/12/2010 11:52 Página 5 7.20.5 Slideshow ............39 7.20.5.1 Starting a Slideshow .
-
Page 6: Technical Specifications
KA_TechniStar S1_International_2233660001900_EN:TECHNISTAR S1 22/12/2010 11:52 Página 6 8.4.2.6 Preview ............49 8.4.2.7 Deleting . -
Page 7: Safety Advice
KA_TechniStar S1_International_2233660001900_EN:TECHNISTAR S1 22/12/2010 11:52 Página 7 HDMI, the HDMI-Logo and High Definition Multimedia Interface are trademarks or registered trademarks of HDMI Licensing LLC. Manufactured under license from Dolby Laboratories. “Dolby” and the double-D symbol are trademarks of Dolby Laboratories. -
Page 8: Periods Of Non-Use
KA_TechniStar S1_International_2233660001900_EN:TECHNISTAR S1 22/12/2010 11:52 Página 8 Do not open the receiver housing under any circumstances! You risk receiving an electric shock. Any necessary repairs to the receiver should only be carried out by qualified service personnel. In the following circumstances you should disconnect the receiver from the mains power and consult an expert: >... -
Page 9: Important Notes On Operation
Before handing your receiver over to your supplier for maintenance purposes, we recommend that you remove all storage media or data carriers. Restoring data is not part of maintenance or repair work. TechniSat accepts no responsibility for the loss of or damage to data during repair work. -
Page 10: Illustrations
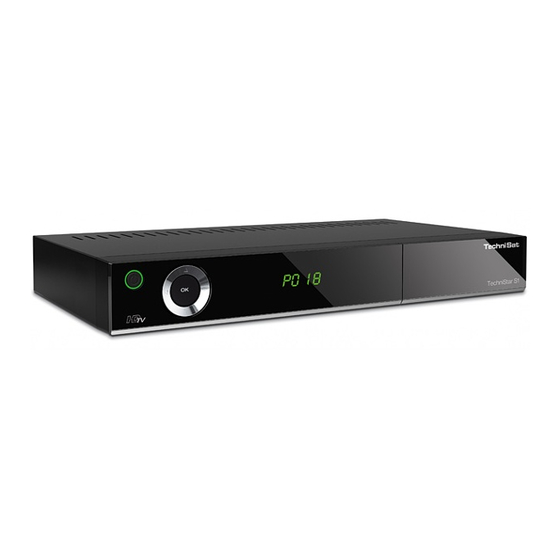
KA_TechniStar S1_International_2233660001900_EN:TECHNISTAR S1 22/12/2010 11:52 Página 10 3 Illustrations Front of receiver CI module slot On/Stand-by Arrow keys LED display Card reader: > Insert the CONAX smartcard into the card reader (gold chip facing down and at the front as you insert) and push it in as far as it will go. -
Page 11: Remote Control
Remote control option: by switching on the remote control option, two receivers and one TechniSat TV with the same coding can be operated using this remote control. > To set the remote control option, press the buttons you want (SAT1, SAT2 or TV) and OK all at the... -
Page 12: Connecting The Dvb Receiver
KA_TechniStar S1_International_2233660001900_EN:TECHNISTAR S1 22/12/2010 11:52 Página 12 4 Connecting the DVB receiver Mains connection Connecting the LNB to the LNB input on the DVB receiver. HDMI connection between the DVB receiver and the TV. Scart connection between the DVB receiver and the TV. -
Page 13: Mains Power Connection
KA_TechniStar S1_International_2233660001900_EN:TECHNISTAR S1 22/12/2010 11:52 Página 13 The following references (a b c etc.) relate to the illustration on the previous page 10. 4.1 Mains power connection The digital receiver should only be connected to the mains power supply once you have finished making all the connections to the various other components. -
Page 14: Usb Port
You can use the network port to connect the receiver to your existing network. This enables you to use the TechniSat Mediaport to copy DVR recordings and MPEG, MP3 and JPG files to your PC. Furthermore, you can use the MPEG, MP3 and JPG playback functions to access MPEG, MP3 and JPG files that are stored and shared on drives connected to the network. -
Page 15: Settings
KA_TechniStar S1_International_2233660001900_EN:TECHNISTAR S1 22/12/2010 11:52 Página 15 When you start the search using the green function key, an automatic search runs. > This will scan all the satellites set up in the antenna configuration for channels. This procedure may take several minutes. Please note all messages displayed on screen. -
Page 16: Stand-By Clock
KA_TechniStar S1_International_2233660001900_EN:TECHNISTAR S1 22/12/2010 11:52 Página 16 6.2.4 Stand-by clock In this item you can decide whether the current time is to be shown in the display while the receiver is in stand-by mode. The power consumed in stand-by mode is reduced when the stand-by clock is switched off. -
Page 17: Subtitle Language
KA_TechniStar S1_International_2233660001900_EN:TECHNISTAR S1 22/12/2010 11:52 Página 17 6.4.2 Subtitle language You can display teletext and DVB subtitles on your DVB receiver. As long as the language defined is being broadcast, these will be automatically displayed. If no subtitle language has been selected or there is no broadcast in the selected language, subtitles can be manually switched on. -
Page 18: Additional Settings/Lnb Properties
KA_TechniStar S1_International_2233660001900_EN:TECHNISTAR S1 22/12/2010 11:52 Página 18 6.5.4 Additional settings/LNB properties After you have set your DVB receiver’s switching matrix to your receiving device, you still need to check and, if necessary, correct the LNB settings for your receiving device. -
Page 19: Test Transponder
KA_TechniStar S1_International_2233660001900_EN:TECHNISTAR S1 22/12/2010 11:52 Página 19 > Use the numeric keys to enter one of the frequencies found in the Frequency field. > When using a SatCR LNB with PIN support, use the numeric keys to enter the PIN for the frequency in the PIN code field. -
Page 20: Automatic Broadcaster Tagging
KA_TechniStar S1_International_2233660001900_EN:TECHNISTAR S1 22/12/2010 11:52 Página 20 6.6.2.1 Automatic broadcaster tagging This function can be used when recording to a hard drive (DVR recording), to automatically add tags to the recording wherever there is a change of programme during a recording. -
Page 21: Wlan Network Settings
KA_TechniStar S1_International_2233660001900_EN:TECHNISTAR S1 22/12/2010 11:52 Página 21 6.6.4.2 IP address If the DHCP function is set to Static or DHCP server, the IP address must be configured manually. > Use the numeric keys to enter the corresponding digits. 6.6.4.3 Subnet mask You need to configure the subnet mask manually if the DHCP function has been set to Static. -
Page 22: Tcp/Ip - Settings
KA_TechniStar S1_International_2233660001900_EN:TECHNISTAR S1 22/12/2010 11:52 Página 22 > The remote control keys and/or displayed keyboard offer the following functions. Arrow keys: Move the highlight on the keyboard. The highlighted character is added behind the character highlighted in blue, or the function highlighted on the keyboard is run. -
Page 23: Exiting Wlan Network Settings
KA_TechniStar S1_International_2233660001900_EN:TECHNISTAR S1 22/12/2010 11:52 Página 23 6.6.5.3.2 IP address If the DHCP function is set to Static or DHCP server, the IP address must be configured manually. > Use the numeric keys to enter the corresponding digits. 6.6.5.3.3 Subnet mask You need to configure the subnet mask manually if the DHCP function has been set to Static. -
Page 24: Port Number
KA_TechniStar S1_International_2233660001900_EN:TECHNISTAR S1 22/12/2010 11:52 Página 24 6.6.6.2 Port number Entering the port number enables you to create settings between the receiver and an existing router or firewall. > Switch on Remote access and use the up/down arrow keys to highlight the Port number item. -
Page 25: Operating The Unit
KA_TechniStar S1_International_2233660001900_EN:TECHNISTAR S1 22/12/2010 11:52 Página 25 7 Operating the unit 7.1 Switching on > Switch the digital receiver on by pressing the On/Stand-by button either on the receiver panel or on the remote control. 7.2 Selecting the user If the user-dependent parental control (children’s viewing time account) is activated, the user profile selection screen appears after switching on. -
Page 26: Using The Navigator (Channel List)
KA_TechniStar S1_International_2233660001900_EN:TECHNISTAR S1 22/12/2010 11:52 Página 26 When entering channel numbers with several digits, you have approx. three seconds after pressing a key to complete the entry. If you wish to enter a number consisting of only one, two or three digits, you can speed up the entry procedure by keeping the key depressed a little longer on the last digit. -
Page 27: Calling Up Blocked Channels
KA_TechniStar S1_International_2233660001900_EN:TECHNISTAR S1 22/12/2010 11:52 Página 27 7.4.4 Calling up blocked channels If a channel is selected that is blocked by the parental control function, the message Unit PIN will be displayed on the screen. > Use the numeric keys to enter your PIN code. -
Page 28: Receiving Encrypted Channels
KA_TechniStar S1_International_2233660001900_EN:TECHNISTAR S1 22/12/2010 11:52 Página 28 > Extended information text can be moved line by line using the up/down arrow keys or scrolled through page by page using the left/right arrow keys. > Where available, pressing the Info key again will bring up the next programme. -
Page 29: Selecting A Different Language
KA_TechniStar S1_International_2233660001900_EN:TECHNISTAR S1 22/12/2010 11:52 Página 29 7.10 Selecting a different language If a programme is broadcast in multiple languages or with multiple sound channels, this is indicated in a message. You can then set a different language or another audio channel as follows: >... -
Page 30: Freeze Frame
KA_TechniStar S1_International_2233660001900_EN:TECHNISTAR S1 22/12/2010 11:52 Página 30 > In addition, you can use the coloured function keys to display Audio/Video information, channel information and, where available, information on the Encryption system (CA) in use. > Press the Menu key to exit the information function. -
Page 31: Exiting Teletext
KA_TechniStar S1_International_2233660001900_EN:TECHNISTAR S1 22/12/2010 11:52 Página 31 7.14.4 Exiting teletext > Press the Back key to return to normal operating mode. 7.14.5 Subtitles Where subtitles are broadcast, this will be indicated by the message. If you have switched on the subtitles function, these will be displayed automatically, provided that they are being broadcast in the language selected. -
Page 32: Acquiring The Epg/Sfi Data
KA_TechniStar S1_International_2233660001900_EN:TECHNISTAR S1 22/12/2010 11:52 Página 32 7.15.1 Acquiring the EPG/SFI data The channel information is updated by your receiver at the preset update time. The receiver must be in stand-by mode for this to be executed. If your receiver is being used at this time, the function will not be executed. -
Page 33: Epg/Sfi Information
KA_TechniStar S1_International_2233660001900_EN:TECHNISTAR S1 22/12/2010 11:52 Página 33 The individual days of the week are displayed along the bottom of the screen. If information is available for subsequent days, the appropriate fields will be highlighted. > To view a preview for a specific day, use the numeric keys to enter the appropriate number for the weekday required. -
Page 34: Epg/Sfi Overview By Programme Type (Genre)
KA_TechniStar S1_International_2233660001900_EN:TECHNISTAR S1 22/12/2010 11:52 Página 34 > To see a preview for a specific day, use the numeric keys to enter the appropriate number for the required day of the week.. > Press the Return key to go back to the “Next” table. -
Page 35: Timer Recordings
KA_TechniStar S1_International_2233660001900_EN:TECHNISTAR S1 22/12/2010 11:52 Página 35 7.17 Timer recordings You can use the DVR timer to record programmes to an attached recording medium while you are out. Your receiver is equipped with video recorder timers and channel-switching timers. In terms of their programming, these timer types differ only in name. -
Page 36: Timer Settings (Underrun/Overrun Time)
KA_TechniStar S1_International_2233660001900_EN:TECHNISTAR S1 22/12/2010 11:52 Página 36 7.17.3 Timer settings (underrun/overrun time) With EPG/SFI timer programming, the receiver receives the data for the selected programme automatically via the EPG/SFI data. This means that the start and end times for the programme to be recorded are transferred to the exact minute. -
Page 37: Track Information
KA_TechniStar S1_International_2233660001900_EN:TECHNISTAR S1 22/12/2010 11:52 Página 37 7.19.1 Track information > Pressing the Info button reveals additional information relating to the selected track, where available in the track’s ID3 tag. > Press this button again to hide this information. 7.19.2 Skipping tracks >... -
Page 38: Creating A Playlist
KA_TechniStar S1_International_2233660001900_EN:TECHNISTAR S1 22/12/2010 11:52 Página 38 > Use the up/down arrow keys to highlight the Music item and confirm with OK. > Use the up/down arrow keys to select the source from which you want to transfer MP3 files into a playlist and confirm with OK. -
Page 39: Showing Next/Previous Image
KA_TechniStar S1_International_2233660001900_EN:TECHNISTAR S1 22/12/2010 11:52 Página 39 USB device, these are represented as a single USB device. Any folders present are indicated by the icon, MP3 files by and playlists by > Use the up/down arrow buttons to select the source from which the JPG files should be read. -
Page 40: Showing Next/Previous Image
KA_TechniStar S1_International_2233660001900_EN:TECHNISTAR S1 22/12/2010 11:52 Página 40 7.20.5.2 Showing next/previous image > Press the up/down arrow keys to jump to the next or previous image. 7.20.5.3 Setting the frame change rate > By pressing the right/left arrow keys you can select an image transition speed of 5 to 100 seconds. -
Page 41: Playing Films
KA_TechniStar S1_International_2233660001900_EN:TECHNISTAR S1 22/12/2010 11:52 Página 41 All playlists on the storage medium are now displayed. > Use the up/down arrow keys to highlight the playlist you want to play and confirm with OK. 7.21 Playing films You can use your receiver to play files stored in MPEG format on a device connected to the USB port or a card inserted into the card reader. -
Page 42: Operating The Dvr
KA_TechniStar S1_International_2233660001900_EN:TECHNISTAR S1 22/12/2010 11:52 Página 42 8 Operating the DVR Your receiver has a DVR function (DVR = Digital Video Recorder) and a slot for USB devices. You can use this as a recording medium. A USB device must be inserted as a recording medium in order to record. -
Page 43: Recording
KA_TechniStar S1_International_2233660001900_EN:TECHNISTAR S1 22/12/2010 11:52 Página 43 8.2 Recording 8.2.1 Instant recording Select this type of recording to immediately record the programme currently being broadcast at the push of a button. 8.2.1.1 Starting recording manually Option 1 > Switch to the channel on which the programme you want to record is being broadcast. -
Page 44: Timer Recordings
KA_TechniStar S1_International_2233660001900_EN:TECHNISTAR S1 22/12/2010 11:52 Página 44 By selecting Start watching recording from beginning the recording continues in Timeshift mode. Option 2 > Press the Record button; the following window appears. > Use the up/down arrow keys to highlight the line with the action you want e.g. +1 hour and confirm with OK. -
Page 45: Playback
KA_TechniStar S1_International_2233660001900_EN:TECHNISTAR S1 22/12/2010 11:52 Página 45 8.3 Playback You can access DVR recordings via the DVR Navigator. There are various ways to call this up. Depending on whether you are in TV or radio mode, a list appears with all the TV or radio recordings present on the storage medium. - Page 46 KA_TechniStar S1_International_2233660001900_EN:TECHNISTAR S1 22/12/2010 11:52 Página 46 > Press the Fast forward or Rewind button again and the speed increases. The message “Fast forward “ or “Rewind “ appears. > If you press the Fast forward or Rewind button once again, the scan speed will increase.
-
Page 47: Managing Music/Images/Films
KA_TechniStar S1_International_2233660001900_EN:TECHNISTAR S1 22/12/2010 11:52 Página 47 > When you use the up/down arrow keys to highlight a tag, playback starts at this point. > Press the OK button to close the window and return to normal playback mode. 8.3.2.8 Ending a recording >... -
Page 48: Managing Music/Images/Films
KA_TechniStar S1_International_2233660001900_EN:TECHNISTAR S1 22/12/2010 11:52 Página 48 8.4.1.3.1 Navigating to any point in the recording > Use the Play / Pause, Fast forward, Rewind and Jog shuttle buttons to navigate accurately to any point in the recording. 8.4.1.3.2 Functions >... -
Page 49: Copying
KA_TechniStar S1_International_2233660001900_EN:TECHNISTAR S1 22/12/2010 11:52 Página 49 Please note that you can only manage MP3 files/playlists in the Copy music menu, only manage JPG files/playlists in the Copy images menu and only manage MPEG files in the Manage films menu. -
Page 50: Changing The Basic Programming
KA_TechniStar S1_International_2233660001900_EN:TECHNISTAR S1 22/12/2010 11:52 Página 50 9 Changing the basic programming 9.1 Configuring TV/radio lists This function is required to sort new channels found after a scan into the list, where no automatic inclusion option has been selected. To work with this function, you need to know the following: your receiver has a Tota list and three TV/radio lists. -
Page 51: Adding Channels To A Tv/Radio List
KA_TechniStar S1_International_2233660001900_EN:TECHNISTAR S1 22/12/2010 11:52 Página 51 9.1.4 Adding channels to a TV/radio list To add a channel from the Total list to a TV/radio list, access the channel list manager, select the TV/radio list you want if necessary and switch to the Total list. -
Page 52: Sorting Channels
KA_TechniStar S1_International_2233660001900_EN:TECHNISTAR S1 22/12/2010 11:52 Página 52 9.1.6 Sorting channels To sort the sequence of channels in a TV/radio list how you want, access the channel list manager and select the TV/radio list you want if necessary. 9.1.7 EPG/SFI You also have the option of adding or removing any channels you want to or from the EPG/SFI electronic programme guide as described in this section. -
Page 53: Starting Update Manually
KA_TechniStar S1_International_2233660001900_EN:TECHNISTAR S1 22/12/2010 11:52 Página 53 Programmes This form of display provides a table with the current day’s programming for a single channel. Genres If you are interested in specific types of programme, you can display the channel information by specific genres, e.g. -
Page 54: Global Parental Control
KA_TechniStar S1_International_2233660001900_EN:TECHNISTAR S1 22/12/2010 11:52 Página 54 the menu for user-specific parental control (once activated) via the parents’ account. Furthermore the maximum daily user allowance (i.e. time for which the receiver is allowed to be used) must be entered for the activated user profiles (with the exception of the parents’ profile). - Page 55 KA_TechniStar S1_International_2233660001900_EN:TECHNISTAR S1 22/12/2010 11:52 Página 55 9.3.1.3.1 Blocking a TV/radio broadcaster You have the option of tagging or untagging the channels or sources as you wish under global parental control. > Use the up/down arrow keys to highlight the Select TV broadcaster or Select radio broadcaster option.
- Page 56 KA_TechniStar S1_International_2233660001900_EN:TECHNISTAR S1 22/12/2010 11:52 Página 56 > Use the up/down arrow keys to highlight the Music item. > Press the right/left arrow keys to block or unblock the function. 9.3.1.3.4 Blocking the images function In this section you can use global parental control to completely block or remove the block from the images function.
- Page 57 KA_TechniStar S1_International_2233660001900_EN:TECHNISTAR S1 22/12/2010 11:52 Página 57 9.3.2.2.1 User name In the receiver’s default settings, the user profiles are named as Child 1, Child 2, Child 3 and Child 4. However, you can name the various profiles however you want. To do this, proceed as described below.
-
Page 58: Automatic Scan
KA_TechniStar S1_International_2233660001900_EN:TECHNISTAR S1 22/12/2010 11:52 Página 58 not been unblocked for the user) are indicated by the key . Channels that are blocked by global parental control and for the selected user are indicated by the key > Use the up/down arrow buttons to highlight the Access restrictions item. -
Page 59: After The Scan/Search
KA_TechniStar S1_International_2233660001900_EN:TECHNISTAR S1 22/12/2010 11:52 Página 59 3. Transponder search Select this search to scan a specific transponder for a satellite. 4. Manual scan Select this type of search to scan specifically for one particular channel using channel-specific PID numbers. -
Page 60: Hdcp Setting
KA_TechniStar S1_International_2233660001900_EN:TECHNISTAR S1 22/12/2010 11:52 Página 60 Caution: To enable the new software to be downloaded automatically, the digital receiver must be in stand-by mode. The download process is indicated by the message “LoAd”. Do not interrupt this procedure by e.g. switching the receiver on or off. -
Page 61: Programming A New Timer Event
In addition to the automatic software updates via satellite, you have the option of updating the receiver’s software via the USB interface. To be able to run the software update via the USB interface, you first need to download the current software version from the Technisat homepage (www.technisat.de). -
Page 62: Technical Specifications
KA_TechniStar S1_International_2233660001900_EN:TECHNISTAR S1 22/12/2010 11:52 Página 62 12 Technical specifications DVB-S Tuner Input frequency range 950 ..2,150 MHz Demodulation DVB-S: (QPSK) DVB-S2: (8PSK, QPSK) Symbol rate DVB-S: 2 ... 45 Mbaud/s, SCPC/MCPC DVB-S2: 10 – 30 Mbaud/s (8PSK), DVB-S2: 10 –... - Page 63 KA_TechniStar S1_International_2233660001900_EN:TECHNISTAR S1 22/12/2010 11:52 Página 63 > 60 dB > 60 dB Crosstalk < - 65 dB Power-on volume Automatic reproduction of previously set volume level Input impedance > 40 kOhm Digital output SP/DIF output electrical, Cinch socket Dolby Digital...
Need help?
Do you have a question about the S1 and is the answer not in the manual?
Questions and answers