Table of Contents
Advertisement
Advertisement
Table of Contents

Related Manuals for Kenwood DNR935WBT


Summary of Contents for Kenwood DNR935WBT
-
Page 1: Quick Start Guide
CONNECTED MONITOR WITH DVD RECEIVER DNR935WBT DNR935WBTM Quick Start Guide You can update the system by connecting a USB device containing an update file. For updating the system, visit <http://www.kenwood.com/cs/ce/>. © 2014 JVC KENWOOD Corporation B5K-0037-00 (MN/M2N/XN) -
Page 2: Table Of Contents
For functions not described in this Guide, refer to the Instruction Manual on the following website: Features of Connected systems ......5 http://manual.kenwood.com/edition/im388/ First Step ............... 6 Functions of the Buttons on the Front Panel ... 8 Common Operation ..........9 Login ................10... -
Page 3: Precautions
Kenwood dealer. Ñ Precautions on using this unit • When you purchase optional accessories, check with your Kenwood dealer to make sure that they work with your model and in your area. • 8-cm (3 inch) discs cannot be used. - Page 4 Ñ About the front panel Ñ How To Reset Your Unit When removing the product from the box or If the unit or the connected unit fails to operate installing it, the front panel may be positioned properly, reset the unit. at the angle shown in (Fig.
-
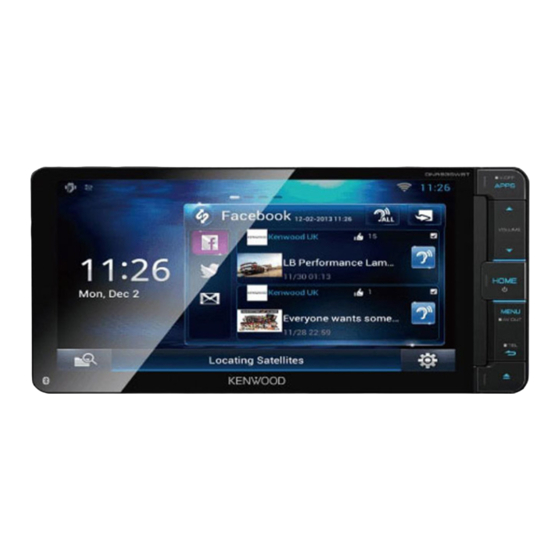
Page 5: Features Of Connected Systems
• This unit becomes the Wi-Fi access point paid accounts. and you can enjoy music and video in a • Aupeo! smartphone Wi-Fi connected by Kenwood • Facebook Wireless Link. • Twitter • Dropbox... -
Page 6: First Step
Wifi Setup First Step Configure settings for connection to Wi-Fi. 1) Touch [Wifi Setup]. Power on the unit and perform some setup steps 2) Slide Wi-Fi to ON. before using. 3) Select the Wi-Fi access point to register from Press the <8HOME> button. the list. - Page 7 • You can register yourself via the Web. Color http://www.route-collector.com/ Set the screen and button illumination color. You • This step may be skipped if you have already can select whether to perform color scan and adjust registered yourself in the Route Collector site. scanning color.
-
Page 8: Functions Of The Buttons On The Front Panel
Ñ How to prepare the remote control CAUTION • Put the remote controller in a place where it will Insert two “AAA”/“R03”-size batteries with the not move during braking or other operations. A poles aligned properly, following the illustration dangerous situation could result, if the remote inside the case. -
Page 9: Common Operation
Ñ List screen Name/ Motion 6 (Back) There are some common function keys in the list • Return to the previously viewed screen. screens of most sources. • Pressing for 1 second displays the Hands Free screen (Instruction Manual P.94). Gesture control sensor •... -
Page 10: Login
Ñ Gesture Control Login Without touching the unit, you can control it by a motion of your hand. Press the <HOME> button to turn the power on. Gesture control sensor Select the login user. Enter the password. X (Right) * Displays Current Source Control screen. -
Page 11: Operation On The Home Screen
Ñ Source launcher panel Operation on the Home Screen Press the <HOME> button to display the Home screen. Flick the screen left or right to select the Service panel, Media panel, Source launcher panel, or Network contents panel. (Shortcut icon) You can register sources you use frequently so that you can start them quickly. -
Page 12: How To Play Music
Adding of a shortcut icon to Source iPod, USB device launcher panel 1) Connect the device with each cable. Playback starts. To disconnect the device: 1) Touch [G] on the screen and disconnect the device from the cable. 1) Touch [ ] in Source launcher panel. -
Page 13: How To Play Movie
How to Play Movie Repeats current content. You can play DVD video, Video CD (VCD), movie files from disc media, iPod and USB storage device. Plays all contents in random order. ✎ NOTE ✎ NOTE • For details on playable file format, device format, •... -
Page 14: How To Listen To The Radio
How to Listen to the Radio How to Make a Phone Call You can use your Bluetooth cell-phone when paired Press the <HOME> button twice to the to this unit. Source launcher panel. Register your cell-phone to the unit. Touch [ ] in the Source launcher panel. - Page 15 Connect your cell-phone to the unit. Call using the phonebook 1) Touch the device name you want to connect 1) Touch [ in the Bluetooth SETUP screen. 2) Select the name from the list. 2) Touch [ON] of [TEL(HFP)] in the BT 3) Select the number from the list.
-
Page 16: Installation
touching to cause a short circuit, then replace the Installation old fuse with one with the same rating. • Insulate unconnected wires with vinyl tape or other Ñ Before Installation similar material. To prevent a short circuit, do not Before installation of this unit, please note the remove the caps on the ends of the unconnected following precautions. - Page 17 Ñ Supplied accessories ✎ NOTE First of all, make sure that all accessories are • Make sure that the unit is installed securely in place. supplied with the unit. If the unit is unstable, it may malfunction (eg, the sound may skip). 1 ...1 4 ...1 Ñ...
-
Page 18: Connecting Wires To Terminals
Ñ Connecting wires to terminals HDMI/MHL M4 x 8mmMAX iPod/ AV-IN/OUT AV-IN2 AV-OUT REMO AUDIO POWER Accessory 1 Brown (Mute control wire) Connect to the terminal that is grounded when either the telephone rings or during MUTE Connect to vehicle's harness. conversation. - Page 19 Ñ System connection Accessory 4: Bluetooth Microphone WI-FI receiver FM/AM antenna input - Reception may drop if there are metal objects near the WiFi Bluetooth antenna and WI-FI Receiver receiver. 5V=500mA - Install the WI-FI receiver besides the place enclosed by HDMI/MHL the metal.
- Page 20 Ñ 3 way speaker system setup Region code 3 area Connect the speaker wires HDMI/MHL M4 x 8mmMAX iPod/ AV-IN/OUT AV-IN2 Join the wires AV-OUT REMO AUDIO POWER Subwoofer Preout - Red (Audio Right Output) - White (Audio Left Output) Accessory 1 Mid Range Preout - Red (Audio Right Output)
- Page 21 Switching between speaker systems Touch [3way]. Switch to the 3 way speaker system following the A confirmation screen appears. procedure below. • Be sure to set the speaker network correctly. Connecting 3 way speakers with the 2 way mode selected can break the speakers. Press the <HOME>...
- Page 22 Accessory 6 Steering remote harness - Red (Audio Right Output) Connect to vehicle's steering remote harness. - White (Audio Left Output) Contact your Kenwood dealer for details. Subwoofer Preout C6 C7 C8 - Red (Audio Right Output) - White (Audio Left Output)
-
Page 23: Ipod/ Iphone/ Android Setup
Ñ iPod/iPhone connection and setting Android smartphone Connectable iPod/iPhone (sold separately) The following models can be connected to this unit. KCA-MH100 (1.8m) Made for Type (Optional Accessory) • iPhone 5s A B E • iPhone 5c A B E • iPhone 5 A B E •... - Page 24 E To listen to music via Bluetooth USB 1Wire – Bluetooth profile: A2DP B D : Select when connecting with KCA-iP103 or – Bluetooth profile: SPP KCA-iP102. – iPod connection setup: Bluetooth (P.24) HDMI + BT F To listen to music of Bluetooth Audio source A : Select when connecting with KCA-HD100 and –...
- Page 25 Touch [CHANGE]. Touch [Done]. ✎ NOTE Select the device installed the apps. • For the details of the necessary cable and adapter to connect with iPod/iPhone and Android, refer to iPod/iPhone connection and setting (P.23) and Android connection (P.23). • When you select “HDMI + BT”, “HDMI/MHL + BT”...
-
Page 26: About This Unit
Bluetooth SIG, Inc. and any use of such marks by • ABOUT DIVX VIDEO: DivX® is a digital video JVC KENWOOD Corporation is under license. Other format created by DivX, LLC, a subsidiary of Rovi trademarks and trade names are those of their Corporation. - Page 27 • ABOUT DIVX VIDEO-ON-DEMAND: This DivX the following disclaimer. Certified® device must be registered in order to play - Redistributions in binary form must reproduce the purchased DivX Video-on-Demand (VOD) movies. above copyright notice, this list of conditions and To obtain your registration code, locate the DivX the following disclaimer in the documentation and/ VOD section in your device setup menu.
- Page 28 This KENWOOD Route Network Service “Route issues between Users. Collector” User’s Agreement (“Agreement”) sets forth the terms and conditions for use of the KENWOOD (4) Should any third parties suffer losses or damages Route Network Service “Route Collector” provided by as a result of the User’s use of the Service, we shall...
- Page 29 5. Compensation Claim the User’s valid e-mail address and arbitrary User’s information via the next page (collectively Should any complaints, lawsuits or similar claims be “Information”). We shall properly manage and keep asserted against us by other Users or third parties for Information as important data in conformity with any reasons attributable to the User in connection our “Privacy Policy”...
-
Page 30: Laser Product
Netherlands toplama sistemlerini kullanan ülkeleri için English uygulanabilir) Hereby, JVC KENWOOD declares that this unit Sembollü (üzerinde çarpı işareti olan çöp DNR935WBTM is in compliance with the essential kutusu) ürünler ev atıkları olarak atılamaz. requirements and other relevant provisions of Eski elektrik ve elektronik ekipmanlar, Directive 1999/5/EC. - Page 31 English ñ...
Need help?
Do you have a question about the DNR935WBT and is the answer not in the manual?
Questions and answers