Table of Contents
Advertisement
Laser Distance Measure
Model No. 40-6001
Instruction Manual
Congratulations on your choice of this Laser Distance Measure. We
suggest you read this instruction manual thoroughly before using the
instrument. Save this instruction manual for future use.
This is a Class II laser tool and is manufactured to comply with CFR 21,
parts 1040.10 and 1040.11 as well as international safety rule IEC 285.
©2010 Johnson Level & Tool - Rev. 1
1
Advertisement
Table of Contents

Related Manuals for Johnson 40-6001


Summary of Contents for Johnson 40-6001
- Page 1 Save this instruction manual for future use. This is a Class II laser tool and is manufactured to comply with CFR 21, parts 1040.10 and 1040.11 as well as international safety rule IEC 285. ©2010 Johnson Level & Tool - Rev. 1...
-
Page 2: Table Of Contents
Components ..pg. 5-7 9. Product Registration . . . pg. 27 1. Kit Contents Description Qty. Laser Distance Measure Protection Cover Wrist Strap 9V Battery Instruction Manual Soft-sided Pouch ©2010 Johnson Level & Tool - Rev. 1... -
Page 3: Safety Information
• Remove the battery when storing the tool for an extended time (more than 3 months) to avoid damage to the tool should the batteries deteriorate. • Do not attempt to repair or disassemble the laser tool. If unqualified persons attempt to repair this tool, warranty will be void. ©2010 Johnson Level & Tool - Rev. 1... -
Page 4: Warning Labels
3. Location/Content of Warning Labels ©2010 Johnson Level & Tool - Rev. 1... -
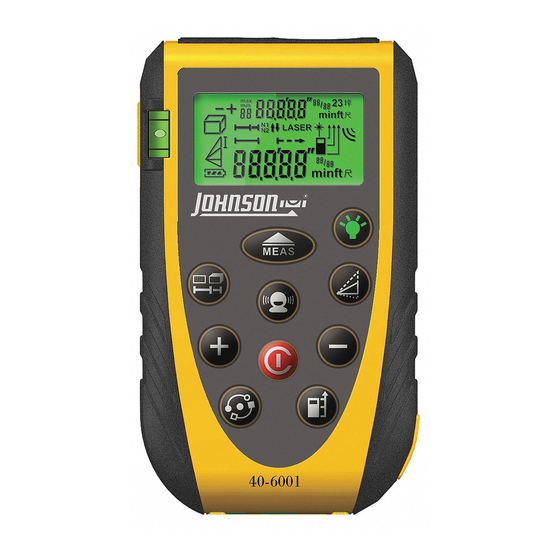
Page 5: Location Of Parts/Components
4. Location of Part/Components Side Measure Button Level Vial Sound Port / Speaker Tripod Thread 1/4 - 20 Battery Cover Wrist Strap Bracket ©2010 Johnson Level & Tool - Rev. 1... - Page 6 11. Unit of Measure / Max & Min Switch 12. Backlight/Continuous Laser Mode 13. Indirect Measurement/Pythagoras 14. Sound Activated Measure/ Memory Recall 15. Subtract/Count Down 16. Power/Clear/Escape 17. Measuring Reference Position / Sound On/Off ©2010 Johnson Level & Tool - Rev. 1...
- Page 7 10. Sub-Screen Unit of Measure Area Measuring 11. Sound Activated Mode Volume Measuring 12. Laser Active Measuring Mode 13. Measurement Reference Position Normal Mode Continuous Mode 14. Main Screen Unit of Measure 15. Main Screen ©2010 Johnson Level & Tool - Rev. 1...
-
Page 8: Laser Distance Measure
This is most important if the instrument has been exposed to abnormal use. Always confirm accuracy before and during important measurements. Keep the laser distance measure optic clean and inspect for damage. ©2010 Johnson Level & Tool - Rev. 1... -
Page 9: Start Up - Battery Installation
Power Button 1 X to power up. Press and hold Power Button to power off. This instrument powers off automatically after three minutes of inactivity. Backlight Press Backlight Button 1 X to activate backlight. ©2010 Johnson Level & Tool - Rev. 1... -
Page 10: Automatic Shutoff
Press & Hold Measuring Reference Position until you hear a beep to de-activate Sound. Repeat to activate. Automatic Shutoff Laser will turn off after 30 seconds Unit will turn off after 3 minutes ©2010 Johnson Level & Tool - Rev. 1... -
Page 11: Using The Product
0.00 ft 0.00 ft 0.00 ft 0’0” 0.00 ft 0.00 ft 1/32 0.00 in 0.00 ft 0.00 ft 0.00 ft 0.00 ft 1/32 0.00 ft 0.00 ft 1/16 0.00 ft 0.00 ft ©2010 Johnson Level & Tool - Rev. 1... - Page 12 Direct Laser Beam to Target. Press 1 X. Record measurement (up to 10 measurements will be stored automatically and available for recall, see Memory Recall page 22). Press & Hold 1 X to power down ©2010 Johnson Level & Tool - Rev. 1...
- Page 13 Result on sub-screen Flash twice to confirm Press measure button 1 X and addition record first measurement. Press 1 X (first measurement moves to sub value position on screen sign temporarily appears). ©2010 Johnson Level & Tool - Rev. 1...
- Page 14 Normal Measuring Mode Press and hold measure button 1 X. The Continuous Measure will appear on screen. Switch to Continuous Measuring Mode End Continuous Measure: Press Measure 1 X. Operating in Continuous Measuring Mode ©2010 Johnson Level & Tool - Rev. 1...
- Page 15 Unit of Measure Max/Min Switch 1 X (MAX appears in sub value position of screen). Press Measure Button 1 X to continue measure Press Measure Button 1 X to Pause To Exit: Press Power Button 1 X ©2010 Johnson Level & Tool - Rev. 1...
- Page 16 Area calculation will be presented in sub value position at top of screen. Unit of measure for area will be displayed in decimal form in feet or meters on sub screen. Area Measuring Instructions Measure Length Measure Width ©2010 Johnson Level & Tool - Rev. 1...
- Page 17 Volume calculation will be presented in sub value position at top of screen Unit of measure for area will be displayed in decimal form in feet or meters in sub screen. Volume Measuring Screen 1x2x3=V Width Height Length ©2010 Johnson Level & Tool - Rev. 1...
- Page 18 Second Press for Double Pythagoras Pythagoras (Partial Measurement) Pythagoras (Summary) Calculates distance between Calculates distance between Calculates distance between Point 1 and Point 2 Point 1 and Point 2 Point 1 and Point 3 ©2010 Johnson Level & Tool - Rev. 1...
- Page 19 Aim laser at third target. Use the level vial to ensure an accurate 90º measurement. Press measure button to record third measurement. Pythagoras calculation (full height) will be presented in sub-value position at top of screen. ©2010 Johnson Level & Tool - Rev. 1...
- Page 20 Note: Unit of measure for each Pythagoras function is capable of being displayed in decimal (feet, inches or metric) or inches + feet to 1/32. Simply press measure button to scroll through each type. ©2010 Johnson Level & Tool - Rev. 1...
- Page 21 Enter Continuous Measuring Mode. An arrow will guide direction. When approaching the set stake, it will alert you by beeping. This function can be Screen show direction and N1 stopped by pressing the red power button ©2010 Johnson Level & Tool - Rev. 1...
- Page 22 ©2010 Johnson Level & Tool - Rev. 1...
- Page 23 Low Battery Install a new battery Temperature is outside of working range Measure in an environment within specified working temperature range Ambient light is too strong Measure in a darker place (shadow target) ©2010 Johnson Level & Tool - Rev. 1...
- Page 24 To accurately measure from the rear of the instrument, use a scrap piece of drywall or other flat material. Extend the material off the corner and butt the LDM up to the material. Then take measurement. ©2010 Johnson Level & Tool - Rev. 1...
-
Page 25: Technical Specifications
*The working range and accuracy is dependent on how well laser light is reflected from the surface for the target and with increased brightness of the ambient light intensity measuring accuracy may deteriorate. ©2010 Johnson Level & Tool - Rev. 1... -
Page 26: Product Warranty
8. Product Warranty Johnson Level & Tool offers a two year limited warranty on our laser distance measure products. You can obtain a copy of the limited warranty for a Johnson Level & Tool product by contacting Johnson Level & Tool's Customer Service Department as provided below or by visiting us online at www.johnsonlevel.com. -
Page 27: Product Registration
PLEASE NOTE THAT IN ADDITION TO ANY OTHER LIMITATIONS OR CONDITIONS OF JOHNSON LEVEL & TOOL'S LIMITED WARRANTY, JOHNSON LEVEL & TOOL MUST HAVE RECEIVED YOUR PROPERLY COMPLETED WARRANTY CARD WITHIN 30 DAYS OF YOUR PURCHASE OF THE PRODUCT OR ANY LIMITED WARRANTY THAT MAY APPLY SHALL NOT APPLY AND THERE SHALL BE NO WARRANTY. - Page 28 ©2010 Johnson Level & Tool - Rev. 1...
Need help?
Do you have a question about the 40-6001 and is the answer not in the manual?
Questions and answers