Advertisement
Quick Links
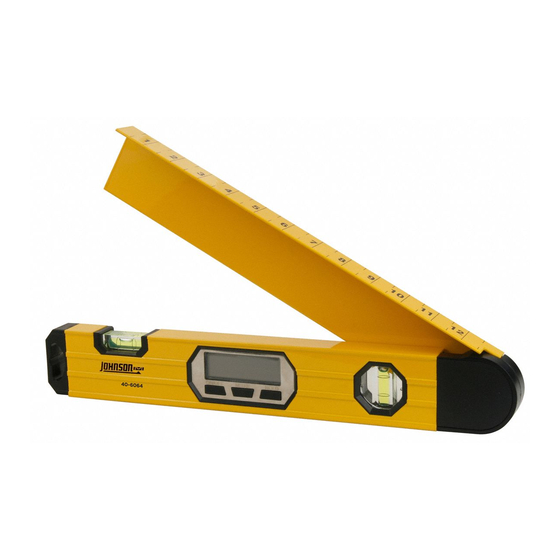
Location of Parts/Components
Digital Angle Locator
Battery
compartment
Model No. 40-6064
On/Off key
Miter key
Battery Installation
Instruction Manual
• To open the battery cover, unscrew the
end cap then pull out
Congratulations on your choice of this Digital Angle Locator. We
• Insert the 9V battery paying attention to
suggest you read this instruction manual thoroughly before using the
instrument. Save this instruction manual for future use.
the polarity, put back the end cap and
screws
• Power on the instrument
Features and Functions
• Digitally displays angle
• Angle measurements in degrees
• Working range of angle measurement
0 to 222º
• Automatic shut-off
• Hold function to freeze measurement
Note:
Used (discharged) batteries are hazardous
waste and should be disposed of properly. Take
Safety Instructions
out the batteries if the instrument is not going
Please read and understand all of the following
to be used for a long time.
instructions, prior to using this tool.
Using the Product
On/Off Key
Power on and off the instrument by pressing
this key.
Hold Key
The angle readings change in accordance with
the change of the angle measurement. Press
Angle level arm
the key to enter into the "hold" mode. The
measured angle reading will be held. Pressing
the key again will stop the "hold" mode and
measured value will change with the movement
of the angle level arm.
Vial for
horizontal
Miter Key
leveling
The key switches the measured angle and con-
verts it to the miter cut angle. This measure-
ment is the angle that needs to be set in the
miter saw to create the correct cut angle.
Automatic Shut-off
This instrument will shut-off automatically if no
operation is received within five minutes.
Hold Key
Vial for
Measuring Angles
Base arm
vertical
leveling
Position the angle level arm and the base arm
plane against the edges to be measured. The
displayed reading corresponds with the z angle
between the angle level arm and the base arm.
The displayed reading can be retained in the
display by pressing the HOLD key.
When the hold key is pressed, "HOLD" is
indicated in the display. The measured angle
reading will be held (even when the legs are
moved in relation to each other) until the HOLD
key is pressed again.
Transferring angle to miter angles
When directly projecting a measured angle onto
a work piece, pay attention that the angle level
arm and base don't move. After pressing the
HOLD key, which store the measured angle, the
user can now activate the MITER key. By
pressing the miter key, the Angle Finder is tak-
Localizador de Ángulo Digital
ing the measured angle and
converting it to the correct
miter cut angle. This
measurement is the angle
that needs to be set in the
miter saw to create the
correct cut angle.
Technical Specifications
Working Range Angle
0º - 222º
Accuracy Angle
±0.5º (9mm/m)
Power Supply
1 9V battery
Battery Life
Approx. battery life
50 hours
continuous use
Dimensions arm to
17.72"
Manual de Instrucciones
arm length
(450mm)
Weight
1.1 lbs
Felicitaciones por elegir este Localizador de Ángulo Digital. Le
(0.5 Kg)
sugerimos que lea este manual de instrucciones cuidadosamente antes
de usar el instrumento. Guarde este manual de instrucciones para
Working temperature
32ºF to 122ºF
poder consultarlo en el futuro.
(0ºC to -50ºC)
Automatic Shut-off
After 5 min. approx.
Características y Funciones
Lifetime Warranty
• Muestra el ángulo de forma digital
Johnson Level & Tool warrants this product to be
• Mediciones de ángulos en grados
free from defects in material or workmanship for
• Rango operativo de medición angular de
the normal life of this product. Product abuse
0 a 222º
voids warranty. At its sole option, Johnson will
• Apagado automático
repair or replace this product if it fails to conform
• Función de suspensión para congelar la
to this warranty under normal use and service.
medición
Johnson's liability is expressly limited to the repair
or replacement of the defective product.
Note:
Instrucciones de Seguridad
The user is responsible for the proper use and care of the
product.
Lea y comprenda todas las instrucciones a
continuación, antes de utilizar esta herramienta.
For further assistance, or if you experience problems with
this product that are not addressed in this instruction
manual, please contact our Customer Service Department.
In the U.S., please call 800-563-8553.
In Canada, please call 800-346-6682.
Ubicación de las Piezas y
Componentes
Compartimento
Modelo N.° 40-6064
de las baterías
El frasco para
nivelar horizontal
Botón de
Encendido
y Apagado
Botón para
ingletes
Botón de suspensión
Instalación de las Baterías
• Para abrir la cubierta de las baterías,
desajuste la cubierta protectora para
extremos y luego extráigala
• Inserte la batería de 9V prestando atención
a la polaridad, vuelva a colocar la cubierta
protectora para extremos y los tornillos
• Encienda el instrumento
Nota:
Las baterías usadas (descargadas) son residuos
peligrosos y se deben desechar de forma ade-
cuada. Extraiga las baterías si el instrumento no
se va a utilizar durante un tiempo prolongado.
Cómo Utilizar el Producto
Botón de Encendido y Apagado
Para encender o apagar el instrumento presione
este botón.
Brazo del nivel de ángulo
Ampolla para
nivelación
Brazo base
vertical
Advertisement

Related Manuals for Johnson 40-6064


Summary of Contents for Johnson 40-6064
- Page 1 • Muestra el ángulo de forma digital • Digitally displays angle moved in relation to each other) until the HOLD Johnson Level & Tool warrants this product to be • Mediciones de ángulos en grados • Angle measurements in degrees key is pressed again.
- Page 2 • Affichage numérique de l’angle autres) jusqu’à ce que la touche soit appuyée Johnson Level & Tool garantiza este producto Johnson Level & Tool garantit que ce produit ne el botón de SUSPENSIÓN se vuelva a presionar. • Mesures d’angle affichées en degrés de nouveau.
Need help?
Do you have a question about the 40-6064 and is the answer not in the manual?
Questions and answers