Advertisement
Available languages
Available languages
Quick Links
6697H-All_Manuals 1/31/13 11:04 AM Page 1
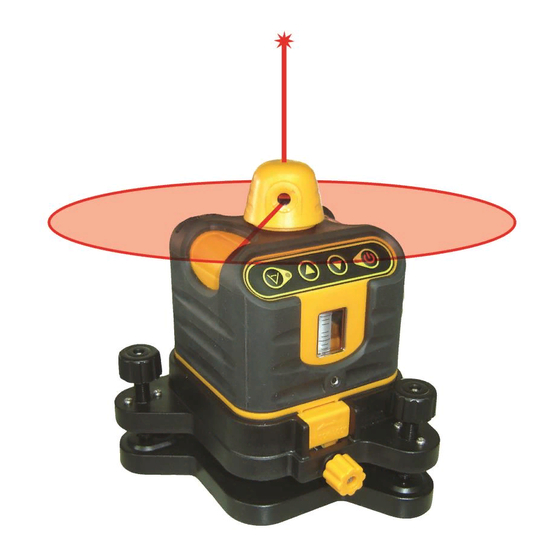
Manual-Leveling Rotary Laser
Model Nos. 40-6502 and 40-6512
Instruction Manual
Congratulations on your choice of this Manual-Leveling Rotary Laser.
We suggest you read this instruction manual thoroughly before using
the instrument. Save this instruction manual for future use.
This is a Class IIIa laser tool and is manufactured to comply
with CFR 21, parts 1040.10 and 1040.11 as well as international
safety rule IEC 285.
©2013 Johnson Level & Tool - Rev. 2
1
Advertisement

Subscribe to Our Youtube Channel
Related Manuals for Johnson 40-6502


Summary of Contents for Johnson 40-6502
- Page 1 Save this instruction manual for future use. This is a Class IIIa laser tool and is manufactured to comply with CFR 21, parts 1040.10 and 1040.11 as well as international safety rule IEC 285. ©2013 Johnson Level & Tool - Rev. 2...
- Page 2 Manual-Leveling Rotary Laser “AA” Alkaline Batteries Wall/Ceiling Mount 8’ Grade Rod Detector with 2 “AAA” Batteries and Clamp Tinted Glasses Magnetic Target Elevating Tripod Instruction Manual with Warranty Card Hard-Shell Carrying Case ©2013 Johnson Level & Tool - Rev. 2...
-
Page 3: Features And Functions
Failure to do so, may void the warranty. DANGER! Class IIIa Laser Product Max. Power Output: Wavelength: 625-645nm THIS TOOL EMITS LASER RADIATION. DO NOT STARE INTO BEAM. AVOID DIRECT EYE EXPOSURE. ©2013 Johnson Level & Tool - Rev. 2... - Page 4 • Use only original Johnson ® parts and accessories purchased from your Johnson ® authorized dealer. Use of non-Johnson ® parts and accessories will void warranty. ©2013 Johnson Level & Tool - Rev. 2...
- Page 5 6697H-All_Manuals 1/31/13 11:04 AM Page 5 4. Location/Content of Warning Labels ©2013 Johnson Level & Tool - Rev. 2...
- Page 6 Rotating beam Output Window output window Keypad Z-level Vial Z-vial calibrating hole Base unlock/lock DC 6V outlet knob Y-vial leveling knob X-level Vial Y-level Vial X-vial leveling knob 5/8” - 11 thread ©2013 Johnson Level & Tool - Rev. 2...
-
Page 7: Operating Instructions
(scan & rotate mode LED (5) is on), laser is rotating. Small scan: Laser is in small scan (scan & rotate mode LED (5) blinks). Big scan: Laser is in big scan (scan & rotate mode LED (5) blinks). ©2013 Johnson Level & Tool - Rev. 2... - Page 8 (Note: when turning the power on, the laser is in its highest rotation speed) Press rotation speed decreases In the scan mode: Press scan moves in counterclockwise direction Press scan moves in clockwise direction ©2013 Johnson Level & Tool - Rev. 2...
-
Page 9: Using The Product
2. Remove battery cover (rotate the battery compartment knob coun- terclockwise to the open position). 3. Put in 4 “AA” alkaline batteries following the polarity specified in the battery compartment. ©2013 Johnson Level & Tool - Rev. 2... - Page 10 5/8” - 11 tripod 3. Adjust the vial leveling knobs to center the bubble inside the X-vial and Y-vial. 4. Turn on the laser. 5. After finishing work, turn off the laser. ©2013 Johnson Level & Tool - Rev. 2...
- Page 11 Sound function Short sound and solid sound LED indication Upper red, middle orange, middle green, down red Size 4.645” x 2.637” x 0.984” (118mm x 67mm x 25mm) Weight 0.253 lbs. (115g) ©2013 Johnson Level & Tool - Rev. 2...
- Page 12 Power Key: Turn on/off the instrument 3. Battery Installation 1. Open the battery cover and put the batteries into the battery case according to the polarity shown in the battery slot. 2. Snap the battery cover back. ©2013 Johnson Level & Tool - Rev. 2...
- Page 13 No Sound Note: 1. While detecting a horizontal laser beam, it is necessary to have the horizontal bubble vial centered, as the tilt of the detector will influence its receiving accuracy. ©2013 Johnson Level & Tool - Rev. 2...
- Page 14 The horn will give two short sounds and the unit will power off automatically. 5. Accessories Usage • Connecting to the grade rod bracket ©2013 Johnson Level & Tool - Rev. 2...
- Page 15 If unit comes into contact with water or other liquids, wipe it dry immediately. • Do not use unit around fire or expose it to fire in any way. ©2013 Johnson Level & Tool - Rev. 2...
- Page 16 6. Level the laser, and then adjust the height so that the laser is level and hits the mark you made on the far wall (wall #2). You may need to re-level to achieve this. ©2013 Johnson Level & Tool - Rev. 2...
- Page 17 3. Next, remove the screw cap for the vial for the axis you are working with, and using a 2.5mm hex tool, adjust the vial so that it appears level. Inner Hexagon Spanner X-Direction Level Calibration Hole Y-Direction Level X-Direction Level Y-Direction Level Calibration Hole ©2013 Johnson Level & Tool - Rev. 2...
-
Page 18: Technical Specifications
(130 x 130 x 156mm) Weight 1.653 lbs. (0.75Kg) Working Temperature 14°F to 113°F (-10°C to +45°C) Center Screw Thread 5/8" – 11 Rotation speeds 150-300 rpm Scanning mode Large, Small, Dot IP Protection Class ©2013 Johnson Level & Tool - Rev. 2... -
Page 19: Application Demonstrations
6697H-All_Manuals 1/31/13 11:04 AM Page 19 10. Application Demonstrations Ceiling installation Anti-static flooring installation Window installation Baseboard installation Hanging pictures Dormer installation ©2013 Johnson Level & Tool - Rev. 2... -
Page 20: Care And Handling
12. Product Warranty Johnson Level & Tool offers a three year limited warranty on each of its products. You can obtain a copy of the limited warranty for a Johnson Level & Tool product by contacting Johnson Level & Tool's Customer Service Department, as provided below, or by visiting our web site at www.johnsonlevel.com. -
Page 21: Warranty Registration
For further assistance, or if you experience problems with this product that are not addressed in this instruction manual, please contact our Customer Service Dept. In the U.S., contact Johnson Level & Tool’s Customer Service Department at 888-9-LEVELS. In Canada, contact Johnson Level & Tool’s Customer Service Department at 800-346-6682. - Page 22 NO WARRANTY. If you need any assistance in locating any accessories, please contact our Customer Service Department. In the U.S., contact Johnson Level & Tool’s Customer Service Department at 888-9-LEVELS. In Canada, contact Johnson Level & Tool’s Customer Service Department at 800-346-6682.
- Page 23 Ésta es una herramienta láser Clase IIIa y está fabricada según la norma CRF 21, partes 1040.10 y 1040.11, y según la norma de seguridad internacional IEC 285. ©2013 Johnson Level & Tool - Rev. 2...
- Page 24 Support pour plafond et mur Estadal de 8’ Detector con 2 Baterías “AAA” y Abrazadera Lentes Protectores Sombreados Blanco Magnético Trípode para elevación Manual de Instrucciones con Tarjeta de Garantía Estuche de Transporte Resistente e Inflexible ©2013 Johnson Level & Tool - Rev. 2...
- Page 25 Si no lo hace, se puede anular la garantía. ¡PELIGRO! Producto Láser de Clase IIIa Salida Máxima de Corriente: 5mW Longitud de Onda: 625-645nm ESTA HERRAMIENTA EMITE RADIACIÓN LÁSER. NO MIRE FIJO AL RAYO. ©2013 Johnson Level & Tool - Rev. 2...
- Page 26 • No intente reparar ni desarmar la herramienta láser. Si una persona no calificada intenta reparar esta herramienta, se anulará la garantía. • No procure reparar ni desmontar el instrumento del láser. Si personas sin título procuran reparar este instrumento, la garantía será vacío. ©2013 Johnson Level & Tool - Rev. 2...
- Page 27 AL RAYO. EVITE LA EXPOSICIÓN DIRECTA A LOS OJOS. Producto Láser de Clase IIIa. Salida Máxima de Corriente: 5mW Longitud de Onda: 640-660nm. Este Producto cumple con los requerimien- tos aplicables de 21 CFR parts 1040.10 y 1040.11. ©2013 Johnson Level & Tool - Rev. 2...
- Page 28 Salida de 6V CC bloqueo de base Perilla de nivelación de ampolla Y Ampolla de Ampolla de Nivelación X Nivelación Y Perilla de nivelación de ampolla X Rosca de 5/8” – 11 ©2013 Johnson Level & Tool - Rev. 2...
- Page 29 Rotación rápida: Al encender el láser, éste se encuentra en su máxima velocidad de rotación (el LED en modo de lectura y rotación (5) se encuentra encendido), el láser está girando. ©2013 Johnson Level & Tool - Rev. 2...
- Page 30 En el modo de lectura: Presione para que la lectura se mueva en sentido contrario a las agujas del reloj Presione para que la lectura se mueva en el sentido de las agu- jas del reloj ©2013 Johnson Level & Tool - Rev. 2...
- Page 31 3. Coloque 4 baterías alcalinas "AA" según la polaridad que se especifica en el compartimento de las baterías. ©2013 Johnson Level & Tool - Rev. 2...
- Page 32 3. Ajuste las perillas de nivelación de ampolla para centrar la burbu- ja dentro de las ampollas X e Y. 4. Encienda el láser. 5. Al terminar el trabajo, apague el láser. ©2013 Johnson Level & Tool - Rev. 2...
- Page 33 Función de sonido Sonido corto y sonido firme Indicación LED Rojo superior, naranja medio, verde medio, rojo inferior Tamaño 4.645” x 2.637” x 0.984” (118mm x 67mm x 25mm) Peso 0.253 lbs. (115g) ©2013 Johnson Level & Tool - Rev. 2...
- Page 34 1. Abra la tapa del compartimento de las baterías y coloque las baterías dentro del compartimento de acuerdo con la polaridad que aparece en la ranura de las baterías. 2. Cierre la tapa de las baterías. ©2013 Johnson Level & Tool - Rev. 2...
- Page 35 Nota: 1. Al detectar un rayo láser horizontal, es necesario que la ampolla de la burbuja se ubique en el centro, ya que la incli- nación del detector influenciará la exactitud recibida. ©2013 Johnson Level & Tool - Rev. 2...
- Page 36 La alarma emitirá dos sonidos cortos y la unidad se apagará automáticamente. 5. Utilización de los Accesorios • Conexión al soporte del estadal. ©2013 Johnson Level & Tool - Rev. 2...
- Page 37 Si se moja la unidad con agua u otros líquidos, séquela inmediatamente. • La unidad no debe utilizarse cerca del fuego ni exponerse al fuego en ninguna circunstancia. ©2013 Johnson Level & Tool - Rev. 2...
- Page 38 6. Nivele el láser, y luego ajuste la altura para que el láser se encuentre a nivel y apunte a la marca que usted hizo en la pared #2. Es probable que usted tenga que volver a nivelar para lograr este resultado. ©2013 Johnson Level & Tool - Rev. 2...
- Page 39 Llave hexagonal L Orificio para calibración de nivel en dirección X Nivelación en dirección Y Nivelación en dirección X Orificio para calibración de nivel en dirección Y ©2013 Johnson Level & Tool - Rev. 2...
- Page 40 1.653 lbs. (0.75Kg) Temperatura de Trabajo 14°F to 113°F (-10°C to +45°C) Rosca Central 5/8" – 11 Velocidades de rotación 150-300 rpm Modos de lectura Gran alcance, poco alcance, PUNTO Grado de Protección IP ©2013 Johnson Level & Tool - Rev. 2...
- Page 41 6697H-All_Manuals 1/31/13 11:04 AM Page 41 10. Demostraciones de Aplicación Instalación de techos Instalación de pisos antiestáti- Instalación de ventanas Instalación de zócalos Colgar cuadros Instalación de buhardilla ©2013 Johnson Level & Tool - Rev. 2...
- Page 42 12. Garantía del Producto Johnson Level & Tool ofrece una garantía limitada de tres años para cada uno de sus productos. Puede obtener una copia de la garantía limitada de un producto Johnson Level &...
- Page 43 En Estados Unidos, comuníquese con el Departamento de Servicio al Cliente de Johnson Level & Tool llamando al 888-9-LEVELS. En Canadá, comuníquese con el Departamento de Servicio al Cliente de Johnson Level & Tool llamando al 800-346-6682. 13. Registro de la garantía Con este manual de instrucciones encontrará...
- Page 44 ® están disponibles para la compra en los comercios autorizados de Johnson ® . El uso de accesorios que no sean Johnson ® anu- lará toda garantía aplicable y NO HABRÁ GARANTÍA. Si necesita ayuda para ubicar algún accesorio, comuníquese con nuestro Departamento de Servicio al Cliente.
- Page 45 Cet outil laser de catégorie IIIa a été fabriqué en conformité avec le Code de règlements fédéraux des É.-U. (CFR 21), articles 1040 .10 et 1040 .11, et avec le règlement international sur la sécurité no IEC 285. ©2013 Johnson Level & Tool - Rev. 2...
- Page 46 Tige graduée de 2,4 M (8 pi) Détecteur avec 2 piles «AAA» et pince de blocage Verres teintés Cible magnétique Trépied réglable en hauteur Manuel d’instructions et carte de garantie Mallette de transport rigide ©2013 Johnson Level & Tool - Rev. 2...
- Page 47 Puissance de sortie maximale : 5 mW Longueurs d'onde : 625-645 nm CET OUTIL ÉMET UN RAYONNEMENT LASER. NE FIXEZ PAS DES YEUX LE FAISCEAU LASER. ÉVITEZ TOUT CONTACT DIRECT AVEC LES YEUX. ©2013 Johnson Level & Tool - Rev. 2...
- Page 48 • N’essayez pas de réparer ou de démonter l’outil laser. Si une personne non qualifiée tente de réparer cet outil, la garantie sera annulée. • Ne pas tenter de réparer ou démonter l'outil laser. Si les personnes incompétentes tentent de réparer cet outil, la garantie sera vide. ©2013 Johnson Level & Tool - Rev. 2...
- Page 49 LASER. ÉVITEZ TOUT CONTACT DIRECT AVEC LES YEUX. Produit à laser de classe IIIa. Puissance de sortie maximale : 5 mW Longueurs d'onde : 625-645 nm. Cet Outil Est Conforme Aux Exigences Applicables Du CFR21, Parties 1040.10 et 1040.11 ©2013 Johnson Level & Tool - Rev. 2...
- Page 50 Molette de mise à niveau de l’axe Y Fiole de niveau Fiole de niveau de de l’axe X l’axe Y Molette de mise à niveau de l’axe X Filetage de 5/8 po – 11 ©2013 Johnson Level & Tool - Rev. 2...
- Page 51 Rotation rapide : Aussitôt en marche, le laser fonctionne en mode de rotation à la vitesse la plus rapide (le voyant de mode balayage et rotation [5] est allumé); le laser effectue sa rotation. ©2013 Johnson Level & Tool - Rev. 2...
- Page 52 En mode balayage: Appuyez sur le bouton balayage pour faire tourner le faisceau dans le sens antihorairej Appuyez sur le bouton balayage pour faire tourner le faisceau dans le sens horaire ©2013 Johnson Level & Tool - Rev. 2...
- Page 53 3. Insérez 4 piles alcalines «AA» dans le compartiment en tenant compte de la polarité indiquée dans le compartiment des piles. ©2013 Johnson Level & Tool - Rev. 2...
- Page 54 3. Réglez les molettes de mise à niveau pour centrer la bulle à l’in- térieur de la fiole de l’axe X et de la fiole de l’axe Y. 4. Activez le faisceau laser. 5. Après l’utilisation, éteignez le faisceau laser. ©2013 Johnson Level & Tool - Rev. 2...
- Page 55 - rouge, centre – orange, centre – vert, bas - rouge Dimensions 118 mm x 67 mm x 25 mm (4,645 po x 2,637 po x 0,984 po) Poids 115 g (0,253 lb) ©2013 Johnson Level & Tool - Rev. 2...
- Page 56 1. Ouvrez le compartiment des piles et insérez les piles en respectant la polarité indiquée dans le logement des piles. 2. Replacez le couvercle du compartiment des piles en appuyant jusqu’à ce qu’il y ait un déclic. ©2013 Johnson Level & Tool - Rev. 2...
- Page 57 Remarque: 1. Il est nécessaire de centrer la fiole lorsque vous voulez détecter un faisceau laser horizontal, car la déviation du récepteur modifiera la précision de sa réception. ©2013 Johnson Level & Tool - Rev. 2...
- Page 58 été appuyé au cours de ces 6 minutes. L’avertisseur sonore émettra deux sons courts et l’appareil s’éteindra automatiquement. 5. Utilisation des accessoires • Raccordement au support de la tige d’inclinaison. ©2013 Johnson Level & Tool - Rev. 2...
- Page 59 Si l’appareil entre en contact avec de l’eau ou d’autres liquides, essuyez-le immédi- atement. • N’utilisez jamais l’appareil à proximité du feu et ne l’exposez jamais au feu. ©2013 Johnson Level & Tool - Rev. 2...
- Page 60 6. Mettez le laser de niveau, puis ajustez-en la hauteur pour qu'il soit de niveau et touche à la marque que vous avez tracée sur le mur éloigné (mur n 2). Vous devrez peut-être le remettre de niveau pour y arriver. ©2013 Johnson Level & Tool - Rev. 2...
- Page 61 Orifice de cali- Clé hexagonale intérieure bration de niveau dans la direction X Niveau dans la direction Y Niveau dans la direction X Orifice de calibration de niveau dans la direction Y ©2013 Johnson Level & Tool - Rev. 2...
- Page 62 10 °C à +45 °C (14 °F à 113 °F) Filetage de la vis centrale 5/8" – 11 Vitesses de rotation 150 à 300 tr/min Modes de balayage Balayage large, balayage réduit, POINT Catégorie de protection IP ©2013 Johnson Level & Tool - Rev. 2...
- Page 63 6697H-All_Manuals 1/31/13 11:04 AM Page 63 10. Illustrations d’applications pratiques Installation de plafonds Installation de revêtements anti-statiques Installation de fenêtres Installation de plinthes Accrochage de tableaux Installation de lucarnes ©2013 Johnson Level & Tool - Rev. 2...
- Page 64 Johnson®. À défaut de quoi, la garantie limitée de Johnson Level & Tool (s’il y a lieu) sera nulle et AUCUNE GARANTIE ne pourra s’appliquer. Communiquez avec un de nos centres de service pour toute réparation...
- Page 65 VEUILLEZ PRENDRE NOTE QU’EN PLUS DE TOUTE AUTRE LIMITATION OU CONDITION QUI POURRAIT S’APPLIQUER SOUS LA GARANTIE LIMITÉE DE JOHNSON LEVEL & TOOL, LA SOCIÉTÉ JOHNSON LEVEL & TOOL DOIT AVOIR REÇU VOTRE FICHE DE GARANTIE DÛMENT REMPLIE ET VOTRE PREUVE D’ACHAT DANS LES 30 JOURS QUI SUIVENT L’ACHAT DE VOTRE...
- Page 66 Service à la clientèle. Aux États-Unis, appelez le 888 9-LEVELS pour communiquer avec le Service à la clientèle de Johnson Level & Tool. Au Canada, appelez le 800 346-6682 pour communiquer avec le Service à la clientèle de Johnson Level & Tool.
Need help?
Do you have a question about the 40-6502 and is the answer not in the manual?
Questions and answers