Table of Contents
Advertisement
Quick Links
Advertisement
Table of Contents

Related Manuals for Plinius KAITAKI


Summary of Contents for Plinius KAITAKI
- Page 1 KAITAKI Preamplifier Instruction Manual The heart of music www.pliniusaudio.com...
-
Page 3: Table Of Contents
All operational, technical and descriptive material in this publication is subject to change at any time without notice. For further product information or queries, please contact your Plinius dealer. Plinius products are designed and manufactured by Plinius Audio Limited, New Zealand. -
Page 4: Introduction
We have designed and manufactured this preamplifier to reproduce your favourite music faithfully and accurately. With a little care and a full understanding of the operating recommendations in this manual, your Plinius Kaitaki Preamplifier will provide years of high-quality, trouble-free performance. -
Page 5: Design Philosophy
Design Philosophy From a distance you can see that the design of the Plinius products is more than an applied styling exercise to the front panel. We have started from the ground up to produce a casing for our electronics that is unrivalled in its physical strength and visual simplicity. -
Page 6: Unpacking
NOTE: This unit has been designed for use in moderate climates only, not for tropical conditions. The design of this Plinius product incorporates a very high level of mechanical decoupling of the input and output. It can however still be influenced by acoustical feedback in the operating environment. -
Page 7: Care & Maintenance
SURFACE CLEANING From time to time you may wish to clean the surface of your Plinius equipment to remove dust, or any material build up from the atmosphere or on commonly used controls. Your Plinius product is made up of parts that have a hard anodised or a powder coat finish and will clean easily without being damaged. -
Page 8: Precautions
PLEASE TAKE SPECIAL NOTE OF THE FOLLOWING PRECAUTIONS BEFORE OPERATING YOUR NEW PREAMPLIFIER. • The Plinius Kaitaki Preamplifier contains electronic circuits that are capable of generating heat that could have an adverse effect on other electronic equipment, furniture, etc. •... -
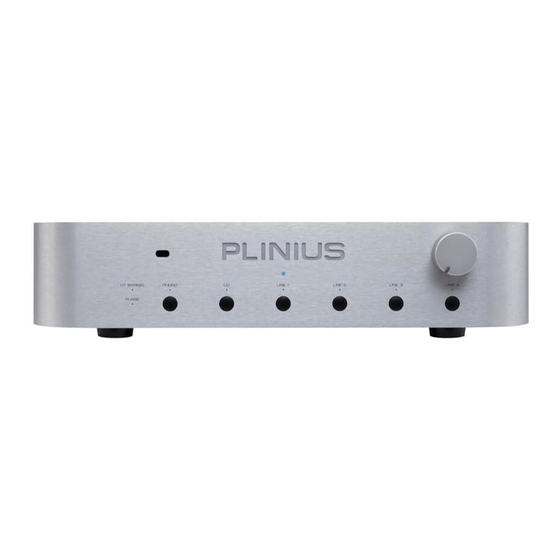
Page 9: Front Panel Functions
Front Panel Functions The front of the Plinius Kaitaki Preamplifier incorporates all the facilities you will require on a daily basis. 1. DISPLAY LED The blue LED on the front panel indicates the mode of operation. When fi rst switched on the unit will go into standby and the display LED will vary in brightness. -
Page 10: Rear Panel Functions
Network player, tuner, etc, to the outputs to the power amplifi er and the mains supply. Please remember that your Plinius Kaitaki Preamplifi er is a high quality electronic instrument capable of an exceptional level of performance. Be sure that you understand your system’s requirements fully before you make any connection to this preamplifi er. - Page 11 This input is for use specifically with home theatre processors. In some circumstances you may wish to use the power amplifier connected to the Kaitaki as the front two channels of a surround or home theatre environment. The HT Bypass input can be used for this purpose, as any signal connected to these inputs can be sent directly to the power amplifier bypassing the preamplifier entirely.
- Page 12 This socket is for connecting to an external remote control sender. Some companies manufacture these devices to enable multi-room remote control. Please see your Plinius dealer for further advice. 11. MAINS POWER CORD IEC SOCKET This connector is where the mains supply cable from your wall connects to the preamplifier.
-
Page 13: Remote Control Functions
Remote Control Functions The Plinius Kaitaki Preamplifier features a full function remote to control all settings and configurations of the preamplifier as well as complete controls for operating your Plinius CD player. KAITAKI PREAMPLIFIER REMOTE FUNCTIONS: 1. STANDBY Standby is used to put the unit into a low power mode. This disconnects the outputs of the preamplifier and turns off the white display LED’s. - Page 14 Hold down either button to continually adjust the volume level. 7. MUTE Pressing this button toggles the Kaitaki Preamplifier in and out of mute. CD PLAYER REMOTE FUNCTIONS: 8. REPEAT The repeat LED on the front panel will illuminate once this button is pressed.
-
Page 15: Installation & Operation
FOR PLACEMENT & OPERATION OF THIS PRODUCT. CONNECTIONS Connections to your Kaitaki Preamplifier should be made in the same order as they are listed in this section. DO NOT attempt to connect your Kaitaki Preamplifier until you have read and fully understood these instructions. Should you require further assistance, please contact your Plinius dealer. - Page 16 If using single-ended RCA outputs, connect your Kaitaki to the RCA inputs on the back of the power amplifier. Make sure you connect the red coded cable to the red RIGHT RCA output, and the white (or black) cable to the black LEFT RCA output.
- Page 17 Preamplifier Output. USING LINE OUT A line level output is provided on the back of the Kaitaki Preamplifier for connection to accessories such as recording devices, headphone amplifiers sub-woofer speakers etc. the level is fixed and carries signal of the selected output, even when the Preamplifier is muted.
-
Page 18: Product Features
The gain can now be adjusted noting that high gain (factory setting) is set with jumpers toward the base, and low gain is set with jumpers toward the lid. Now re-assemble your Kaitaki Preamplifier. - Page 19 (such as power surges, damaged mains cable, etc) before replacing the fuse with one of the same rating and type. Should the preamplifier continue to suffer mains fuse failure, contact your Plinius dealer. P R E A M P L I F I E R...
-
Page 20: Troubleshooting
Refer to the Product Features section on page 16 for further information. NOTE: If the unit immediately or repeatedly suffers mains fuse failure, there may be a major problem and you should contact your Plinius dealer. P L I N I U S K A I TA K I... -
Page 21: Specifications
Specifications FREQUENCY RESPONSE PHONO INPUT: 20Hz to 20kHz +/-0.2dB INPUT CAPACITANCE: 100pF DISTORTION <0.05% THD at rated input level GAIN: 60dB, 66dB SIGNAL TO NOISE RATIO -80dB at rated input level, A weighted LOAD: 47k ohms, 470 ohms, 100 ohms, INPUT SENSITIVITY FOR RATED OUTPUT 125mV RMS Unbalanced inputs 47 ohms, 22 ohms... -
Page 22: Index
Index Display LED....................7 Front Panel Layout ................7 Ground Lift Switch ................9 HT Bypass....................7, 9 IEC Power Connector................10 Input Terminals..................8 Line Out ......................9, 15 Mains/Line Fuse ..................17 Mains Supply Connection .............10, 15 Mains Switch .....................8 Operating Temperature..............4 Output Terminals ...................9, 14 Phasing ......................14 Phono Earth Post ..................10 Phono Gain Adjustment ..............16...
Need help?
Do you have a question about the KAITAKI and is the answer not in the manual?
Questions and answers