
Related Manuals for Gigaset SL78H


Summary of Contents for Gigaset SL78H
- Page 1 Congratulations By purchasing a Gigaset, you have chosen a brand that is fully committed to sustainability. This product’s packaging is eco-friendly! To learn more, visit www.gigaset.com.
-
Page 3: Brief Overview
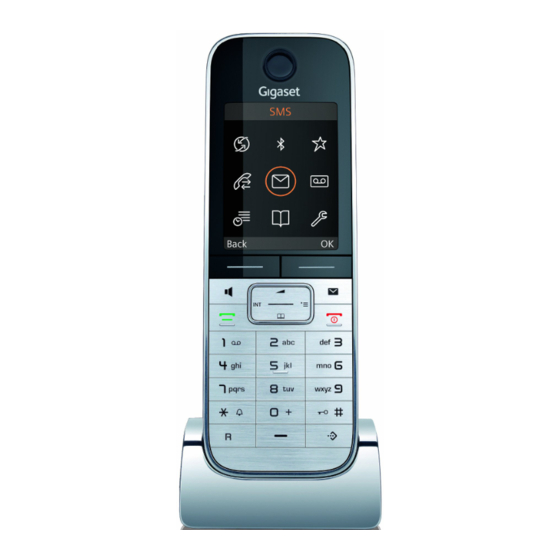
Brief overview Brief overview ¢ 1 Display in idle status 2 Battery charge status ( ¢ page 14) ¢ 3 Display keys ( page 18) 4 Message key ( page 32) Access to Calls and Message lists; flashes: new message or new call 5 End Call key, On/Off key End call, cancel function, go back one menu level (press briefly), back to idle status... -
Page 4: Display Symbols
Display symbols Display symbols The following symbols are displayed regardless of the settings and the operating status of your phone: ¢ Signal strength ( page 14) ¢ or ECO Mode symbol ¼ ( page 34) ¢ Bluetooth activated ( page 38) or ô/ õ... -
Page 5: Table Of Contents
Contents Contents Brief overview ........... . . 1 Display symbols . - Page 6 Contents Setting the alarm clock ......... . . 36 Using a handset as a room monitor .
-
Page 7: Safety Precautions
Safety precautions Safety precautions Warning Be sure to read this user guide and the safety precautions before using your telephone. Explain their content and the potential hazards associated with using the telephone to your children. Use only the charging cradle supplied with the power adapter. ¢... -
Page 8: First Steps
First steps First steps Checking the package contents One Gigaset SL78H handset One battery One battery cover One belt clip One charging cradle with power adapter One user guide... -
Page 9: Installing The Charging Cradle
First steps Installing the charging cradle The charging cradle is designed to be operated in closed, dry areas at temperatures ranging from +5°C to +45°C. Please note Keep in mind the range of the base station. It is up to 985 feet (300 m) in unobstructed outdoor areas and up to 165 feet (50 m) inside buildings. -
Page 10: Setting Up The Handset For Use
Warning ¢ Use only the rechargeable batteries ( page 48) recommended by Gigaset Communications GmbH; using other batteries could result in significant health risks and property damage. For example, the outer casing of the batteries could be destroyed, or the batteries could explode. The phone could also malfunction or be damaged as a result of using batteries that are not the recommended type. - Page 11 First steps If you need to reopen the battery cover to connect the USB cable or change the battery: ¤ Remove the belt clip (if attached). ¤ Place a coin into the notch at the bottom of the casing and pull the battery cover upwards.
-
Page 12: Registering Handsets
First steps Registering handsets A Gigaset SL78H handset can be registered to up to four base stations. Registration of Gigaset SL78H You must initiate handset registration on the handset (1) and on the base station (2). Once it has been registered, the handset returns to idle status. The handset's inter- nal number is shown on the display (e.g., INT 1). - Page 13 First steps 2) On the base station Within 60 seconds, press and hold the Registration/Paging key on the base station (approx. 3 sec.). Please note Information on how to deregister can be found in your base station's user guide. First battery charge and discharge The correct charge status can only be displayed if the battery is first fully charged and then discharged.
-
Page 14: Setting The Date And Time
First steps Setting the date and time Set the date and time so that the alarm and the calendar can be used. ¤ §Time§ Press the key below on the dis- play screen to open the input field. Time (If you have already entered the date and time, open the input field using ¢... - Page 15 First steps ¤ am/pm Save §Save§ Press the key below on the dis- play screen to save your entries. ‰ The display shows Saved. You will hear a confirmation tone. Saved Date/Time Date: 10/14/2009 Time: 07:15am ¤ §Back§ Press the key below on the dis- am/pm Save...
-
Page 16: Setting Up Area Codes
First steps Display in idle status Once the phone is registered and the time set, the idle display is shown, as in this example. After successful reg- istration, the following is displayed: INT 1 The strength of the signal between the base station 14, 2009 and handset: –... -
Page 17: Connecting The Usb Cable
You can connect a standard USB data cable with a mini-B connector to the back of your handset to connect the handset to a PC. To use this func- tion, the Gigaset QuickSync software must be ¢ installed ( page 49). -
Page 18: What Would You Like To Do Next
Use the following guide to quickly locate the most important topics. If you are unfamiliar with menu-driven devices, such as other Gigaset telephones, ¢ you should first read the section entitled "Using the phone" ( page 17). -
Page 19: Using The Phone
Using the phone Using the phone Using the Control key In the text below, the side of the Control key that you must press in the operating situation described is marked in black (top, bot- tom, right, left, center), for example, v for "press right on the Control key"... -
Page 20: Using The Display Keys
Using the phone Using the Display keys The function of the Display keys changes depending on the particular operating sit- uation. Example: Current Display key functions Back Save Display keys Important Display keys include: Options Open a menu for further functions. Confirm selection. -
Page 21: Using The Menus
Using the phone Using the menus Your telephone's functions are accessed using a menu that has a number of levels. Main menu (first menu level) ¤ Press the Control key right v in the handset's idle status to open the main menu. -
Page 22: Activating/Deactivating The Handset
Using the phone Activating/deactivating the handset With the phone in idle status, press and hold the End Call key to switch off the handset. A confirmation tone plays as the phone turns off. Press and hold the End Call key again to switch the handset on. Please note When switching on, an animation of a clock will be displayed for several sec- onds. -
Page 23: Using This Guide
Using the phone Using this guide The operating steps are shown in abbreviated form. Example: The illustration: ¢ ¢ ¢ Settings Telephony Auto Answer (³ = on) means: ¤ Press right on the Control key v to open the main menu. ¤... - Page 24 Using the phone Telephony ´ The Auto Answer function is already Auto Answer selected. Area Codes Listening In Dialing Mode Back Change ¤ §Change§ Press the Display key activate/deactivate the function. Telephony The change is immediately effective ³ and does not need to be confirmed. Auto Answer Area Codes Listening In...
-
Page 25: Menu Tree
Menu tree Menu tree With the telephone in idle status, press v (open main menu): · ¢ Alarm Clock page 36 ò Bluetooth ¢ Activation page 38 ¢ Search for Headset page 39 ¢ Search for DataDevice page 39 ¢ Known Devices page 39 ¢... - Page 26 Menu tree Ï Settings ¢ Date/Time page 12 ¢ Audio Settings Call Volume page 42 ¢ Ringer Settings page 43 ¢ Advisory Tones page 44 Music on Hold (dependent on base station) ¢ Display Screensaver page 41 ¢ Backlight page 42 ¢...
-
Page 27: Making Calls
Making calls Making calls Ending a call ¢ Press the End Call key. If the backlight is deactivated ( page 42) it is switched on by pressing any key. In this Accepting a call case the pressed key has no other function. The handset indicates an incoming call in Making an external call three ways: by ringing, by a display on the... -
Page 28: Using The Handsfree Feature
Making calls Using the handsfree feature Making internal calls In handsfree mode, instead of holding the Internal calls to other handsets registered on handset to your ear, you can put it down, for the same base station are free. example, on the table in front of you. This Calling a specific handset allows others to participate in the call. -
Page 29: Using The Directory And Lists
Using the directory and lists Using the directory and Quick list A list of name/numbers that can be Person/ lists Business name and phone number; dial- around name and code; descriptive name The options are: and PIN, etc. ¤ Directory Open the Quick list in idle status by press- ing the C key. - Page 30 Using the directory and lists Caller Melody (VIP): Selecting entries in the directory You can mark a directory entry as a VIP and Quick list s / C Open the directory or Quick list. (very important person) by assigning a specific ringer to it.
-
Page 31: Another Handset
Using the directory and lists Editing entries Linking Quick list numbers with ¢ s / C s (select entry) one number §View§ §Edit§ Press Display keys one after the You can insert the dialing code of a network other. provider ahead of the number ("linking"). ¤... - Page 32 Using the directory and lists Transferring the directory as a Saving an anniversary in the vCard with Bluetooth directory ¢ In Bluetooth mode ( page 38), you can For each number in the directory, you can transfer directory entries in vCard format, for save an anniversary and specify a time at example, to exchange entries with your which a reminder call should be made on...
-
Page 33: Using The Last Number Redial List
Using the directory and lists Reminder call on an anniversary Display Number (as in the directory, page 29) In idle status, a reminder call is signaled in ¢ Delete Entry (as in the directory, page 29) the handset display ( page 2) and with the selected ringer. -
Page 34: Opening Lists With The Message Key
Using the directory and lists Press the Talk key c to return the The number of new entries is displayed on selected call. the right, next to the corresponding symbol. §View§ Press the Display key to display addi- ™ Ë Ã... -
Page 35: Using The Network Mailbox
Enter the number for the net- work mailbox. §Save§ Press the Display key. The setting for Fast Access applies to all Gigaset SL78H handsets. Calling the network mailbox Press and hold. You are directly connected to the network mail- box. -
Page 36: Eco Dect
¢ You are helping to protect the environment already been set ( page 12). Í ¢ with your Gigaset SL78H. Reducing energy consumption October 2009 By using a power-saving adapter plug, your telephone consumes less power. Reducing radiation (dependent on base) The radiation can only be reduced if your base supports this function. - Page 37 Setting an appointment (calendar) Text: Managing appointments Enter text (max. 16 characters). The text appears as the appointment name in the Editing individual appointments r / q Select the day in the graphic cal- list and will be displayed on the screen endar and press the w Control during the appointment reminder.
-
Page 38: Displaying Missed Appointments, Anniversaries
Setting the alarm clock Displaying missed Setting the alarm clock appointments, anniversaries Requirement: The date and time have ¢ already been set ( page 12). Missed appointments/anniversaries ¢ page 30) are displayed in the Missed Alarms list if: Activating/deactivating the alarm clock and setting the wake-up time You do not accept an appointment/anni- Í... -
Page 39: Using A Handset As A Room Monitor
Using a handset as a room monitor Deactivating the wake-up call/ Warning! repeat after pause (snooze mode) Always check the operation of the room monitor before use. For exam- Requirement: A wake-up call is sounding. ple, test its sensitivity. Check the §OFF§... -
Page 40: Using Bluetooth Devices
Using Bluetooth devices When the room monitor is activated, the idle Using Bluetooth devices display appears as follows: Your Gigaset SL78H handset can communi- cate wirelessly with other devices using INT 1 Á Bluetooth™ technology. 07:15am 2009 Before you can use your other Bluetooth devices, you must first activate Bluetooth and then register the devices to the handset. -
Page 41: Search For Headset
Using Bluetooth devices Registering Bluetooth devices Canceling/repeating current search To cancel search: The distance between the handset in Blue- §Cancel§ Press the Display key. tooth mode and the activated Bluetooth device (headset or data device) should be no To repeat the current search, if necessary: more than 33 feet (10 m). -
Page 42: Handset Settings
Handset settings Changing the name of a Bluetooth Handset settings device ¢ s (select entry) Open list Your handset is preconfigured, but you can §Options§ Press the Display key. change the settings to suit your individual requirements. §OK§ Edit Name Select and press Change the name. -
Page 43: Changing The Display Language
Handset settings Redial Select language and §Select§ Displaying the Last Number Redial list. press More Functions... If you accidentally choose a language you do Depending on your base station, addi- not understand: Ï ¢ ¢ ¢ ¢ tional key assignments are also possible. Press the keys one after the Starting the function, dialing the §OK§... -
Page 44: Activating/Deactivating Auto Answer
Handset settings §Save§ Setting the display backlight Press the Display key, if neces- sary, to save the setting perma- Depending on whether the handset is in the nently. charging cradle, you can activate or deacti- Setting the volume during a call: vate the backlight. -
Page 45: Ringer Settings
Handset settings Settings for individual functions Please note You can also set the call volume, the ring- Set the volume and melody depending on ers, and the advisory tones using the ¢ the type of signaling required. menu ( page 24). In idle status: ¢... -
Page 46: Using The Resource Directory
Handset settings Using the Resource Directory Sounds: The selected sound is played back immedi- ately. Use the q key to scroll between the The Resource Directory on the handset man- ages sounds, which you can use as ringers, sounds. and pictures (CID pictures and screensavers), You can set the volume during playback: which you can use as caller pictures or as §Volume§... -
Page 47: Setting Long-Distance And Area Codes
"1" in front of the telephone number You can also set the call volume, ringers, before transferring the number to the and advisory tones using the menu ¢ phonebook SL78H handset via Blue- page 24). tooth. Setting long-distance and Restoring the handset... -
Page 48: Questions And Answers
If you have any questions about using your ¥ ¢ station or has been de-registered. phone, visit us at www.gigaset.com/service Register the handset ( page 10). any time. The table below contains a list of common problems and possible solutions. -
Page 49: Protecting Our Environment
Our environmental mission Disposal statement Batteries should not be disposed of in gen- At Gigaset Communications GmbH, we take eral household waste. Observe local waste our social responsibilities very seriously and disposal regulations, details of which can be are actively committed to improving the obtained from your local authority or the world we live in. -
Page 50: Appendix
72 hours (not in a mi- The operating time of your Gigaset depends crowave, oven etc.). on the capacity and age of the batteries and the way they are used. (All times are maxi- 4. -
Page 51: Writing And Editing Text
PC interface entries is automatically capitalized, fol- lowed by lowercase letters. To enable your handset to communicate with the PC the "Gigaset QuickSync" Writing names program must be installed on your PC (free to download at Press the relevant key several times to enter www.gigaset.com/gigasetsl780). -
Page 52: Updating The Firmware
Data is first loaded from the update server Bluetooth Qualified Design Identity over the Internet. The time required The Bluetooth QD ID for your Gigaset SL78H depends on the speed of your Internet con- is: B013322. nection. Your telephone display is switched off, and the Message key f and the Handsfree key d flash. -
Page 53: Industry Canada Certification
Warning: Changes or modifications to this unit tions (1) this device may not cause interference, not expressly approved by Gigaset Communica- and (2) this device must accept any interference, tions USA LLC could void the FCC authority to including interference that may cause undesired operate the equipment. -
Page 54: Power Outage
FCC / ACTA Information The telephone company may make changes in its However, there is no guarantee that interference facilities, equipment, operations or procedures will not occur in a particular installation. If this tel- that could affect the operation of the equipment. ephone system does cause harmful interference If this happens the telephone company will pro- to radio or television reception, which can be... -
Page 55: Safety Precautions
FCC / ACTA Information Safety precautions c.) If the product has been exposed to rain or water. d.) If the product does not operate normally by fol- Before using your telephone equipment, basic lowing the operating instructions. Adjust only safety instructions should always be followed to those controls that are covered by the operating reduce the risk of fire, electric shock and injury to instructions because improper adjustment of... -
Page 56: Service (Customer Care)
(collec- tained or modified (including the antenna) by tively, "Product") provided by Gigaset Communi- anyone other than Gigaset NAM or a Gigaset cations USA LLC or Gigaset Communications Can- NAM-approved repair facility, or that have ada Inc. - Page 57 (IF ANY) CREATED BY ANY DOCUMENTATION OR All warranty claims must be made by notifying PACKAGING EXCEPT FOR THE LIMITED WAR- Gigaset NAM prior to the expiration of the war- RANTY, AND TO THE MAXIMUM EXTENT PERMIT- ranty period. Gigaset NAM's obligation to provide...
-
Page 58: Governing Law
International Sale of Goods. TIAL DAMAGES WHATSOEVER (INCLUDING, BUT NOT LIMITED TO, DAMAGES FOR LOSS OF PROFITS If you want to learn more about Gigaset Service or OR CONFIDENTIAL OR OTHER INFORMATION, FOR for Support on your Gigaset phone, visit our web BUSINESS INTERRUPTION, FOR PERSONAL INJURY, site at http://www.gigaset.com or please call... -
Page 59: Index
Index Index Bluetooth ..... accepting a call ......activating . - Page 60 Index E-mail address ..copying from the directory Deactivating ......End Call key .
- Page 61 Index Icon Making calls ..........alarm clock accepting a call .
- Page 62 Index ..........Questions and answers Talk key .
Need help?
Do you have a question about the SL78H and is the answer not in the manual?
Questions and answers