Table of Contents
Advertisement
Available languages
Available languages
Quick Links
MANUAL DE INSTRUCCIONES
REPRODUCTOR PARA AUTO CD/MP3
INTERFASE USB – INTERFASE SD/MMC
SCR-0934MR
ESTIMADO CLIENTE
Felicitaciones por su compra!
Por favor lea cuidadosamente este manual, y guárdelo para su futura referencia.
Si necesita soporte adicional, no dude en escribir a: info@premiermundo.com
Página 1
Advertisement
Table of Contents

Related Manuals for Premier SCR-0934MR


Summary of Contents for Premier SCR-0934MR
- Page 1 MANUAL DE INSTRUCCIONES REPRODUCTOR PARA AUTO CD/MP3 INTERFASE USB – INTERFASE SD/MMC SCR-0934MR ESTIMADO CLIENTE Felicitaciones por su compra! Por favor lea cuidadosamente este manual, y guárdelo para su futura referencia. Si necesita soporte adicional, no dude en escribir a: info@premiermundo.com...
-
Page 2: Instalación
Las etiquetas que están comenzando a despegarse dejan residuos pegajosos USO Y MANTENIMIENTO DE LOS DISCOS COMPACTOS No utilice CD’s propios con etiquetas. CONDENSACIÓN DE HUMEDAD En días lluviosos o en áreas muy húmedas, se puede condensar la humedad dentro del lente. En caso Las etiquetas se pegan de que esto ocurriese. - Page 3 MONTAJE FRONTAL Y TRASERO DEL DIN Esta unidad puede ser instalada de dos formas: FRONTAL (instalación frontal convencional) INSTALACION DEL MARCO y TRASERA (instalación trasera, atornillándola a los hoyos del chasis de la unidad). Para mayor información siga las siguientes instrucciones. Antes de ajustar el marco, coloque hacia abajo el lado con la etiquete MONTAJE FRONTAL DEL DIN (MÉTODO A) pegada, que dice “Bottom”...
-
Page 4: Panel De Control Desmontable
PANEL DE CONTROL DESMONTABLE CONEXIÓN ELÉCTRICA SOLTAR Quitar el panel de control desmontable PANEL 1. Compruebe que la batería de su automóvil sea de 12V (6 tapas) con el polo negativo en tierra (si no, 1. Apague la unidad necesitará un conversor). 2. -
Page 5: Instrucciones De Uso
PERILLA DE VOLUMEN CODIFICADOR INSTRUCCIONES DE USO Cuando la función Menú no está activada, gire esta perilla para cambiar el volúmen. Cuando la función Menú está activada, gire esta perilla para navegar por los diferentes itemes del BOTÓN DE ENCENDIDO/APAGADO (POWER) menú. - Page 6 BOTÓN LOUDNESS REPRODUCCIÓN DE CD Use este botón aumentar el reforzamiento de bajos. CARGADO DE CD Presione el botón para abrir hacia abajo el panel de adelante, inserte el dico en la ranura de CD, el FM MONO/ESTÉREO disco se cargará automáticamente y comenzará la reproducción. Use este botón para elegir la recepción estéreo o monaural de las estaciones de radio FM.
- Page 7 3. No importa el modo en el que se encuentre el reproductor (RADIO, CDC, CD, SD/MMC, etc.), una INGRESANDO AL MODO DE OPEARCIÓN SD/MMC vez que haya conectado el USB, el equipo cambiará automáticamente al modo USB. 4. El método de reproducción de los archivos almacenados en el dispositivo USB es igual que para 1.
- Page 8 Estando en el modo de búsqueda, presione el botón ENTER. El mensaje “001” aparecerá en la REPRODUCCIÓN MP3 (CD-R/CD-RW/SD/MMC/DISPOSITIVO USB) pantalla. Use los botones VOL+ / VOL- para seleccionar la pista que desee. En este manual denominaremos “Carpeta” a un directorio con archivos MP3 y “Pista” a los archivos •...
-
Page 9: Especificaciones
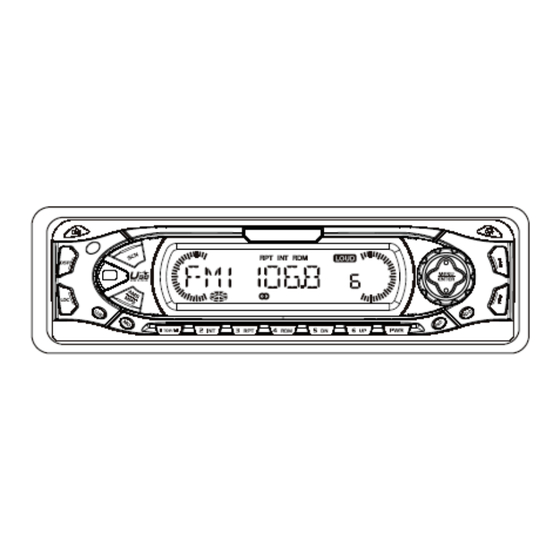
ESPECIFICACIONES DIAGRAMA DEL CIRCUITO REPRODUCTOR DE CD Sistema Disco compacto de audio Discos compatibles Discos compactos Frecuencia de rastreo 44.1KHz Cuantificación de bits 1bit Frecuencia 5 – 20.000Hz Número de canales 2, estéreo Proporción S/N 70dB RADIO Rango de frecuencia 87.5 –... - Page 10 PANEL ENCODER PANEL RELEASE SCAN VOLUME FOLD DOWN BUTTON BUTTON DISPLAY KNOB BUTTON MODEL: SCR-0934MR LOCAL LOUDNESS MONO PRESET MEMORY STATION BUTTONS POWER FUNCTION TUNING / SEEK / BUTTON BUTTON BUTTON (M1-M6) BUTTON MENU/ TRACK UP/DOWN MP3 ENTER BUTTONS BUTTON...
-
Page 11: Handling Compact Discs
1.HANDLING COMPACT DISCS 2.INSTALLATION Before finally installing the unit, connect the wiring temporarily and make sure it is all connected up properly MOISTURE CONDENSATION and the unit and system work properly. On a rainy day or in a very damp area, moisture may condense on the lenses inside the unit. Should this occur, the unit Use only the parts included with the unit to ensure proper installation. -
Page 12: Detachable Control Panel (D.c.p .)
Removing the unit 3.DETACHABLE CONTROL PANEL (D.C.P .) a. Frame Removing The Detachable Control Panel (D.C.P .). b. Insert fingers into the groove in the front of frame and pull out to remove the frame. (When re-attaching the frame, RELEASE point the side with a groove down wards and attach it.) BUTTON c. -
Page 13: Electrical Connection
4. ELECTRICAL CONNECTION 5.GERNERAL OPERATION a. Make sure your car battery is a 12 volt (6 filler caps) negative ground system (if not, a POWER BUTTON converter will be necessary). Press power button to turn on/off the unit. b. Before starting wiring connections, disconnect the power supply by removing the fuse from MENU BUTTON the fuse box. - Page 14 ENCODER VOLUME KNOB LOCAL / DX BUTTON When the Menu function is not activated, rotate this knob to change the volume level. This control can be used to change between Local and Distant (-DX) tuning mode. Local When Menu function is activated, rotate this knob to navigate through different menu items. mode improves reception in some areas where the signal is too strong.
- Page 15 6.CD OPERATIONS 7 . MMC/SD CARD & USB DEVICE OPERATIONS START THE USB DEVICE MODE LOADING THE CD Press the Panel Fold Down Button to fold down the front panel, insert the disc through CD slot, 1.The USB mini socket is accessible as the disc will be automatically loaded and playback will also start.
-
Page 16: Start The Sd/Mmc Mode
START THE SD/MMC MODE 8.MP3 OPERATIONS(CD-R/CD-RW/SD/MMC/USB FILES) - An MP3 directory is shown in this manual as “Folder”, and an MP3 file is shown as “Track”. P .4 1.Press open button to fold down the front panel.(P .4) - Maximum length of track name : 16 characters 2.The SD/MMC card slot is located on top of the front panel as - Maximum length of folder name : 16 characters - Maximum depth of folder levels : 8... -
Page 17: Specifications
2. Searching by track 9.SPECIFICATIONS Pressing the MP3 Search Button once will turn on track search mode, the LCD will show “TRK SCH”. If no action is taken for about 5 seconds, normal play will resume. CD PLAYER At Track Search mode, press Enter Button once, the display will show “001”, use Volume up/down Control to select the desired track. -
Page 18: Schematic Diagram
10.SCHEMATIC DIAGRAM 120K R82422K R725 CDC SBY C401 104 47UF EC503 C405 C406 C409 C410 R412 R413 470 1/6W R190 C121 LAMP+ R112 ZD110 ZD109 ZD108 ZD107 C103 ZD106 Page 16...
Need help?
Do you have a question about the SCR-0934MR and is the answer not in the manual?
Questions and answers