
Related Manuals for Kinetik TD1 Series


Summary of Contents for Kinetik TD1 Series
- Page 1 By Paul Aylett at 2:57 pm, Jun 05, 2012 Dual Channel TENS Digital Pain Reliever User Manual TD1 Series...
-
Page 2: Table Of Contents
Content Introduction Parts Features General Warnings and Safety 5 - 6 Using your Dual Channel TENS Digital Pain Reliever 7 - 9 Programme Selection 10 - 11 Gel Pad Positioning Battery Information Specification Troubleshooting Maintenance and Cautions Explanation of Symbols on Unit... -
Page 3: Introduction
Introduction Thank you for purchasing the Kinetik Dual Channel TENS Digital Pain Reliever. The Dual Channel TENS Digital Pain Reliever is effective in relieving pain. TENS stands for Transcutaneous Electrical Nerve Stimulation. TENS is recognised as a safe and highly effective method of relieving pain. -
Page 4: Parts
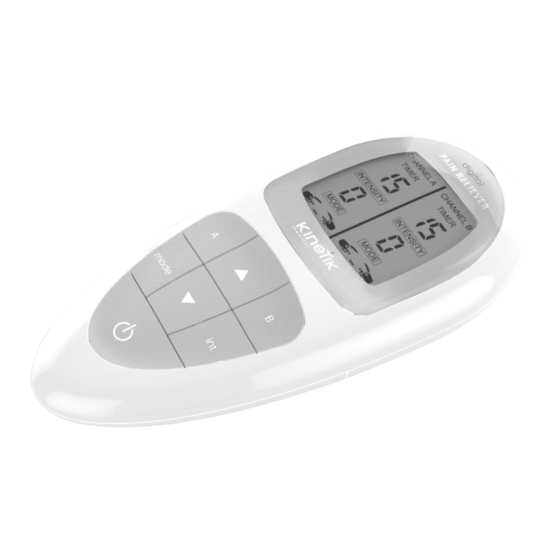
Parts About Dual Channel TENS Digital Pain Reliever Main Unit Cables x 2 Gel pads x 4 MAIN UNIT PARTS OUTPUT PLUG SOCKETS (CHANNELS A & B) LCD SCREEN REMAINING MASSAGE TIME DISPLAY TIME DISPLAY DOT (FLASHES ONCE PER SECOND) OUTPUT INTENSITY DISPLAY MODE DISPLAY... -
Page 5: Features
Features • 2 output channels • Each output channel can be adjusted independently • 8 mode settings to provide different pain relief and massage effects • 8 output intensities to suit different parts of the body and pain • Touch control buttons and large LCD display making the unit user friendly •... -
Page 6: General Warnings And Safety
General Warnings and Safety Before you start: Please carefully read and understand the following warnings and cautions to ensure the safe and correct use of this device and to prevent injury. • Make sure the batteries are installed correctly. • Connect the cable to the gel pads and then connect to the unit (see page 7 for more details). •... -
Page 7: General Warnings And Safety
General Warnings and Safety Gel Pad not suitable for use on: • Head • Face • Back of neck • Throat • Chest area • Heart • Oral cavity • Eyes • Spine • Sexual organs • Bones • Scarred areas following surgery for at least 10 months after the operation •... -
Page 8: Using Your Dual Channel Tens Digital Pain Reliever
Using your Dual Channel TENS Digital Pain Reliever How to connect the gel pads to the output cable: Preparation before using the unit 1. This unit requires 4 x AAA batteries (included). 2. To insert/replace batteries, remove the battery compartment cover at the back of the unit and insert the batteries, observing correct polarity. - Page 9 Using your Dual Channel TENS Digital Pain Reliever Clip here Clip on pocket In hand Not designed for belt On table...
-
Page 10: Using Your Dual Channel Tens Digital Pain Reliever
Using your Dual Channel TENS Digital Pain Reliever Please ensure the gel pads are correctly attached and placed on the desired area before switching the unit on. 1: Press the “ON/OFF” button to switch the unit on. 2: Press the “A” button to select channel A. “CHANNEL A” will be displayed on the left hand side of the LCD. -
Page 11: Programme Selection
Programme Selection One of the following symbols will be displayed in the LCD, depending on which mode setting is chosen. DURATION PROGRAM MODE PROGRAM FOR: (mins) SELECTION FUNCTION TAPPING PAIN RELIEF (SLOW) TAPPING PAIN RELIEF (FAST) VIBRATING PAIN RELIEF/MASSAGE (SLOW) VIBRATING PAIN RELIEF/MASSAGE (MEDIUM) - Page 12 Programme Selection • The output intensity will be displayed on the LCD as a number from 1 – 8. (1 is the lowest and 8 is the highest). • The unit has a memory function - if a particular mode setting is chosen then it will remain on that mode even when the unit is switched off and switched back on.
-
Page 13: Gel Pad Positioning
Gel Pad Positioning Legs and Feet Lower back Upper back NOTE: DO NOT PLACE ON SPINE For other areas of pain, place the gel pads around the area of pain 4 - 6 inches apart (approximately). -
Page 14: Battery Information
Battery Information 1. Please use 4 x AAA batteries in the unit (included). 2. Remove the batteries if the product is not in use for long periods of time. 3. Do not mix old and new batteries or different types of batteries. 4. -
Page 15: Specification
Specification • Power Source: DC: 6.0V 4 x AAA batteries (included) • Frequency: 4~ 128Hz • Band width: 60-200µs • Output current: Max.30mA±20% • Output voltage: 40V(P-P) by 500 load±20% • Size: 60(w) mm x 140 (h) mm x 26 (d) mm (approx.) •... -
Page 16: Troubleshooting
Troubleshooting Problem Check points Possible solution Are the batteries exhausted? Replace the batteries. The unit does not switch on Are the batteries installed correctly? Insert the batteries observing correct polarity. Is the cable properly connected? Firmly connect the cable. No output stimulus/sensation Have you removed the transparent Remove the protective film. -
Page 17: Maintenance And Cautions
Maintenance and Cautions CAUTIONS REGARDING SAFETY • Do not immerse device in water or any liquid. Do not drop device or throw it from a height. • After using the device, please remove output plug from output socket and re-attach the pads to the protective transparent film. -
Page 18: Explanation Of Symbols On Unit
Explanation of Symbols on Unit Read the instructions. This symbol indicates that this product is a Type BF device. Symbol for "Environment Protection" – Waste electrical products should not be disposed of with household waste. Please recycle where facilities exist. Check with your local Authority or retailer for recycling advice. - Page 19 Harvard Medical Devices Ltd. Unit 1301-2, 13th Floor, Railway Plaza, 39 Chatham Road South, Tsimshatsui, Kowloon, Hong Kong. Kinetik Medical Devices Ltd. Harvard House, The Waterfront, Elstree Road, 0197 Elstree, Herts WD6 3BS, UK Made in PRC TD1 UK IB 20110524...
Need help?
Do you have a question about the TD1 Series and is the answer not in the manual?
Questions and answers