Table of Contents
Advertisement
Quick Links
Advertisement
Table of Contents

Subscribe to Our Youtube Channel
Related Manuals for ZMODO SFN6


Summary of Contents for ZMODO SFN6
- Page 1 4/8/16Channel DVR Quick Manual...
- Page 2 4/8/16Channel DVR Quick Manual Notes: The power supply of this DVR is provided through DC12V3A adapter, please check the power outlet before installation and ensure it can meet the requirements of the adapter; Do not place the DVR at a place subject to rain and moisture; Do not install the DVR at a place subject to violent vibration;...
-
Page 3: Table Of Contents
4/8/16Channel DVR Quick Manual Contents Chapter 1 Open-case inspection and quick installation ........3 1.1 Open-case inspection ................3 1.2 Product appearance and port .............. 3 1.3 Quick Installation ................. 5 1.3.1 HDD installation ................ 5 1.3.2 Power on ................... 6 Chapter 2 Software interface basic operation ........... -
Page 4: Chapter 1 Open-Case Inspection And Quick Installation
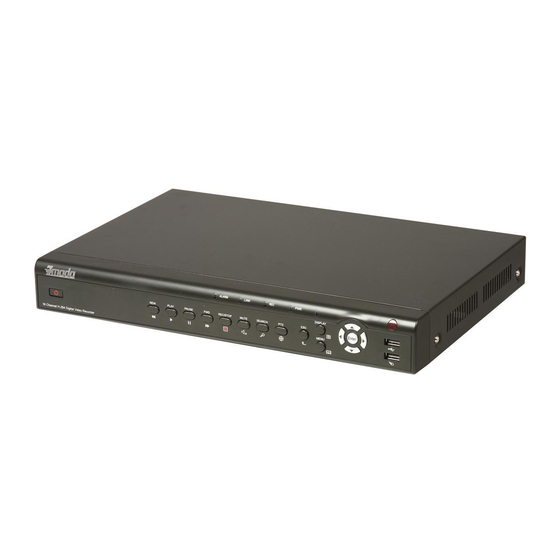
4/8/16Channel DVR Quick Manual Chapter 1 Open-case inspection and quick installation 1.1 Open-case inspection ◆ When you receive the products, please check if the DVR is complete or make sure if there is any accidental damage during transportation. ◆ Then, please open the package and check if the accessories are complete. You can remove the protective film of the DVR package. - Page 5 4/8/16Channel DVR Quick Manual 1.Power switch 2.Rewind 3.Play 4.Pause 5.Foward 6.Manual start/stop recording 7.Mute 8.Video search 9.PTZ control 10.REC:Video recording indicator; PWR: Power 11.ESC:Exit/Return 12.DISPLAY:Display mode; MENU: Main menu 13.up,down,left,right and Confirm 14.USB interface(the upper one for USB flash disk, the one below for mouse connection) 15.Remote control infrared receiver Front panel 3 :...
-
Page 6: Quick Installation
4/8/16Channel DVR Quick Manual (7、 8、 9、 10) 1. Video in 2. Video out (BNC port) 3. Audio out 4. Audio in 5. VGA output port 6.Network port 7.RS485 8.Public terminal 9. Alarm output 10. Alarm input 11. Power input 12.Grounding terminal Note: The above picture is the back panel of 16CH DVR. -
Page 7: Power On
4/8/16 4/8/16 4/8/16 4/8/16Channel DVR Quick Manual Channel DVR Quick Manual Channel DVR Quick Manual Channel DVR Quick Manual Channel DVR Quick Manual Channel DVR Quick Manual Channel DVR Quick Manual Channel DVR Quick Manual Channel DVR Quick Manual Channel DVR Quick Manual Channel DVR Quick Manual Channel DVR Quick Manual Channel DVR Quick Manual... -
Page 8: Recording Mode
4/8/16Channel DVR Quick Manual 【Playback】: Search detailed recording files 【Record】: Set the recording mode including channels, quality, frame rate, etc. 【HDD】: Check HDD capacity and formatting 【Setup】: Setup of system basic information including language, time, user password, etc. 【Advanced】 : Setup of alarm, motion detection, and mobile phone surveillance, etc. -
Page 9: Recording Search And Playback
4/8/16Channel DVR Quick Manual 2.4 Recording Search and Playback 2.4.1 Search and playback Enter the Video Search screen from “Main Menu” →“Video Search”, as shown below: 1) Enter the specific date and time in the time frame and click 【 PLAY 】 , and the DVR plays back the video from the input time. -
Page 10: Alarm Basic Setup
4/8/16Channel DVR Quick Manual Alarm trigger Alarm Power Alarm output Alarm input Note: The above picture is the type of normally on alarm, and normally off is the opposite way. 2.5.1 Alarm basic setup Enter from 【 Main Menu 】 → 【 Advanced 】 → 【 Alarm Setup 】 , as shown below: I/O ALARM: Each channel corresponds to an I / O alarm status, which means that alarm recording of corresponding channel will be started when one channel alarm input is valid. -
Page 11: Ptz Control
4/8/16Channel DVR Quick Manual SSL: a secure link transmission protocol. “Off” is usually chosen. SMTP PORT: the mailing port of the mailbox server, usually being 25, with the exception of a few mailboxes, such as the mailing port of the GMAIL server whose port number is 465. -
Page 12: Motion Detection
4/8/16Channel DVR Quick Manual Operate the PTZ with mouse through the keypad on the interface. Set the cruise point in the cruise setup, as shown on the right picture above. 2.7 Motion Detection Enter the Motion Detection screen from “Main Menu” →“Advanced” to “Motion Detection”, as shown below: STATUS: Each channel has a corresponding switch. -
Page 13: Network Setup
4/8/16 4/8/16 4/8/16 4/8/16Channel DVR Quick Manual Channel DVR Quick Manual Channel DVR Quick Manual Channel DVR Quick Manual Channel DVR Quick Manual Channel DVR Quick Manual Channel DVR Quick Manual Channel DVR Quick Manual Channel DVR Quick Manual Channel DVR Quick Manual Channel DVR Quick Manual Channel DVR Quick Manual Channel DVR Quick Manual... -
Page 14: Port Mapping
4/8/16Channel DVR Quick Manual DDNS (Dynamic Domain Name Server): with the two options of “ON” and “OFF”; when a dynamic domain name server is available, please select DDNS "ON"; SERVICE: The user may select his/her desired DDNS server, with the 2 options of 3322 and dyndn. -
Page 15: Mobile Phone Surveillance
4/8/16Channel DVR Quick Manual Put the DVR's IP and port (WEB port, media port, phone port) to fill in the corresponding location, the protocol is “Both”, and the state is “Enable” or Reboot. Then click “Save Settings”, add other ports in the same way. 6000 is mobile phone monitoring port, this port must be added in order to use the mobile phone surveillance function. -
Page 16: Client End And Playing Software
4/8/16 4/8/16 4/8/16 4/8/16Channel DVR Quick Manual Channel DVR Quick Manual Channel DVR Quick Manual Channel DVR Quick Manual Channel DVR Quick Manual Channel DVR Quick Manual Channel DVR Quick Manual Channel DVR Quick Manual Channel DVR Quick Manual Channel DVR Quick Manual Channel DVR Quick Manual Channel DVR Quick Manual Channel DVR Quick Manual... -
Page 17: Player
4/8/16 4/8/16 4/8/16 4/8/16Channel DVR Quick Manual Channel DVR Quick Manual Channel DVR Quick Manual Channel DVR Quick Manual Channel DVR Quick Manual Channel DVR Quick Manual Channel DVR Quick Manual Channel DVR Quick Manual Channel DVR Quick Manual Channel DVR Quick Manual Channel DVR Quick Manual Channel DVR Quick Manual Channel DVR Quick Manual... -
Page 18: Ie Login
4/8/16Channel DVR Quick Manual 1. Security 2. Sites 5. Enable 4. Add 6. Ok 3. Cancel After finishing setup, restart the browser. Enter the IP address in the IE address bar and complete the automatic installation of the plug-in units according to the indication. 2.12.2 IE login After finishing the plug-in units installation, and then login. -
Page 19: Central Management Software (Cms)
4/8/16Channel DVR Quick Manual Password: Enter the IE password of DVR. This password is set at the Internet end. Please refer to the manual in the CD for details Network: LAN: If the computer and DVR are in the same LAN, choose “LAN”... - Page 20 4/8/16Channel DVR Quick Manual 【user name】 : Create the initial user name for login 【password】: Create the initial password 【Re-enter】: Confirm the initial password 【 Language 】 : Chinese and English are optional. Note: If the earlier version of this software has already been installed, please manually delete the installation menu “user.cfg”.
-
Page 21: Appendix: System Connection Picture
4/8/16Channel DVR Quick Manual Appendix: System Connection Picture... - Page 22 4/8/16Channel DVR Quick Manual...
Need help?
Do you have a question about the SFN6 and is the answer not in the manual?
Questions and answers