
Subscribe to Our Youtube Channel
Related Manuals for Technicolor TG650S


Summary of Contents for Technicolor TG650S
- Page 1 TECHNICOLOR TG650S INSTALLATION GUIDE FOR AT&T FIRMWARE VERSION 10.2 AND LATER AT&T MANAGED BROADBAND Document version 1.0 April 7, 2015...
- Page 2 File: ATT_TG650s_Quick_Install_Guide Version: Number of pages: Release date: 04/07/15 Previous version: Planned revision date: This document will be updated, if appropriate, after management reviews, for legal or technical reasons. Change history Version Changes Draft version Final version ATT_TG650s_Quick_Install_Guide Page 2...
-
Page 3: Table Of Contents
TABLE OF CONTENTS 1 Introduction........................... 5 1.1 Welcome letter.....................6 2 Technicolor Gateways........................7 Technicolor TG650s modem/gateway.............7 2.2 Generic firmware..................9 3 Physical installation........................10 3.1 Package description..................10 3.2 Physical Installation Environment..............10 3.3 Connections Overview.................11 4 Start of the installation......................... 13 Initial Setup....................13 4.2 Reconfigure my gateway................19... - Page 4 Preface This document describes how to install the Technicolor TG650s SHDSL modem/gateway provided by AT&T as part of the AT&T Managed Broadband access. AT&T Managed Broadband is available in selected countries, each country requires a country specific configuration. This guides you through the setup process and provides a short problem determination flow.
-
Page 5: Introduction
INTRODUCTION This documentation describes the TG650s modem/gateway, its physical installation, its configuration, how to get support and a modem problem determination flow. Welcome letter Package description Modem description Physical installation Modem configuration Most common configuration problems... -
Page 6: Welcome Letter
Welcome letter Welcome letter AT&T Business Subject: Do-it-yourself installation package Service: Managed Broadband (IP DSL) for AT&T VPN Tunneling Services (AVTS) AT&T Network Based IP VPN Remote Access (ANIRA) Dear Customer, Thank you for your confidence in the AT&T Managed Broadband Service. This access technique provides you with high-speed connection to your Corporate Network and the Internet. -
Page 7: Technicolor Gateways
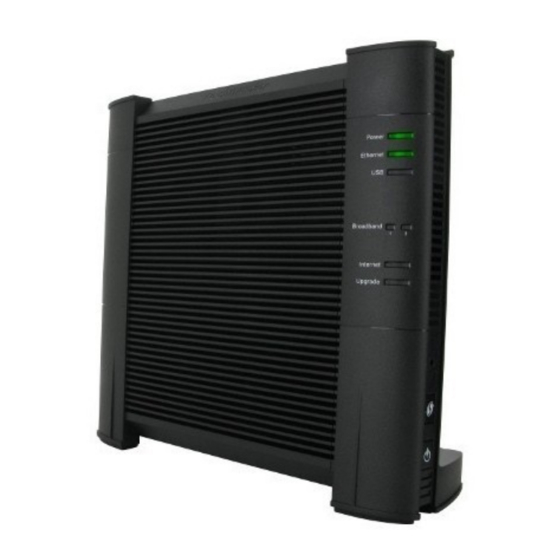
It is presented in a slim-line box with an external power converter. The TG650s modem/gateway is a versatile device, which can be configured as a bridge or a router (or gateway). AT&T uses this device solely in bridge mode to support the VPN CPE cascaded behind it. - Page 8 The TG650s supports several features, which are not supported by AT&T: Storage server function The LED functions: Illustration 2.2: LED indications overview. Please notice the dual Broadband LEDs, 1 per wire-pair. The ports to connect all cables to are at the backside of the modem. The layout of the ports is displayed in illustration 2.3.
-
Page 9: Generic Firmware
DSL-port. The power socket is located next to the power switch on the right hand side on the modem. The USB port is unused. Generic firmware Generic firmware The TG650s as AT&T uses it runs standard generic firmware: The default user is “Administrator” ... -
Page 10: Physical Installation
◦ 1 RJ45 Cat5e Ethernet straight cable There is no localization supplied, as the TG650s is an SHDSL modem, and does not support line-sharing with Voice, hence no splitter/filter nor additional cabling is supplied. Examples of the RJ45 and RJ14 connectors: Illustration 3.1: RJ14 (left) and RJ-45 (right) connector. -
Page 11: Connections Overview
Connections Overview Connections Overview The TG650s' gray SHDSL port is directly connected to the wall-socket using one RJ14 cable. No voice services are supported on the wire-pair. The AT&T VPN Gateway or Cisco Ethernet based router is then best connected to yellow LAN port 1, as this is the Gigabit Ethernet port. - Page 12 pair connection. This then requires that the cable needs to be modified as shown below in Illustration 3.3. Illustration 3.3: RJ-14 cable pin-out and Y-cable when 2 wall-sockets are used to support the SHDSL connection. ATT_TG650s_Quick_Install_Guide Page 12...
-
Page 13: Start Of The Installation
START OF THE INSTALLATION The configuration software for this modem can be found on the AT&T ftp server here: ftp://anonymous@ftp.attglobal.net/pub/MoW_Broadband/ The file name will vary, but always start with TG650. The latest release will have the highest extension number. This file must be unpacked and the “setup.exe” can be launched. This then presents a menu panel shown below in Illustration 4.1 Illustration 4.1: Configuration panel To configure the modem, please connect your PC to one of the yellow LAN ports of the modem. - Page 14 Illustration 4.2: Start of the Setup Wizard Select “Next” to go to the next screen to select the DSL device: Illustration 4.3: In the dropdown box, please select the gateway you have received. A new screen with safety instructions and regulatory notices is displayed. ATT_TG650s_Quick_Install_Guide Page 14...
- Page 15 Illustration 4.4: Safety instructions and Regulatory notices; please read these carefully To continue confirm that you have read the instructions and notices by tagging the box. This will show the “Next” button. Illustration 4.5: Here the physical installation of your gateway starts ATT_TG650s_Quick_Install_Guide Page 15...
- Page 16 Click “Next”. Illustration 4.6: DSL line connection Click “Next”. Illustration 4.7: This panel is not valid for the TG650s, please select "no". ATT_TG650s_Quick_Install_Guide Page 16...
- Page 17 Illustration 4.8: Again this panel is invalid for the TG650s, please click "Next". Now the power supply will be connected: Illustration 4.9: Connection to the power supply Click “Next”. ATT_TG650s_Quick_Install_Guide Page 17...
- Page 18 Illustration 4.10: After this panel the configuration software for this modem will be started. You will only need the country in which this modem will be installed, and the user-name/password to locally secure the modem. The user-name and password are only valid for access to the modem from the LAN side of the network.
-
Page 19: Reconfigure My Gateway
Reconfigure my Reconfigure my GATEWAY GATEWAY The CD software will now scan for DSL (gateway) device connected to the PC. The screen will look like this: Illustration 4.12: Start of the setup program to configure the gateway Click “Next: 4.2.1 Finding the gateway 4.2.1 Finding the gateway... - Page 20 In some cases, e.g. when the AT&T Global Network Client is installed on the computer, or other equipment between the computer and the DSL device, the wizard will not find the DSL device. If the wizard didn't detect the DSL device, then go to paragraph 5.2 “Wizard did not detect the Gateway”, page 24.
- Page 21 The next screen will ask if the modem should be reconfigured: Illustration 4.16: Please tick "Yes" if you want to configure the modem The next screen will show a drop-down menu (Region) to select the country and the required service: Illustration 4.17: Please select the country in which this modem will be connected and click “Next”.
-
Page 22: Securing The Gateway
The configuration will now start with securing the Gateway by asking your preferred user-name and password needed to locally access the modem. 4.2.2 Securing the gateway 4.2.2 Securing the gateway In the panel shown in Illustration 4.18 you are asked to submit an user name and password to prevent unauthorized access to the DSL device. -
Page 23: Finalizing The Configuration
4.2.3 4.2.3 Finalizing the configuration Finalizing the configuration This ends the selection of configuration settings, and, the configuration you have created will be pushed in to the Gateway. Illustration 4.19: Pushing in the configuration. This process can take some time, and possibly you will see a few reboots of the gateway. The configuration becomes active during this phase. -
Page 24: Trouble Shooting
Wizard did not detect the Gateway Wizard did not detect the Gateway The Technicolor configuration software uses a multicast IP protocol to detect the gateway and determine the model. If the configuration software cannot find the gateway, the following panel... - Page 25 Illustration 5.2: Gateway not found Click on “Wired” to try again. If this doesn't help, check following causes which could generate problem: • The DSL modem is not connected directly with your computer. Remove all equipment connected between the modem and your computer (your modem has to be connected directly with your computer without other equipment on the LAN).
-
Page 26: Led Diagnostics
Illustration 5.3: Firewall is active, please turn it off for the configuration software to work LED diagnostics LED diagnostics After establishing Internet connectivity, at least the following LEDs should solidly light green: Power and Broadband. When service option 2 is selected (AT&T VPN services), the Internet LED (@) should also be green. -
Page 27: Browsing To The Gateway
DNS server: enabled Master firewall: enabled Default Connection profile settings: Transparent Bridging on VPI*VCI=8*35, 0*35 and EFM untagged. The TG650s uses generic Technicolor firmware with 4 embedded templates: Bridge: this template will configure bridge mode configurations. Routed IPoA: This will set up the gateway as router asking an IP-address via DHCP. -
Page 28: Wrong Configuration Profile Selected
Routed PPP: This enables the gateway as router using PPPoE or PPPoA protocols Voice router: Not supported on this model. AT&T supports only bridge mode on the gateway model. 5.5.3 Wrong configuration profile selected 5.5.3 Wrong configuration profile selected It can always happen, that during the configuration the wrong profile is selected for the service requested. -
Page 29: Att_Tg650S_Quick_Install_Guide
This is the last page of this document. ATT_TG650s_Quick_Install_Guide Page 29...
Need help?
Do you have a question about the TG650S and is the answer not in the manual?
Questions and answers