Brady IP Quick Start Manual
Brady ip thermal printer
Hide thumbs
Also See for IP:
- Operation/configuration manual (75 pages) ,
- Service manual (30 pages) ,
- Manual (75 pages)
Table of Contents
Advertisement
Quick Links
Advertisement
Table of Contents

Related Manuals for Brady IP


Summary of Contents for Brady IP
- Page 2 No part of this manual nor any translation may be reproduced or transmitted in any form or by any means, for any purpose other than the purchaser’s personal use, without the express written permission of Brady. United States Note: This equipment has been tested and found to comply with the limits for a Class A digital device, pursuant to part 15 of the FCC Rules.
- Page 3 Brady’s high quality specialized materials. To gain the full benefit of the system, material and ribbons from Brady are programmed with the ability to communicate with the printer and software.
-
Page 4: Table Of Contents
Quick Start Manual About the Printer The Brady IP™ printer is designed to work with BradySoft, IdentiLab or LabelMark software. When used with one of those software packages, the printer will automatically recognize all Brady non-metallized materials up to 4 inches (101.6 mm) wide. -
Page 5: Quick Start Road Map
7. Load the material ................. Page 15 8. Calibrate the printer ..............Page 19 Safety The Brady IP printer is configured for voltages of 100 to 240 V ~ (50 to 60 ■ Hz). Connect only to a grounded power outlet. -
Page 6: Unpacking The Brady Ip Printer
• CONTACTING power supply can cause electrocution. A PELIGRO Peligro de choque eléctrico • NO ABRA la caja de la Brady IP impresora de rótulos. • DESENCHUFE el cordón de energía antes de darle servicio. • El hacer CONTACO con la fuente de energía puede causar electrocución. -
Page 7: What's In The Box
Stress Free System Setup Stress Free System Setup is available, free of charge, in North America. Brady’s Stress Free System Setup helps you set up your new printer and software. To schedule a free phone setup assistance appointment, call 1-800-643-8766 and select Menu Option 4. -
Page 8: Installation
Printer Connection NOTICE The device and printing materials will be damaged by moisture and wet conditions. Set up Brady IP printers only in dry locations protected from moisture. AVISO El dispositivo y los materiales de impresión serán dañados por la humedad y las condiciones mojadas. -
Page 9: Interface Connections
5. Turn on the power switch on the back of the printer (Figure 1, 5). The printer will perform a self test and then go into Ready mode. NOTE: If an error occurs during installation, refer to the “Brady IP™ Printer Operator/Configuration Manual” located on the Product... -
Page 10: Usb Connection
Quick Start Manual USB Connection 1. Ensure that the Brady IP Printer is turned off. 2. Connect the printer to the computer using the supplied USB cable. The USB cable connects to the printer at the USB port (Figure 1, 2) and to a USB port on the computer. -
Page 11: Multiple Printers
USB, to install, continue to Multiple Printers on page 8. Multiple Printers If you want to add an additional IP Printer to your PC, ensure the additional IP Printer is powered on, then connect to your computer NOTICE When connected to your PC, the Found New Hardware Wizard will appear. - Page 12 Quick Start Manual Figure 3, Printers Window 1. Ensure the Product CD is in the CD drive. Select Run from your computer’s start menu. Choose the drive where the Product CD is located. Choose Setup\Setup.exe. Choose OK. Figure 4, Run Dialog Box 2.
- Page 13 Quick Start Manual 3. Choose the printer. Figure 6, Choose Printer Dialog Box 4. Choose the appropriate port. Figure 7, Choose Printer Port Dialog Box 5. Click Yes. Figure 8, Read Only File Detected Dialog Box...
-
Page 14: Rs-232 Or Ethernet Printer Driver
On-line Status Monitor The On-line Status Monitor provides printer status information. From the Options menu, you can select Warn if no Brady Smart Supply, Always on top or Unit of Measure (inches or mm). The Help menu provides links to... -
Page 15: Printer Overview
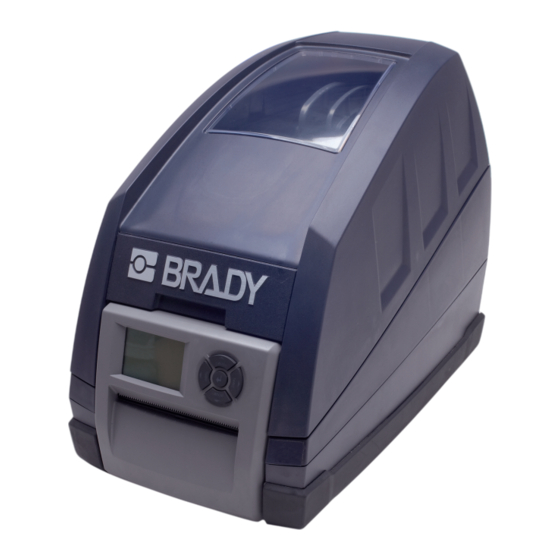
Quick Start Manual Figure 10, On-line Status Monitor Printer Overview Figure 11, Brady IP Printer 1. Print Module Release Button 4. Printer Cover 2. Ribbon Carrier Close Points 5. Material Holder 3. Ribbon Take-up Spindle 6. Control Panel... -
Page 16: Loading The Ribbon
Quick Start Manual Loading the Ribbon Figure 12, Print Module Release Button 1. Print module release button 1. Open the cover (Figure 11, 4) and press the green print module release button (Figure 12, 1) to open the control panel (Figure 13, 1). 2. - Page 17 Quick Start Manual 3. Position the square end of the new ribbon spindle in the square notch on the right side of the printer, push the spindle slightly to the right and slide the other end of the spindle into the notch (Figure 13, 2) on the left side of the printer.
-
Page 18: Loading The Material
There are electrical contacts located under the side tabs (Figure 15, 3) on both sides of the material supply holder. Be careful not to damage these electrical contacts or the Brady IP printer will be unable to read the material identification tag on the labels. - Page 19 Figure 16, Labeling Material 1. End piece 2. Electrical contacts under side tabs 3. Slide the Brady labeling material roll onto the material supply holder and reinstall the end piece (Figure 16, 1), which will automatically center the roll on the holder.
-
Page 20: Reading The Lcd Display
Reading the LCD Display The use of Brady-brand supplies and LabelMark, BradySoft or IdentiLab labeling software allows access to the full operation of Brady mode. For detailed information about Brady mode, refer to the “Brady IP™ Printer Operator/Configuration Manual” located on the Product CD. - Page 21 5. Material part number and 3. Sensor position estimated amount remaining If the printer is in a state other than Ready, refer to the “Brady IP™ Printer Operator/Configuration Manual” located on the Product CD to determine what the problem might be.
-
Page 22: Calibrating The Printer
Other Modes The Brady IP printer can be used in modes other than described in this manual. For information regarding use of metallized labels, other non-Brady IP-enabled materials or software packages and Auto Peel-off mode, refer to the “Brady IP™... - Page 23 Quick Start Manual For Repair or Technical Assistance, find your regional Brady Tech Support office by going to: In the Americas: www.bradyid.com ■ In Europe: www.bradyeurope.com ■ In Asia: www.bradycorp.com ■...
Need help?
Do you have a question about the IP and is the answer not in the manual?
Questions and answers