Table of Contents
Advertisement
Advertisement
Table of Contents

Related Manuals for Brady BBP11-34L


Summary of Contents for Brady BBP11-34L
- Page 1 BBP11-34L Thermal Transfer Printer User Guide Ed 08/09...
-
Page 2: Table Of Contents
Contents Introduction Product Introduction ....................1 Compliance ......................1 Operations Overview Unpacking and Inspection ..................2 Printer Overview..................... 3 Setup Setting Up the Printer ..................... 6 Open / Close the Top Cover................... 7 Loading the Ribbon ....................8 Loading the Media....................11 Diagnostic Tool..................... - Page 3 Worldwide, Inc. guide. This manual is proprietary to Brady Worldwide, Inc. and may be revised from time to time without notice. Brady Worldwide, Inc. disclaims any understanding to provide you with revisions, if any. All brand or product names referenced in this manual are trademarks or registered trademarks of their respective companies or organizations.
-
Page 4: Revision History
Revision History Date Content 2008/8/6 Revise the 3.4.3 section(Loading media in peel-off mode) 2009/08 Revise to include new Brady Standard. BPP11 User Manual... -
Page 5: Product Introduction
Introduction CHAPTER 1 Product Introduction Thank you for purchasing the BRADY BBP11-34L series bar code printer. Although the printer is small, it delivers reliable, superior performance. This printer provides both thermal transfer and direct thermal printing at user-selectable speeds of 2.0 or 3.0 ips. It accepts roll feed, die-cut, and fan-fold labels for both thermal transfer and direct thermal printing. -
Page 6: Operations Overview
Operations Overview CHAPTER 2 Unpacking and Inspection This printer has been specially packaged to withstand damage during shipping. Please carefully inspect the packaging and printer upon receiving the bar code printer. Retain the packaging materials in case you need to reship the printer. Unpacking the Printer The following items are included in the carton: •... -
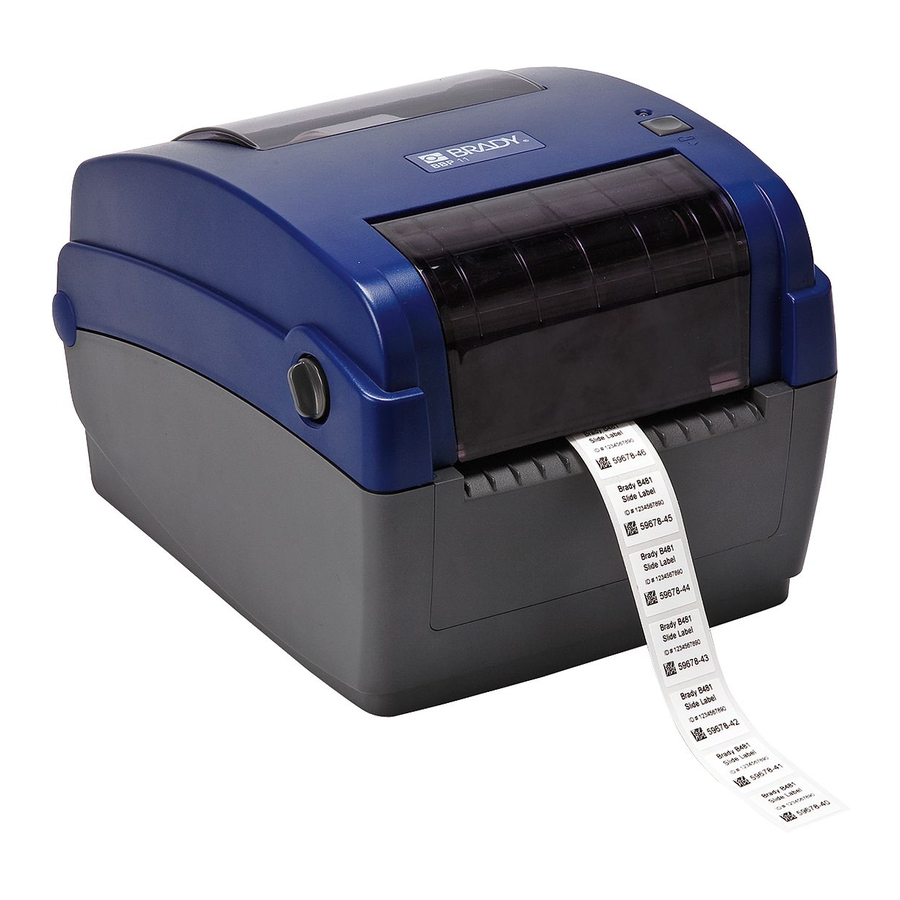
Page 7: Printer Overview
Printer Overview Front View Ribbon access cover Top cover open lever Media view window LED indicator Feed button SD card socket * Recommended SD card specification. SD V 1.0, V 1.1 SD V 2.0 (SDHC) 128MB 4GB class 6 256MB 512MB - Supported DOS FAT file system. - Page 8 Interior View Ribbon rewind hub Ribbon rewind gear Gap sensor (receiver) Media holder Media holder lock switch Gap sensor (transmitter) Printhead Ribbon supply hub Top cover support 10 Media guide adjustment knob 11 Black mark sensor 12 Platen roller BPP11 User Manual...
- Page 9 Rear View Ethernet interface USB interface Parallel/LPT interface Serial/COM interface Power jack socket Power switch Fan-fold paper entrance chute BPP11 User Manual...
-
Page 10: Setup
Setup CHAPTER 3 Setting Up the Printer 1. Place the printer on a flat, secure surface. 2. Make sure the power switch is off. 3. Connect the printer to the computer with the provided USB cable. 4. Plug the power cord into the AC power cord socket at the rear of the printer, and then plug the power cord into a properly grounded power outlet. -
Page 11: Open / Close The Top Cover
Open / Close the Top Cover 1. Open the printer top cover by pulling the grey tabs located on each side toward the front of the printer, then lift the top cover to the maximum open angle. 2. A top cover support at the rear of the printer will engage with lower inner cover to hold the printer top cover open. -
Page 12: Loading The Ribbon
Loading the Ribbon 1. Open the top cover on the printer by pulling the green open levers located on each side of the printer and lifting the top cover to the maximum open angle. 2. Open the ribbon access cover. Note: In normal print mode, the ribbon access cover can be opened while opening the top cover. - Page 13 4. Insert the right side of the paper core onto the rewind hub. Align the notches on the left side and mount onto the spokes. 5. Attach the ribbon leader onto the ribbon rewind paper core. 6. Turn the ribbon rewind gear until the plastic ribbon leader is thoroughly wound and the black section of the ribbon covers the print head.
- Page 14 Ribbon Loading Path BPP11 User Manual...
-
Page 15: Loading The Media
Loading the Media Loading Media 1. Open the printer top cover by pulling the grey tabs, located on each side, toward the front of the printer, then lift the top cover to the maximum open angle. 2. Separate and hold open the media holders. 3. -
Page 16: Diagnostic Tool
5. Optional: If using either an external media holder or folded labels, feed the media through the rear external label entrance chute. 6. Place the paper, print side face up, through the media sensor . 7. Place the label leading edge onto the platen roller. 8. - Page 17 External Label Roll Mount Installation (Option) 1. Attach an external paper roll mount on the bottom of the printer. 2. Insert a 1” label spindle into a paper roll and install it on the external paper roll mount. Note: f your paper core is 1 inch, remove the 1.5” core adapter from the fixed tab. If label width is 4 inch wide, two fixed tabs are not required.
- Page 18 6. Move the media guides to fit the label width by turning the guide adjuster knob. 7. Disengage the top cover support and close the top cover gently. 8. Use the Diagnostic Tool to set the media sensor type and calibrate the selected sensor (see the diagnostic utility quick start guide for more information): a.
-
Page 19: Diagnostic Tool
Diagnostic Tool The Diagnostic Utility is a toolbox that lets users explore the printer's settings and status; change printer settings; download graphics, fonts, and firmware; create printer bitmap fonts; and to send additional commands to the printer. Using this convenient tool, you can explore the printer status and settings and troubleshoot the printer. - Page 20 Printer Function (Calibrate Sensor, Ethernet Setup, RTC Setup…) 1. Select the PC interface connected to the bar code printer. 2. Click Function to set. 3. The detail functions in the Printer Function Group are listed in the table. Function Description Factory Default Initialize the printer and restore the settings to factory default.
-
Page 21: Install Sd Memory Card
Install SD Memory Card 1. Open the SD memory card cover. 2. Insert the SD card until it is fully seated. 3. Close the memory card cover. * Recommended SD Card Specifications SD V 1.0, V 1.1 SD V 2.0 (SDHC) 128 MB 4 GB class 6 256 MB... -
Page 22: Led And Button Functions
LED and Button Functions CHAPTER 4 This printer has one button and one three-color LED indicator. By the button when the LED indicates a different color, the printer can be set to feed labels, pause the printing job, select and calibrate the media sensor, print a printer self-test report, reset the printer to defaults (initialization). -
Page 23: Power On Utilities
Power on Utilities There are six power-on utilities to set up and test printer hardware. These utilities are activated by pressing FEED, then turning on the printer power simultaneously and releasing the button at a different LED color. Follow these steps for various power-on utilities: 1. - Page 24 Gap/Black Mark Calibration, Self-test and Dump Mode While calibrating the gap/black mark sensor, the printer will measure the label length, print the internal configuration (self-test) on a label and then enter the dump mode. Calibrating the gap or black mark sensor depends on the sensor setting in the last print job. To calibrate the sensor: 1.
-
Page 25: Printer Initialization
Dump Mode The printer enters dump mode after printing the printer configuration. In the dump mode, all characters are printed in 2 columns as shown. The ASCII characters are received from your system and right side data shows the corresponding hexadecimal value of the characters. It allows users or engineers to verify and debug the program. - Page 26 After initialization, printer configuration will be restored to defaults as shown in the table. Parameter Default setting Speed 127 mm/sec (5 ips) (203DPI) 76 mm/sec (3 ips) (300DPI) Density Label Width 4” (101.5 mm) Label Height 4” (101.5 mm) Sensor Type Gap sensor Gap Setting 0.12”...
- Page 27 Skip AUTO.BAS TSPL2 programming language lets users download an auto execution file to flash memory. The printer will run the AUTO.BAS program immediately when printer power is turned on. The AUTO.BAS program can be interrupted without using the power-on utility to run the program.
-
Page 28: Troubleshooting
Troubleshooting CHAPTER 5 The following guide lists the most common problems that may be encountered when operating this bar code printer. If the printer still does not function after all suggested solutions have been tried, please contact the Customer Service Department of your purchased reseller or distributor for assistance. -
Page 29: Print Quality
Print Quality Problem Possible Cause Recovery Procedure Not Printing Check if interface cable is properly Re-connect cable to interface. connected to the interface connector. The serial port cable pin Replace the cable with pin to pin configuration is not a pin-to-pin connection. -
Page 30: Maintenance
Maintenance CHAPTER 6 This session presents the cleaning tools and methods to maintain your printer. 1. Use one of following materials to clean the printer: • Cotton swab (Head cleaner pen) • Lint-free cloth • Vacuum / Blower brush • 100% ethanol 2. - Page 31 Notes: • Do not touch the printer head. If you touch it, use ethanol to clean it. • Use 100% Acetone or Ethenol. DO NOT use medical alcohol, which may damage the printer head. • To maintain printer performance and extend printer life, clean the print head and supply sensors whenever you change a new ribbon.
- Page 33 Copyright 2009 Brady Worldwide, Inc. All Rights Reserved BRADY WORLDWIDE, INC. 6835 Winnetka Circle, Brooklyn Park, MN 55428...
Need help?
Do you have a question about the BBP11-34L and is the answer not in the manual?
Questions and answers