
Subscribe to Our Youtube Channel
Related Manuals for Uniden Guardian App Cam 26


Summary of Contents for Uniden Guardian App Cam 26
- Page 1 Guardian app cam 26 IP Camera for more exciting new products please visit our website: australia: www.uniden.com.au...
-
Page 2: Instructions
For your own safety, avoid using the camera or power off the camera • when there is a storm or lightning. Disconnect the power adaptor during long periods between usage.Use • only the accessories and power adaptors supplied by Uniden. -
Page 3: Table Of Contents
........................4 Features ............................4 System ............................4 Guardian App Cam 26 Indoor Camera ..................4 Uniden’s AppCam App ........................ 5 WHat’S In tHe BoX? ...................... 6 GettInG to KnoW your camera ................7 netWorK Setup ...... -
Page 4: Overview
The wireless Guardian App Cam 26 offers superior quality video with true colour. It is suitable for day or night time use. The Guardian App Cam 26 camera is an indoor camera. Also, as dust, grime, and cobwebs accumulate on the camera glass, they can reflect light from the infrared LED and might lower video quality. -
Page 5: Uniden's Appcam App
Built-in microphone and speaker • microSD card slot (microSD card not included) • uniden’s appcam app Multiple camera viewing and management from single app • Remote access to recorded video • Remote snapshot & recording control • Event notification/Email alert... -
Page 6: What's In The Box
WHAT’S IN THE BOX? Quick Start Guide 5V/1.5A Power Adaptor Guardian App Cam 26 Camera Screws and Anchors Antenna Ethernet Cable Mounting Bracket Need Help? Get answers at our website: www.uniden.com.au for Australian model If any item is missing or damaged, contact your place of purchase immediately. -
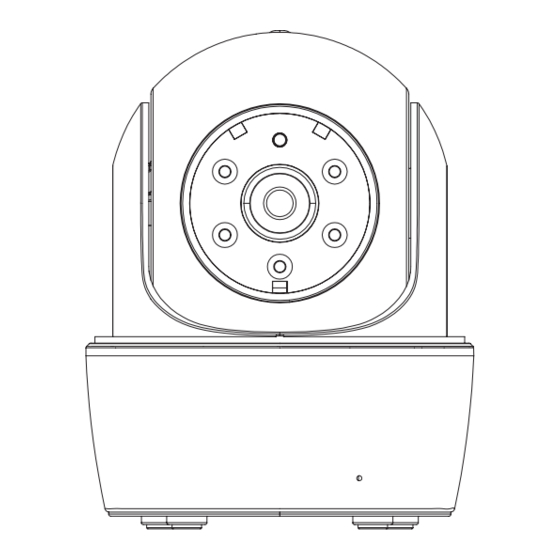
Page 7: Getting To Know Your Camera
GETTING TO KNOW YOUR CAMERA Light Sensor Infrared LEDs Microphone MicroSD Card Slot LAN Port Reset Status LED Antenna Jack Power Jack... -
Page 8: Network Setup
NETWORK SETUP OVERVIEW There are two methods of connecting the Guardian App Cam 26 camera to your mobile device. One method is wireless and the other method has the camera connected directly to the router using the provided Ethernet cable. -
Page 9: Connect Camera And Mobile Device
CONNECT CAMERA AND MOBILE DEVICE 1. If you are connecting wirelessly, from your mobile device’s settings, go to WiFi. Select the Guardian App Cam 26 to connect your device to it. The camera listing will be HD-XXXXXX where XXXXXX are the last 6 digits on the camera label. -
Page 10: Mounting The Plate And Camera
Your camera will reboot and reconnect to the router. If using the wired set up process, unplug the Ethernet cable from the router and camera during the reboot process. Wait 2 - 3 minutes until the camera runs through the Pan/Tilt mode and the LED returns to the steady on state to continue. -
Page 11: Setting Up Email Alert
SETTING UP EMAIL ALERT Set up the email alert so you can be notified when the motion sensor triggers automatic recording. 1. In LIVE view, tap the Back icon ( In LIVE view, tap the Back icon ( ), the System icon ( ), and then the System Setting icon ( 2. - Page 12 Setting up a gmail account is recommended. Check the SSL box and use the data in the following table: for Gmail SMTP Server smtp.gmail.com Enter this. SMTP Port Enter this. User Name XXXX@gmail.com Enter your gmail address in full, including ‘@gmail.com’. Password XXXXXXXXXXX Enter the password for this...
-
Page 13: Operation Overview
OPERATION OVERVIEW to ... Do this: View LIVE Video Tap the image on the Snapshot screen. Start Recording From the LIVE Video screen, tap . The camera will record for 1 minute. View Recorded Files 1. From the Snapshot screen, tap 2. -
Page 14: Using The App
USING THE APP As the Uniden App is constantly under development to enrich user experience, the icons/ screens shown in this manual may vary slightly from the actual app. This OM uses icons from the Andriod device for most of the steps. -
Page 15: Snapshot Vs Live Video Screen
SNAPSHOT VS LIVE VIDEO SCREEN The Snapshot and LIVE Video screens control operations. The Snapshot screen lets you add more cameras, configure advanced settings, access and manage recorded files, update the camera connection status, and check app version. The LIVE Video screen lets you take snapshots and record LIVE video. You can also control the sound. -
Page 16: System Settings
System Settings icon allows you to configure the advanced settings, remove the camera connection, and play back the recorded video clips. Tap the following three icons display in the center of the snapshot image: Accesses System Information - Advanced Screen. This screen lets you configure the camera and set notification alerts. - Page 17 Information to set up and enable PIN lock or to check the app information. Android The PIN lock is a unique security code you must enter when you start the • app. APP information displayed includes APP and API version information. •...
- Page 18 Scroll down to find the field you want to set. You can also format the microSD card or check the device information here. The Advanced field blocks are: Admin Password: The security code for your advanced settings. The • default Admin Password is 123456. Change the default password to one you set yourself.
- Page 19 - Environment Mode This mode enables you to select the power line frequency used at the location of the App Cam 26. The frequency depends on the geographic location. The images may not be very clear if the frequency selected is not correct.
- Page 20 event List Details android 1. Tap the Event List icon ( ) to select a date range of recorded files to display. View a list of recorded video files. 2. Tap the start date and end dates to set the date range. A list of files displays.
- Page 21 1. Tap the Event List icon ( Tap the Event List icon ( ) and then tap the Search icon to set a date ) and then tap the Search icon to set a date range of recorded files to display. 2.
-
Page 22: Live Video Screen Overview
LIVE VIDEO SCREEN OVERVIEW The LIVE Video screen lets you take snapshots, pan and tilt the camera angle, record video, and control the microphone and audio. Tap this icon to take a snapshot of the current image. Snapshots are saved in your mobile device. -
Page 23: Turn Off The App
pan/tILt In the LIVE view, swipe across the screen (horizontally/vertically) to pan/tilt the camera. pre-set record positions 1. Tap 2. The following options are displayed: Record the Point 1, Go to the Record Point 1, Record the Point 2, Go to the Record Point 2, Record the Point 3, Go to the Record Point 3. -
Page 24: Maintaining Your System
MAINTAINING YOUR SYSTEM TAKING CARE OF YOUR CAMERA When dust and grime builds up on the camera lens and glass, it affects night vision capability. The infrared light reflects off of the dust and grime, limiting the camera’s “vision.” Use a microfiber cloth to regularly clean the cameras or when night vision video is cloudy or unclear. -
Page 25: Troubleshooting
TROUBLESHOOTING HOW TO IMPROVE THE WIRELESS SIGNAL qUALITY If possible, remove obstacles in between camera and router that might reflect the signal. These could include furniture, cabinets, and walls. If the wireless signal is not improved, relocate the camera closer to the router. TROUBLESHOOTING If... - Page 26 If... try this... No image appears • Make sure the power adaptor is not damaged or defective and is plugged into an electrical outlet with power. • Relocate the camera to obtain the best reception of wireless signals. • Make sure the camera is properly configured in the app.
- Page 27 • Change router/camera relative position. strength is weak • Use the Ethernet cable to physically connect the Guardian App Cam 26 camera to your router. • Use a Wi-Fi repeater/extender to maximize the service range of your Wi-Fi router. • Switch your router to 11b/11g mode in order to improve router service range.
-
Page 28: Specifications
SPECIFICATIONS General Power 100~240V switching power supply DC 5V/1.5A Power Consumption 1.1A max Camera Body Dimension 91mm x 100mm x 118mm Weight (Main Body) 437g Operating Temperature 14° ~ 122°F (-10° ~ 50°C) network Wireless Technology IEEE 802.11 b/g/n Network Connection Ethernet (10/100 Base-T/Base -TX);... - Page 29 HD 1280x720 Image Resolution Recording Frame Rate 720P@20FPS Supported mobile Internet Device Android Requirement Android 4.1x or above iOS Requirement iPhone 4s, iPad Mini, iPad 2with iOS 7.0 or above Hardware Requirement • 1.5GHz dual core or above • 1GB or above internal memory...
-
Page 30: Warranty
Warranty: Uniden Aust warrants to the original retail purchaser only that the Guardian App Cam 26 (“the Product”), will be free from defects in materials and craftsmanship for the duration of the warranty period, subject to the limitations and exclusions set out below. - Page 31 Product, together with satisfactory evidence of your original purchase (such as a legible copy of the sales docket) to Uniden at the address shown below. You should contact Uniden regarding any compensation that may be payable for your expenses incurred in making a warranty claim.
- Page 32 © 2015 Uniden Australia Pty Limited.
Need help?
Do you have a question about the Guardian App Cam 26 and is the answer not in the manual?
Questions and answers