Table of Contents
Advertisement
Quick Links
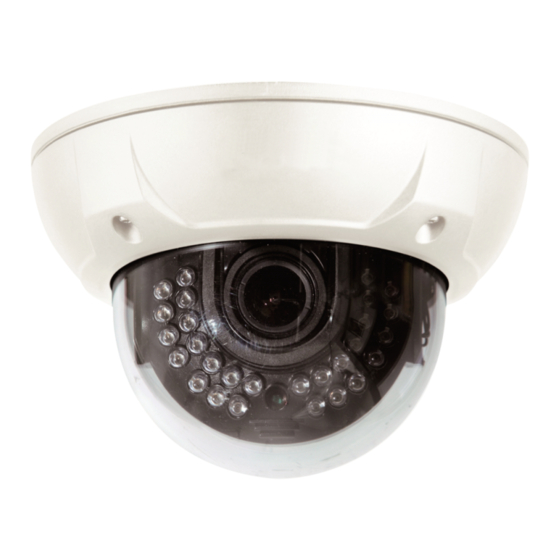
VANDAL-PROOF & WATERPROOF
3-AXIS DOME CAMERA
GST-410
MANUAL
◐ PRECAUTION
1. You can install the camera indoors or outdoors.
2. Choose an ideal location for the camera, since a camera unit must
be protected against vibration.
3. Be careful not to scratch the camera unit, especially lens or dome
cover.
4. Use the camera within the temperature(-10℃ ~ +50℃).
5. Avoid any direct sun light toward the lens.
6. Use the AC adaptor 12V DC, 300mA regulated.
If the product is to be put out of operation definitively,
take it to a local recycling plant for a disposal which
is not harmful to the environment.
◐ FEATURES
1. This camera is incredibly flexible to install with its 3-axis camera con-
struction, which makes the camera ceiling, wall or slope mountable.
2. IP67(Waterproof)
3. Durable material : Body - Aluminum, Dome - Polycarbonate
4. Supreme Resolution(600 TV-Line)
5. Electronic Day & Night function
6. Support 4 different privacy zone
7. DWDR(Digital Wide Dynamic Range)
8. Multi function : High Light Mask, Lens Shading Compensation, Motion
Detection
9. Multi-language full OSD support.
◐ HOW TO INSTALL
1. Camera installation
(1) Fix the camera set with the supplied screws on ceiling or wall
mount. If you don't use supplied screws, the camera may fall off.
(2) Please refer to '3. Camera angle adjustment' regarding adjust
camera angle.
(3) Lens adjustment(Vari-focal Lens only)
① By turning the "Tele-Wide" knob,
you can access a range of focal
lengths within specified limits.
② Since then, by turning the "Near-Far"
knob, you can set the focus toward
The wanted object.
(4) Re-assemble the camera.
<Ceiling mount>
Ø3.5 Ø30
MOUNT HOLE PLA TE(STICKER)
Put a sticker on the ceiling and make holes
according to the spots marked on a sticker.
SCREW Tp1 4x25 3EA
<Wall mount>
MOUNT HOLE PLATE(STICKER)
Put a sticker on the wall and make holes
according to the spots marked on a sticker.
SCREW Tp1 4x25 3EA
2. Pipe application
(1) Remove the screw for fixing a cable on the bottom of the base.
(2) Open the DOME COVER.
(3) Remove the TAP COVER and place the cables there.
(4) After distributing cables, use the TEPLON tape to wipe the pipe.
(5) Combine the pipe to the base.
<Caution> If you don't wipe TEFLON tape on pipe, it might cause troubles on
3
. Camera angle adjustment
(1) Pan adjustment
direction to the right or left(-160 ~ 190 )
(2) Tilt adjustment
direction to the up or down(6 ~ 90 )
(3) Roll adjustment
(-178 ~ 178 )
˚
<Caution> If you try to adjust the camera out of limited angle, it might cause
Ø30
Ø3.5
◐ DIMENSION
water-resistant.
PIPE
TAP COVER
CABLE FIXING SCREW
TEFLON TAPE
DOME COVER
:
: Grasp the disk of camera and then adjust
˚
˚
: Grasp the camera holder and then adjust
˚
˚
: Grasp the camera holder and then rotate
˚
troubles and damage to camera.
DISK
CAMERA
MODULE ASS'Y
R
L
U
CAMERA HOLDER
ROTA TION
D
Ø100
Ø150.5
Ø129
CABLE
Advertisement
Table of Contents

Related Manuals for Orion GST-410


Summary of Contents for Orion GST-410
- Page 1 (2) Open the DOME COVER. (1) Fix the camera set with the supplied screws on ceiling or wall GST-410 (3) Remove the TAP COVER and place the cables there. mount. If you don't use supplied screws, the camera may fall off.
-
Page 2: Function Setting
◐ SPECIFICATION 2. OSD menu structure Model No. GST-410 Function Contents setting menu Select menu Sub menu Determines whether to use the motion detection MOTION OFF, ON function or not Image Sensor 1/3" SONY SUPER HAD CCD Ⅱ Effective Pixel...
Need help?
Do you have a question about the GST-410 and is the answer not in the manual?
Questions and answers