Table of Contents
Advertisement
Advertisement
Table of Contents
Troubleshooting

Related Manuals for Lexmark E320/E322


Summary of Contents for Lexmark E320/E322
- Page 1 Lexmark E320/E322 User’s Reference April 2001 www.lexmark.com...
-
Page 3: Table Of Contents
About your printer ... 5 Chapter 2: Using the operator panel ... 7 Chapter 3: Canceling a print job ... 9 From the printer operator panel ... 9 From a Windows computer ... 9 From a Macintosh computer ... 9 Chapter 4: Setting up a print job ... - Page 4 Chapter 10: Loading labels ... 31 In tray 1 ... 31 In the manual feed ... 33 Chapter 11: Loading card stock ... 35 In tray 1 ... 35 In the manual feed ... 36 Chapter 12: Printing on both sides of the paper ... 38 Chapter 13: Conserving supplies ...
- Page 5 Step 2: Set up to print ... 93 Troubleshooting ... 101 Novell NetWare ... 102 Queue-based printing ... 102 Set up the printer using the Network Printer Utility ... 102 Choosing NPRINTER/RPRINTER or PSERVER ... 103 NPRINTER vs. PSERVER in IntraNetWare NetWare Directory Services (NDS) ... 103 NPRINTER in IntraNetWare NDS ...
- Page 6 Notices ... 111 Edition notice ... 111 Trademarks ... 112 Safety information ... 112 Cautions and warnings ... 113 Electronic emission notices ... 114 Federal Communications Commission (FCC) compliance information statement ... 114 Industry Canada compliance statement ... 114 Avis de conformité aux normes d’Industrie Canada ... 115 European Community (EC) directives conformity ...
-
Page 7: Chapter 1: Printer Overview
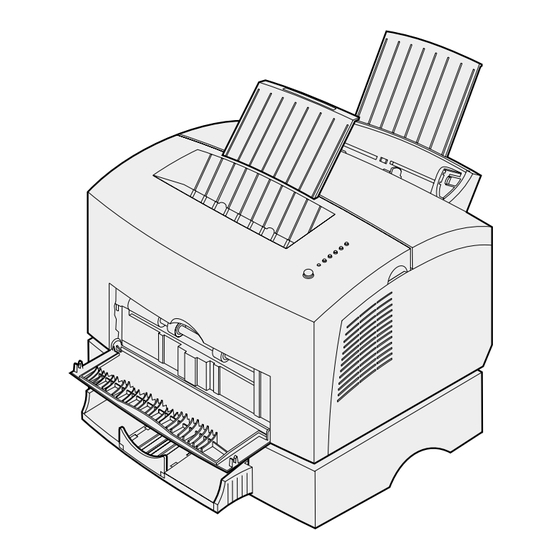
Press the operator panel button with a brief button press (approximately one second) to restart the printer or display an error code. Press the operator panel with a long button press (hold until all the lights come on) to reset the printer or to select a setting in the... - Page 8 Paper guides Adjust the width of the media in tray 1 and the manual sheet feeder. Operator panel lights Check the status of your printer. Top output bin Stack printed documents face down. Front output door Print on special media, for example, card stock or labels.
-
Page 9: Chapter 2: Using The Operator Panel
Using the operator panel The operator panel has 6 lights and 1 operator panel button. When the: The printer: Ready/Data light is on is ready to receive and process data. Ready/Data light is blinking is busy receiving or processing data. - Page 10 As shown in the illustration, lights that are on, off, or blinking indicate different printer conditions such as printer status, or the printer requires attention (for example, out of paper) or the printer requires servicing. For a complete list of light messages, see...
-
Page 11: Chapter 3: Canceling A Print Job
Select the job you want to cancel. Press the Delete key on the keyboard. From a Macintosh computer When you send a job to print, the printer icon appears on the desktop. Double-click the printer icon on your desktop. A list of print jobs appears. -
Page 12: Chapter 4: Setting Up A Print Job
Setting up a print job Once your printer is set up and your drivers are installed, you are ready to print. Do you want to print a letter, add a Do Not Copy watermark to a presentation, adjust the print darkness setting? Just choose the printer setting in your printer driver and print your job. -
Page 13: Printing From A Macintosh Computer
In the Print dialog box, click OK to send the job to print. Note: If you want to change a setting not listed in the printer driver, you can download the Lexmark E320/E322 Setup Utility from the Lexmark Web site (www.lexmark.com). - Page 14 Now print the envelope: Load an envelope vertically, flap side down, with the stamp area in the top left corner in the manual feed. From the File menu, select Page Setup. From the Paper Size setting, select the size envelope you want. Change Orientation to Landscape.
-
Page 15: Chapter 5: Choosing The Right Print Media
• Use 20 lb (75 g/m2) xerographic paper. • Use transparencies designed for laser printers. We recommend Lexmark laser printer transparencies: for letter size transparencies, part number 70X7240; for A4 size transparencies, part number 12A5010. •... - Page 16 Media Size Envelopes Monarch (7 3/4), 9, Com-10, C5, C6, B5, DL Labels (Paper) Minimum: 8.3 x 11 in. (210 mm x 279 mm) Maximum: 8.5 x 11.7 in. (216 mm x 297 mm) Index Bristol Minimum: 3 x 5 in. (76.2 x 127 mm) Tag card stock Maximum: 8.5 x 14 in.
-
Page 17: Chapter 6: Printer Media Sources
Tray 2 An exit output bin on top of the printer holds up to 100 sheets. The single-sheet front output door provides a straight-through paper path for special media, such as transparencies, envelopes, labels, card stock or index cards, reducing curling and potential paper jams. - Page 18 To increase paper capacity, you can purchase the optional tray 2, which holds up to 250 sheets of paper.
-
Page 19: Chapter 7: Loading Paper
Loading paper In tray 1 Extend the rear paper support until you hear a click. Flex the sheets back and forth to loosen them, then fan them. - Page 20 If loading letterhead paper, insert letterhead with the top of the page pointing down, facing you. Note: Preprinted papers such as letterhead must be able to withstand temperatures up to 200°C (392°F) without melting or releasing hazardous emissions. Slide the paper guides against the edges of the paper.
-
Page 21: In The Manual Feed
Extend the front paper support on the paper output bin until you hear a click. If you are printing on legal-sized paper, completely extend the front paper support. Select the paper size and type from your software application. Start your print job. In the manual feed Use the manual feed to print one sheet of paper at a time. - Page 22 Slide the paper guides flush against the edges of the paper. Select the paper size and type from your software application. Start your print job. Briefly (approximately one second) push the operator panel button to start printing. When the Load Paper light blinks and the Press Button light comes on, place another sheet in the manual feed.
-
Page 23: In The Optional Tray 2
In the optional tray 2 Grasp the tabs on either side of the tray and pull it completely out of the printer. Before loading paper, push down on the metal plate until it locks into place. If loading A4 or legal sized paper, extend the paper support. - Page 24 Flex the sheets back and forth to loosen them, then fan them. If loading letterhead paper, insert letterhead face down with the top of the page entering the printer first. Do not exceed the stack height indicator; overfilling the tray may cause paper jams.
- Page 25 Reinstall the tray firmly into the printer. If the tray is not pushed all the way in, the paper may not feed properly. Select the paper size from your software application. Start your print job.
-
Page 26: Chapter 8: Loading Transparencies
Loading transparencies When printing on transparencies, use transparencies designed for laser printers. We recommend Lexmark Laser Printer Transparencies: for letter size transparencies, part number 70X7240; for A4 size transparencies, part number 12A5010. In tray 1 Extend the rear paper support until you hear a click. - Page 27 Flex the transparency sheets back and forth to loosen them, then fan them. Load up to 10 transparencies with the side you want to print on facing you. Note: Transparencies must be able to withstand temperatures of 200°C (392°F) without melting or releasing hazardous emissions.
-
Page 28: In The Manual Feed
In the manual feed Use the manual feed to print one transparency at a time. To reduce curling or potential jams, open the front output door for a straight-through paper path. Slide the paper guides flush against the edges of the transparency. Select the paper size and type from your software application. - Page 29 When the Load Paper light blinks and the Press Button light comes on, place another transparency in the manual feed. Push the operator panel button to print another transparency.
-
Page 30: Chapter 9: Loading Envelopes
Loading envelopes Load up to 10 envelopes in tray 1 or load envelopes one at a time in the manual feed. In tray 1 Extend the rear paper support until you hear a click. Open the front output door for a straight-through paper path. -
Page 31: In The Manual Feed
Load up to 10 envelopes in the center of tray 1 and adjust the paper guides to fit the width of the envelopes. Note: Use envelopes that can withstand temperatures of 200°C (392°F) without sealing, excessive curling, wrinkling or releasing hazardous emissions Select the paper type from your software application. - Page 32 Load an envelope in the center of the manual feed and adjust the paper guides to fit the width of the envelope. Select the paper size and type from your software application. Start your print job. Briefly (approximately one second) push the operator panel button to start printing. When the Load Paper light blinks and the Press Button light comes on, place another envelope in the manual feed.
-
Page 33: Chapter 10: Loading Labels
In tray 1 Extend the rear paper support until you hear a click. To reduce curling or potential jams, open the front output door for a straight-through paper path. Card Stock & Label Guide on the Lexmark Web... - Page 34 Flex the label sheets back and forth to loosen them, then fan them. Load up to 10 label sheets with the side you want to print on facing you. Note: Use labels with a pressure of 25 psi that can withstand temperatures of 200°C (392°F) without releasing hazardous emissions.
-
Page 35: In The Manual Feed
In the manual feed Use the manual feed to print one label sheet at a time. If you experience problems feeding labels in tray 1, try printing one sheet at a time from the manual feed. Extend the front paper support on the paper output bin until you hear a click. Open the front output door for a straight-through paper path. - Page 36 Slide the paper guides against the edges of the label sheet. Select the paper size and type from your software application. Start your print job. Briefly (approximately one second) push the operator panel button to start printing. When the Load Paper light blinks and the Press Button light comes on, place another label sheet in the manual feed.
-
Page 37: Chapter 11: Loading Card Stock
1. Load one sheet of card stock or one index card at a time in the manual feeder. For more information on card stock printing, refer to the Web site at www.lexmark.com. In tray 1 Extend the rear paper support until you hear a click. -
Page 38: In The Manual Feed
Load up to 10 sheets of card stock or 10 index cards with the print side facing you. Note: Use card stock with a pressure of 25 psi that can withstand temperatures of 200°C (392°F) without releasing hazardous emissions. Slide the paper guides against the edges of the card stock. Select the paper size and type from your software application. - Page 39 Slide the paper guides against the edges of the index card. Select the paper size and type from your software application. Start your print job. Briefly (approximately one second) push the operator panel button to start printing. When the Load Paper light blinks and the Press Button light comes on, place another index card in the manual feed.
-
Page 40: Chapter 12: Printing On Both Sides Of The Paper
Printing on both sides of the paper Printing on both sides of the paper reduces printing costs. Select Duplex from your printer driver to format your job to print every other page of the document first. Once the first side of your job prints, the Load Paper light comes on and the Press Button light blinks. - Page 41 Short Edge means the pages are bound along the short edge of the page. Portrait Back of sheet Front of sheet Landscape Front of Back of sheet sheet...
-
Page 42: Chapter 13: Conserving Supplies
Conserving supplies Conserving supplies lowers printing costs. • When printing drafts, conserve toner by changing the Print Darkness setting in your printer driver. The settings range from Very Light to Very Dark. Selecting the Light setting conserves toner. • Reduce paper consumption by using the manual duplex feature to print on both sides of the... -
Page 43: Chapter 14: Replacing The Print Cartridge
Removing the old print cartridge The Toner Low light comes on when the print cartridge is getting low on toner. Note: On the Lexmark E320, the Toner Low light does not come on if the standard 1,500- page print cartridge is installed. -
Page 44: Installing The New Print Cartridge
Grasp the cartridge handle and pull the print cartridge straight up (it may be warm). Set the print cartridge aside. Lexmark does not recommend refilling used printer cartridges or purchasing ARNING refilled cartridges from a third party. Print quality and printer reliability cannot be guaranteed if you do. - Page 45 Do not remove the print cartridge from its packaging until you are ready to install it. • Store print cartridges in the same environment as the printer. • Do not remove the print cartridge from the printer except to replace it or to clear a paper jam. Fuser...
-
Page 46: Chapter 15: Recycling The Print Cartridge
Simply package your used print cartridge in the shipping box your new cartridge came in. Follow the instructions on the outside of the box to send the used cartridge back to Lexmark. If a prepaid shipping label is not available for your country, contact the place where you bought your printer for additional recycling information. -
Page 47: Chapter 16: Ordering Supplies
Within the United States or Canada, you can order Lexmark supplies from any authorized Lexmark supplies dealer. To locate the dealer nearest you, just call 1-800-438-2468. In other countries, contact the place where you bought your printer. You can also visit the Lexmark online store at www.lexmark.com. -
Page 48: Chapter 17: Clearing Jams
Clearing jams If print media jams in the printer, the Paper Jam light prompts you to clear the paper path. If media has just started to feed from tray 1 when the jam occurs: Pull the media straight up out of tray 1. - Page 49 Reinstall the print cartridge. Close the printer cover to resume printing. A jam may occur if the output bin is too full and the media is unable to exit the printer: Empty the media from the output bin. Clear the jam.
- Page 50 Press the operator panel button and print 10 or more menu settings pages. The paper removes any remaining adhesive in or on the fuser. Note: Serious damage to your printer may occur if adhesive labels remain in the fuser. Call for service.
- Page 51 Note: you will lose the rest of the print job. Lift the printer off the support unit. Clear the jam. Align the printer with the front of the support unit and place it on top of the support unit. Turn on the printer and resend your print job.
- Page 52 If the jam occurs just after the paper feeds from tray 2: Pull tray 2 all the way out. Reach inside and gently pull the paper toward you. Reinstall the tray and resume printing.
-
Page 53: Chapter 18: Understanding The Operator Panel Lights
Special Function menu settings. Press the operator panel with a long button press (hold until all the lights come on) to reset the printer or to select a setting in the special function menu. - Page 54 Ready/ Toner Load Data Paper Paper Press Error Button Printer condition: Flushing Flushing and toner low Load manual feed Load manual feed and toner low Load tray 1 or the optional tray 2 Load tray 1 or the optional tray 2 and...
- Page 55 Just click on the indicated page for more information on what it means and what you can Secondary error code light sequences Ready/ Toner Load Data Paper Paper Press Error Button Printer condition: Flash memory full Flash memory full and toner low Reset user defaults Paper Press Error Button Printer condition: Secondary error code...
- Page 56 Special function menu light sequences Ready/ Toner Load Data Paper Paper Press Error Button Printer condition: Font error Insufficient printer memory Insufficient flash memory Error communicating with the host computer special function Paper Press...
- Page 57 Cancel the job. Push the operator panel button until all the lights come on to reset the printer. What this light sequence means: The printer is ready to receive and process data. In addition, the toner in the print cartridge is getting low. What you can do: •...
- Page 58 What this light sequence means: The printer is busy receiving or processing data, or printing a test page. What you can do: • Cancel the job. Push the operator panel button until all the lights come on to reset the printer.
- Page 59 What this light sequence means: The printer is waiting until a print timeout occurs or until it receives additional data. What you can do: • Print data stored in the printer buffer by pushing the operator panel button with a brief button press.
- Page 60 Wait until the operator panel returns to Ready/Data to print other jobs. What this light sequence means: The printer is flushing corrupted print data. In addition, the toner in the print cartridge is getting low. What you can do: •...
- Page 61 What this light sequence means: The printer prompts you to load a single sheet of media in the manual feed. What you can do: • Load media, with the side to be printed facing the front of the printer, into the manual feed.
- Page 62 What this light sequence means: The printer is out of media or envelopes, or the media did not feed properly. What you can do: • Load media into tray 1 or the optional tray 2 and push the operator panel button to resume printing.
- Page 63 What this light sequence means: The printer detects a paper jam. What you can do: • Open the printer cover, clear all media from the paper path and close the cover to resume printing. • Clearing jams for more information.
- Page 64 What this light sequence means: The printer detects a paper jam. In addition, the toner in the print cartridge is getting low. What you can do: • Open the printer cover, clear all media from the paper path and close the cover to resume printing.
- Page 65 What this light sequence means: The printer top cover is open or the print cartridge is not installed. In addition, the toner in the print cartridge is getting low. What you can do: • Close the cover to display the light sequence that appeared before the cover was opened.
- Page 66 Cancel the job. Push the operator panel button until all the lights come on to reset the printer. What this light sequence means: The printer flash memory is full. In addition, the toner in the print cartridge is getting low. What you can do: •...
- Page 67 What this light sequence means: The printer has one of the following errors: • Memory is full • Received a page that is too complex to print • Received a page that is shorter then the page set • Reduces the resolution of a formatted page to 300 dpi before printing •...
- Page 68 Reduce the complexity of the job and/or the resolution. • Press the operator panel button with a brief button press to resume printing. • Cancel the job. Push the operator panel button until all the lights come on to reset the printer. and shake it to extend...
- Page 69 What this light sequence means when you press the operator panel button with a double-button press from special function menu: The printer has received a page that is too complex to print. What you can do: • Reduce the complexity of the job and/or the resolution.
- Page 70 What this light sequence means when you press the operator panel button with a double-button press from special function menu: The printer has run out of memory while formatting a page and is forced to reduce the resolution to 300 dpi before printing it. What you can do: •...
- Page 71 What this light sequence means when you press the operator panel button with a double-button press from special function menu: The printer has received a request for a PPDS font which is not installed. What you can do: • Cancel the job. Push the operator panel button until all the lights come on to reset the printer.
- Page 72 What this light sequence means when you press the operator panel button with a double-button press from special function menu: The printer has insufficient memory to free up unused space in flash memory. What you can do: • Delete fonts, macros, and other data in RAM.
- Page 73 The printer has a service error and printing has stopped. What you can do: • Turn the printer off and back on. If the lights are still blinking, contact the place where you bought your printer. USB port enabled...
-
Page 74: Chapter 19: Solving Print Quality Problems
Use the following tables to find solutions for printing problems you have encountered. If you cannot fix the problem, contact the place where you bought your printer. You may have a printer part that requires cleaning or replacement by a service technician. - Page 75 • Try changing the media weight to a heavier setting and the texture to a rougher setting. To change these settings, download the Lexmark E320/E322 Setup Utility from the Lexmark Web site (www.lexmark.com). • The Toner Low light does not come on if the standard 1,500- page print cartridge is installed in the E320 printer.
- Page 76 – If you cannot print a menu settings page, • If the Toner Low alarm is enabled, the printer stops printing until you replace the print cartridge. Note: Download the Lexmark E320/E322 Setup Utility from the Lexmark Web site (www.lexmark.com) to change the Toner Low Alarm setting.
- Page 77 • Make sure tray 1 is selected from the printer driver. • Do not overfill the tray. • Make sure the optional tray 2 is selected from the printer driver. • Make sure the tray is pushed all the way in.
- Page 78 Install more memory. • Your printer driver may not support manual duplex. Go to the Lexmark Web site at www.lexmark.com to download the latest printer driver for your printer. A paper jam interrupts the duplex process. As a result, the information on the page that jammed is lost.
-
Page 79: Resetting User Defaults
Press and hold the operator panel button until all of the lights come on. Using the special function menu Printer settings for solving print quality problems are found in the special function menu: factory defaults,... -
Page 80: Restoring Factory Defaults
Press the operator panel with a long button press (hold until all the lights come on) to reset the printer to the original factory defaults. Once the settings are returned to the factory default values, the printer returns to the Ready state. -
Page 81: Using Hex Trace Mode
Data sent to the printer is printed out in hexadecimal and character representation to help isolate the source of the problem. To exit Hex Trace mode, turn off the printer or press the operator panel with a long button press. -
Page 82: Using Print Quality Test Pages
Once the paper exits into the output bin, the printer returns to the Ready state. Use the test pages to isolate problems such as print is too light, toner streaks, and so on. See... -
Page 83: Chapter 20: Advanced Troubleshooting
Advanced troubleshooting If you contact the Lexmark Customer Support Center to help you resolve a printing problem, they may guide you through an advanced troubleshooting mode to change a default setting (for example, turning on the PPDS Activated setting if your job application uses the PPDS datastream). - Page 84 Press the operator panel until all the lights come on to initiate the advanced troubleshooting mode. When the printer is in the advanced troubleshooting mode, the operator panel lights take on new meanings based on their function. This illustration represents the operator panel settings in the...
- Page 85 For E320 and E322 printers, Parallel Port Enabled is set to Auto, the factory default. If your printer encounters a memory shortage when trying to print a job and you are not using the parallel port, turn off Parallel Port Enabled to free up memory: •...
- Page 86 Turn off the printer to exit the advanced troubleshooting mode. For E320 and E322 printers, Parallel Protocol is set to Fastbytes, the factory default. When the protocol is set to Fastbytes, the printer receives information at a much faster transmission rate, provided the host computer supports Fastbytes.
- Page 87 • Press the operator panel button with a double button press to scroll to the next menu item, Parallel Mode 2. • Turn off the printer to exit the advanced troubleshooting mode. For E320 and E322 printers, Parallel Mode 2 is set to On, the factory default.
- Page 88 • Press the operator panel button with a double button press to scroll to the next menu item, USB Port Enabled. Turn off the printer to exit the advanced troubleshooting mode. USB Port Enabled is set to Auto, the factory default.
- Page 89 • Press the operator panel button with a double button press to scroll back to the first menu item, PPDS Activated. Turn off the printer to exit the advanced troubleshooting mode. For E322 and E322n printers, PPDS Activated is set to Off, the factory default.
- Page 90 Corresponds to this setting: Auto CRLF/LFCR is set to Off, the factory default. How the printer formats the end of a line depends on the computer system being used. Use this setting to select whether or not the printer automatically performs a carriage return (CR) after a line feed (LF) or a line feed after a carriage return.
-
Page 91: Chapter 21: Calling For Service
Is the printer cover closed completely? If all else fails, try turning your printer off and back on again. If your printer is still not operating properly, call for service. If you are able to print, briefly press the operator panel button to print a test page, which lists the printer model type and other information the service representative may need to know. -
Page 92: Chapter 22: Setting Up The Network Printer
The print jobs are processed on a first-come, first-served basis. Connect the hardware Instructions on connecting the Ethernet cable to your Lexmark E320n Printer can be found in the printer Setup Book. To view the Setup Book from this CD, click the Home icon... -
Page 93: Configure And Print
Configure and print TCP/IP Step 1: Set the IP address, netmask and gateway You must assign an IP address, netmask and gateway to the print server in order for other network devices to find it on the network. • If you have DHCP, the proper addresses are automatically assigned. To verify the assignment has happened, print a network setup page and make sure the IP address, netmask and gateway appear as non-zero. -
Page 94: Troubleshooting
TCP/IP protocol is turned on (activated). If TCP/IP is turned off, use the IPX protocol to activate it. Select the printer and then select the TCP/IP task. Check the Enable box to activate TCP/IP. -
Page 95: Step 2: Set Up To Print
To use this method, you must have at least one server running Windows NT Server software and TCP/ Use direct IP printing if all you want to do is print directly to a network printer. If you need to centrally... - Page 96 Set up LexIP printing on Windows NT 4.0/2000 You can view this file online before you begin installing, or print the file to an alternate network printer that is already set up. Part 1: Install printer drivers and TCP/IP network support Launch the drivers CD.
- Page 97 This is the method you must use if you want to set up direct printing on Windows/95/98/Me clients. You can view this file online before you begin installing, or print the file to an alternate network printer that is already set up.
- Page 98 Printer Drivers (to obtain a custom driver for your printer) – Network Support (TCP/IP) When the list of printer choices is offered, select the model of the printer you want to install, and then click Add. Click Next. On the Drivers and Bi-Di support tabs, modify any settings you want. On the Bi-Di support tab, remove the check mark from the status window if you do not want this function.
- Page 99 Use shared printing if your organization needs to centrally manage network printers. To set up this type of printing, you must install the printer on a server and set it up to be shared with network clients. Note: If your organization has no need to centrally manage network printers from a single location, see Install a shared printer on a Windows NT 4.0/2000 server...
- Page 100 Click Network Port, and then New Port. Enter the information to create the port. Assign a logical port name. This can be any name that reminds you of the printer such as “E322_lab4”. This name eventually appears in the list of available ports.
- Page 101 Check the following to make sure the printer was successfully shared. – The printer object icon in the printers folder now has a shared indicator. For example, in Windows NT 4.0, a hand appears under the printer icon. –...
- Page 102 Click OK. Note: If this is a new printer, you may be prompted to install a printer driver. If no system driver is available, then you will need to provide a path to available drivers.
-
Page 103: Troubleshooting
Look under the TCP/IP heading on the network setup page to see if the TCP/IP protocol is turned on (activated) in the print server. If TCP/IP is turned off, use the IPX protocol to activate it. Select the printer and then select the TCP/IP task. Check the Enable box to activate TCP/IP. -
Page 104: Novell Netware
Windows 95 or Windows 98 workstation running either Novell Client32 or Microsoft Client for NetWare networks. Install the Network Printer Utility for NetWare on the workstation. This software is located the following directory on the drivers CD that shipped with your printer (X=the drive letter of your CD-ROM drive). X:/Interwin/instwin.exe Double-click instwin.exe. -
Page 105: Choosing Nprinter/Rprinter Or Pserver
This could cause a print job to be lost if the printer is turned off in the middle of the print job. This is inherent in the NetWare design. Notes about printing performance: Many people prefer to configure their print servers in PSERVER. -
Page 106: Pserver In Intranetware Nds
Little information is available about the print job. After a job leaves a print server queue, it is removed from the queue, regardless of whether it actually prints. This could cause a print job to be lost, if the printer is turned off in the middle of the print job. This is inherent in the NetWare design. -
Page 107: Pserver In Netware 3.X
Look under the NetWare heading on the network setup page to see if the NetWare protocol is turned on (activated) in the print server. If NetWare is turned off, use the IPX protocol to activate it. Select the printer and then select the NetWare task. Check the Enable box to activate NetWare. -
Page 108: Appletalk
In the Chooser, select the LaserWriter 8 driver. If you have a routed network, there is a list of zones you can select from. The new printer is in the default zone for the network. Select this zone. If you don’t know which zone to select, look on the network setup page under AppleTalk for Zone. -
Page 109: Changing The Zone
Changing the zone If you want to change the zone of the new printer using MarkVision, find the printer in the main MarkVision window, select it from the list and choose Adapter Settings. If you haven’t already done so, install MarkVision. On the drivers CD, click Install printer software. -
Page 110: Troubleshooting
If no, restart the Macintosh workstation and look again. – If yes, make sure the printer name in the Chooser exactly matches the AppleTalk name listed on the network setup page. Check all connections. Check the cables on the back of the Macintosh workstation. Check the cable between the printer and the workstation or network. -
Page 111: Print Server Light Patterns
Ready The print server is processing a Flash file. Do not turn off the printer while the print server is processing Flash – you may damage the firmware. -
Page 112: Error Conditions
• If the problem reoccurs, call Customer Support. Print a network setup page and look under Status. If it shows the printer server is not connected: • Make sure the Ethernet cable is firmly plugged in. • Try another wall outlet. -
Page 113: Notices
Lexmark International Ltd., Marketing and Services Department, Westhorpe House, Westhorpe, Marlow Bucks SL7 3RQ. Lexmark may use or distribute any of the information you supply in any way it believes appropriate without incurring any obligation to you. You can purchase additional copies of publications related to this product by calling 1-800-553-9727. -
Page 114: Trademarks
This product is designed, tested and approved to meet strict global safety standards with the use of specific Lexmark components. The safety features of some parts may not always be obvious. Lexmark is not responsible for the use of other replacement parts. -
Page 115: Cautions And Warnings
Cautions and warnings CAUTION: A caution identifies something that might cause you harm. A warning identifies something that might damage your printer hardware or ARNING software. -
Page 116: Electronic Emission Notices
Federal Communications Commission (FCC) compliance information statement The Lexmark E320, E322 and E322n have been tested and found to comply with the limits for a Class B digital device, pursuant to Part 15 of the FCC Rules. Operation is subject to the following two conditions: (1) this device may not cause harmful interference, and (2) this device must accept any interference received, including interference that may cause undesired operation. -
Page 117: Avis De Conformité Aux Normes D'industrie Canada
A declaration of conformity with the requirements of the directives has been signed by the Director of Manufacturing and Technical Support, Lexmark International, S.A., Boigny, France. This product satisfies the Class B limits of EN 55022 and safety requirements of EN 60950. -
Page 118: Energy Star
This feature will cut the energy used by up to 50 percent. Lexmark is proud to be a participant in this program. As an Energy Star Partner, Lexmark International, Inc. has determined that this product meets the Energy Star guidelines for energy efficiency. -
Page 119: Index
Error light 62, 63, 64, 65 call for service 71 flushing data 58 memory full 64 print cartridge error 63 print cartridge not installed 62, printer top cover open 62, 63 executive 19 loading 19 manual feed 19 tray 1 17 tray 2 21... - Page 120 Load Paper, tray 1 or tray 2 Manual Duplex 61 Memory Full 64, 66 Paper Jam 61, 62 Print Cartridge error 63 Printer Top Cover Open 62, Ready/Data 55 Resolution Reduction Warning 68 Resource Save Off Error 69 Service Error 71...
- Page 121 AppleTalk 108 Hex Trace mode 79 NetWare 105 paper problems 75 print quality problems 72, 73 print quality test pages 80 printing problems 74, 75, 76 resetting user defaults 77 restore factory defaults 78 TCP/IP 101 United Kingdom Telecommunications Act 1984 USB 87 NPA Mode 87 Port Enabled 86...
- Page 123 Lexmark and Lexmark with diamond design are trademarks of Lexmark International, Inc., registered in the United States and/or other countries. © 2000 Lexmark International, Inc. 740 West New Circle Road Lexington, Kentucky 40550...
Need help?
Do you have a question about the E320/E322 and is the answer not in the manual?
Questions and answers