
Related Manuals for DNP DS-SL10


Summary of Contents for DNP DS-SL10
-
Page 1: Operating Instructions
Digital Photo Printer DS-SL10 Operating Instructions Before operating the unit, please read this manual thoroughly and retain it for future reference. 3-00D-003-11 (1) © 2011 Dai Nippon Printing Co., Ltd. - Page 2 Co., Ltd., 1-1-1, Ichigaya Kagacho, Shinjuku-ku, Tokyo, Serial No. ____________________ Japan. The Authorized Representative for EMC and product safety is DNP PHOTO IMAGING EUROPE SAS, ZI WARNING PARIS NORD II - BP 51077, 22 AVENUE DES NATIONS, PARC SILIC - VILLEPINTE, 95948 To reduce the risk of fire or electric shock, do not ROISSY CDG CEDEX, FRANCE.
- Page 3 the WEEE Directive (Directive 2002/96/EC) and is effective only within European Union. Disposal of waste batteries (applicable in the European Union and other European countries with separate collection systems) This symbol on the battery or on the packaging indicates that the battery provided with this product shall not be treated as household waste.
-
Page 4: Table Of Contents
Table of Contents Chapter 1 Outline What This Product Can Do ............. 7 Applications for This Printer ............8 Print Services................... 8 Supported Media and File Formats..........9 Chapter 2 Preparations Supplied Accessories ..............11 Controls and Functions ..............12 Front ....................12 Rear ..................... - Page 5 Settings in Full Mode and Quick Print Mode....... 30 Setting Prices ..................30 Setting the Passwords ................32 Chapter 4 Advanced Settings Band Pricing................... 33 Setting the Maximum Number of Prints ........34 Using Budget Codes ..............35 Setting Cut Mode ................36 Watermarking Order Numbers or File Names on Prints ....
- Page 6 Adjusting the Print Position ..............49 Displaying Logs ................50 Displaying the Print Log ..............50 Displaying the Sales Log..............50 Displaying the System Log ..............50 Adjusting the Touch Panel ............51 Restoring the Factory Settings ............ 52 Chapter 6 Operation Starting Operation .................
-
Page 7: Chapter 1 Outline
Outline Chapter Customizable with original data What This Product Can By inserting a memory card (expansion CompactFlash card) carrying promotional images and border data into the expansion slot, screen savers can be displayed and photos can be combined with borders for printing. Original images can be used for the advertisement and border data. -
Page 8: Applications For This Printer
Applications for This Print Services Printer This unit can print photos taken with a digital camera in several different ways, as listed below. This printer can be used for any of the following Select & Print applications. The appropriate operation mode can be This function lets you select the desired images from the selected according to the intended application. -
Page 9: Supported Media And File Formats
Memo Supported Media and File For details on print sizes that can be printed from your Formats computer using the supplied printer driver, refer to the operating instructions for the printer driver. Supported memory cards This unit supports the following types of memory cards. •... - Page 10 About DCF DCF is the abbreviation for “Design rule for Camera File System”. It is the standards that have been regulated by Japan Electronics and Information Technology Industries Association, or JEITA, to promote environments mainly for users to easily utilize image files, such as ones from digital still cameras, among related products.
-
Page 11: Supplied Accessories
Preparations Chapter Supplied Accessories Make certain you have received the following accessories: Paper Tray (1) Cleaning Cartridge (1) Paper Holder (1) These accessories are stored in the paper holder. Paper Core (1) Adaptor (left,1) Adaptor (right,1) USB Cable (1) Before Using this Printer (1) CD-ROM (1) 1) These items are stored in the printer. -
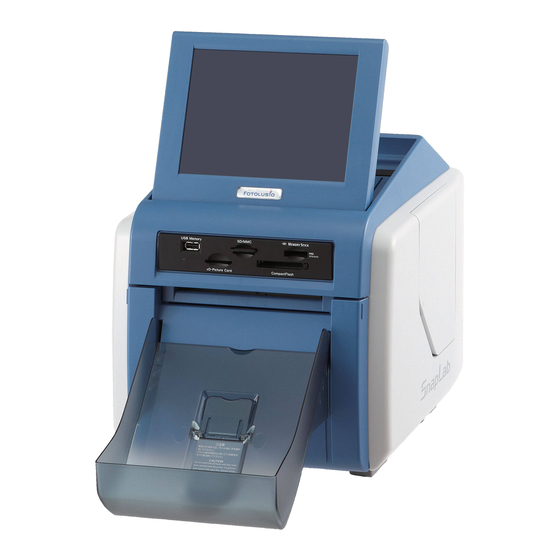
Page 12: Controls And Functions
Controls and Functions Front (10) (11) (12) (1) Display Note Shows the operation screen. Because the display is a touch To avoid loss of image data or damage to the main unit, screen, the user simply touches the field for the desired never attempt to insert a “Memory Stick,”... -
Page 13: Rear
Front door open Rear (1) USB port (host) Allows connection of a USB device. (A) Paper holder (page 15) You can connect a commercially available card reader or The paper roll is inserted here. USB memory device to this port and use it to read data. The white areas between printouts are cut off and 1) Correct operation with every card reader and USB collected in the top portion of the paper holder. -
Page 14: Installation
Installation Loading Paper Roll and Ink Ribbon Connecting the Power Cord Handling the paper roll and ink Connect the power cord to the ~ AC IN connector on the back of the unit, and then connect the plug to a power ribbon outlet. -
Page 15: Before Loading The Paper Roll And Ink Ribbon
• Hold the paper roll with both hands so that you do not Loading the Paper Roll and Ink drop it, because it is heavy. Dropping may result in an Ribbon injury. When using the printer for the first time, you must first load a paper roll and ink ribbon. -
Page 16: Loading The Paper Roll
Press the latch on top of the paper holder and open the When using the print pack 2UPC-C13 series or holder. 2UPC-C15 series Remove the adaptors from the paper holder. Adjust the width of the paper holder. When using the print pack 2UPC-C14 series or Note 2UPC-C48 series Attach adaptors to both ends of the paper holder. - Page 17 • Do not grasp the paper too tightly or strike it against Insert the paper roll into the paper holder. a hard object, because the paper may tear or crease, The arrow on the label in the center of the paper roll effecting the print quality.
-
Page 18: Loading The Ink Ribbon
Loading the ink ribbon Note When closing the paper holder, take care that the Open the side door. leading edge of the paper roll does not stick out of the paper feed opening. Return the paper holder into the unit. Insert the paper holder until you hear a sharp click. -
Page 19: Attaching The Paper Tray
Close the side door. Raise the eject paper stopper. Note Attaching the Paper Tray Do not touch the printouts until they have been ejected Attach the supplied paper tray. from the printer. If a printout gets stuck in the eject slot, remove it from the slot immediately. -
Page 20: Replacing The Paper Roll And Ink Ribbon
Open the front door. Replacing the Paper Roll and Ink Ribbon If the paper roll or ink ribbon runs out while printing, the following error message appears. Proceed as follows to replace the paper roll and ink ribbon. Press the paper holder release button and pull the paper holder out. - Page 21 Press the latch on top of the paper holder and open the Removing the ink ribbon holder. Open the side door. Remove the paper roll. Pull back the latch on the ink ribbon cartridge to release the lock, and then grasp the ink ribbon cartridge and remove it.
-
Page 22: Loading The Paper Roll And Ink Ribbon
Loading the Paper Roll and Ink Startup and Shutdown Ribbon For details on loading the paper roll and ink ribbon, see Startup “Loading the Paper Roll and Ink Ribbon” on page 15. When you are finished loading the paper roll and ink Verify that no memory card is inserted in any of the ribbon, touch the [OK] button in the error message screen. -
Page 23: Shutdown
Checking the Remaining Ink Ribbon You can check the amount of ink ribbon that remains from the Start Guide screen. Display the Start Guide screen. Shutdown Complete any pending operations, and then bring up the start guide screen. Touch the top right corner of the Start Guide screen twice in succession. - Page 24 button Displays the number of prints since the last head cleaning. If the “Cleaning is necessary” message appears to the right of the number of prints, touch the button to perform cleaning. Startup and Shutdown...
-
Page 25: Chapter 3 Setup
Setup Chapter Language and operation mode selections, prices, The password entry screen appears. passwords and other settings for setting up the unit are configured from the administration screen. You can also Enter the administrator password using the numeric change settings after setting up the unit and perform keypad. -
Page 26: About Operation Modes
(Screens) tab About Operation Modes Lets you select the language display and configure settings such as those for the screen saver. (System) tab This unit has three operation modes. Let’s you select the operation mode, set the clock, and configure settings such as those for connecting the unit to a computer. -
Page 27: Flow Of Operations In Each Mode
Flow of Operations in Each Mode Full mode Quick Print mode Event mode Touch the screen Touch the screen Touch the screen Select language Select language Select input method Select input method Select input method • Insert memory card • Insert memory card •... -
Page 28: Basic Settings Used In All Operation Modes
Specifying the languages available for Basic Settings Used in All selection during operation Operation Modes Applicable modes: Full mode, Quick Print mode When using Full mode or Quick Print mode, it is possible This section explains the basic settings that are used in all to specify up to five additional languages to be made of the operation modes. -
Page 29: Setting The Time
If the date is set to 2008 or earlier, a clock settings Setting the Time screen allowing you to set the correct date will appear after you exit the administration screen. This procedure sets the time for the internal clock. If you cancel and exit the clock settings screen without setting the date, you will return to the Start Guide Open the System tab on the administration screen. -
Page 30: Settings In Full Mode And Quick Print Mode
Settings in Full Mode and Quick Print Mode Setting Prices Set the prices for prints. You can set the price per print for each size. You can also set additional fees for matte finishing and special prints such as index or border prints. You can also set initial fees for each order. - Page 31 Select the size field for which to set a price, and touch On-screen Currency button. abbreviation South Korean Won A numeric keypad appears. Mexican Peso Brazilian Real Colombian Peso Venezuelan Bolivar East Carribbean Dollar Argentinian Peso Chilean Peso Peruvian Nuevo Sol Ecuador Sucre Uruguayan Peso Polish Zloty...
-
Page 32: Setting The Passwords
Touch the [ON] button under [Password]. Setting the Passwords Touch the [Administrator Password] button, and When using this unit as a self-service photo kiosk in a enter a four-digit password. store, the store staff needs to verify the number of prints and the charges, accept payment from the customer, and Touch the [Checkout Password] button, and... -
Page 33: Chapter 4 Advanced Settings
Advanced Settings Chapter Touch the button. Band Pricing The following screen appears. You can vary the price per print based on the number of prints ordered. This allows you to offer discounts for large volume printing. Prices can be set for each print size. You can also set additional fees for matte finishing and special prints such as index or border prints. -
Page 34: Setting The Maximum Number Of Prints
Band pricing setting example Setting the Maximum 1 to 10 prints $ 0.50 Number of Prints 11 to 50 prints $ 0.40 51 or more prints $ 0.30 Input example This function sets the maximum number of prints that can be printed. -
Page 35: Using Budget Codes
When Rental or Ink Ribbon is selected Using Budget Codes When you select Rental or Ink Ribbon, Order and Price configurations are also enabled simultaneously. Configure Order and Price settings before selecting Rental or Ink Ribbon when using either of these modes. When direct payment for photos is not required, such as If you reconfigure Order and Price settings after selecting when using the unit for in-house purposes, budget codes... -
Page 36: Setting Cut Mode
Setting Cut mode Setting Cut Mode Open the Print tab on the administration screen. It is possible to print in non-standard sizes when using the 2UPC-C15 series or 2UPC-C48 series printing pack. This function allows you to print several different print sizes without having to replace the printing pack. -
Page 37: Watermarking Order Numbers Or File Names On Prints
Watermarking Order Using Expansion Numbers or File Names CompactFlash Cards on Prints Functions That Require an This setting determines whether the order number or file Expansion CompactFlash Card name is printed on the prints. The order numbers or file name is printed as a watermark A CompactFlash card (expansion CompactFlash card) on the edge of the photo. -
Page 38: Creating An Expansion Compactflash Card
CompactFlash card. Insert the CompactFlash card into the computer. Copy the promotional images. Create the folder, “\DNP\DSSL10”, in the root folder of the CompactFlash card, and copy the “\DNP\DSSL10\Promotion” folder from the supplied CD-ROM into the created folder. -
Page 39: Checking The Remaining Capacity On The Expansion Compactflash Card
Use a memory card or USB memory device to copy data created on a computer onto the expansion CompactFlash card. Note All folders and files stored under the “\DNP\DSSL10” Connect a memory card or USB memory device to folder on the expansion CompactFlash card will be your computer. -
Page 40: Adding Borders
Store the newly created promotional images in the To turn the Start screen on/off “\DNP\DSSL10\Promotion” folder on a memory card or When promotional images have been set, you can choose USB memory. to hide the following Start Guide screen. Promotional image specifications Image size: 640 ×... -
Page 41: Adding Text To Images
[Color] tab Adding Text to Images Lets you specify the text color. You can create prints with text superimposed on the images. Text can also be superimposed on borders. Note Only alphanumeric characters can be superimposed on Depending on the number of characters and text size images. -
Page 42: Printing With Watermarks
Use a memory card or USB memory device to copy the order numbers or file names on the photos. created template onto the unit’s expansion CompactFlash card. Create the folder directory, “\DNP\DSSL10\Watermark,” Creating Watermark Templates for storing the created template on the memory card or USB memory device. -
Page 43: Setting Image Preload
Setting Image Preload Entering Passwords Using Memory Cards Expansion CompactFlash card required (Remote Password Input) You can select whether data for ordered images is loaded onto the unit before printing begins. Expansion CompactFlash card required When image preload is enabled, data for ordered images is loaded from a memory card onto the expansion When the checkout password is requested, instead of using CompactFlash card immediately before printing begins. -
Page 44: System Settings
System Settings Beep Setting Determines whether a beep is heard while performing operations or when an error occurs. To turn the beep on or off, touch the [ON] or [OFF] button under [Beep] on the System tab of the administration screen. -
Page 45: Chapter 5 Maintenance
Maintenance Chapter Cleaning Cleaning the Interior If defects such as white stripes, fading, or scratches begin to appear in printouts, you may need to clean the thermal head and rollers. In particular, white stripes and lines tend to appear when using the 2UPC-C14 series or 2UPC-C48 series printing pack after printing a large quantity of prints with the 2UPC-C13 series or 2UPC-C15 series printing pack. - Page 46 Open the side door, and remove the ink ribbon Remove the paper from the front side of the cleaning cartridge. sheet. Load the cleaning cartridge into the printer, and close the side door. Touch the [OK] button in the message. About 30 cm of print paper emerges, and a message asking for confirmation to begin cleaning appears on the screen.
-
Page 47: Cleaning The Cabinet
Open the side door, and remove the cleaning cartridge. Cleaning the Cabinet If the cabinet is extremely dirty, soak a clean cloth in water, or a solution of water and a neutral detergent, wring out the cloth, and then wipe the surface of the cabinet. Next, wipe clean with a clean, dry cloth. -
Page 48: Setting The Printer Image Quality
Dark Setting the Printer Image Adjusts the scale of the dark tones. Dark tones become darker when you move the slider to the right (+), and Quality lighter when you move the slider to the left (–). Light Adjusting the Printer Image Quality To adjust the printer image quality, open the Printer tab on Output the administration screen and then touch the... -
Page 49: Adjusting The Gray Balance
Adjusting the Print Position Light Adjust the print position if images are printed off-center on the paper. Output Open the Print tab on the administration screen. Dark Input Light Sharpness Adjusts the sharpness of image outlines. Sharpness is enhanced when you move the slider to the right (+), and reduced and smoothened when you move the slider to the left (–). -
Page 50: Displaying Logs
Displaying the Sales Log Displaying Logs The sales log can be displayed by opening the Administration tab on the administration screen and then The print log and system log can be displayed. touching the [Summary Logs] button. Displaying the Print Log The print log can be displayed by opening the Administration tab on the administration screen and then touching the [Print Logs] button. -
Page 51: Adjusting The Touch Panel
The following information is displayed. Adjusting the Touch • Print counter • Cumulative print count Panel • Thermal head print count • Hours of operation (power-on time, fan operation time, LCD backlight operation time) • Firmware version This function is used to calibrate the touch panel. button Open the System tab on the administration screen, and Touch this button to export the system log to an expansion... -
Page 52: Restoring The Factory Settings
Restoring the Factory Settings To reset the unit back to its factory settings, open the Administration tab on the administration screen, and then touch the [Reset to Factory Settings] button. Restoring the Factory Settings... -
Page 53: Chapter 6 Operation
Operation Chapter Touch the desired language. Starting Operation A notice regarding the use of the unit appears. Read the notice and then touch the [OK] button. Applicable modes: All operation modes Insert the memory card into the slot on the front of the unit. - Page 54 To insert USB Memory • Express Print (page 59) Quick Print mode • Select & Print (page 55) • Express Print (page 59) Event mode • Select & Print (page 55) • Border Print (page 56) • Split Image (page 57) •...
-
Page 55: Selecting And Printing Images
Notes Selecting and Printing • The following icon is displayed for images that are Images not compatible with this unit or which are damaged. Applicable modes: All operation modes This procedure explains how to select and print the desired images. •... -
Page 56: Using Border Print
Notes Using Border Print • Up to 99 prints can be made of one image. • The number of prints in a single order cannot be increased beyond the limit on the maximum number Expansion CompactFlash card required of prints that was set by the administrator. To add Applicable modes: Full mode, Event mode further prints, it is necessary to either reduce the number of prints already specified, or else divide the... -
Page 57: Using Split Image Print
If the unit is in Event mode, printing begins. Using Split Image Print If the unit is in Full mode, the order confirmation screen appears. For details on how to proceed, see “Confirming and Printing the Order” on page 59. Applicable modes: Full mode, Event mode This function lets you print multiple images on a single sheet. -
Page 58: Using Index Print
Select the image that you want to assign to the frame, Using Index Print and then touch the [OK] button. The preview screen returns. Applicable modes: Full mode, Event mode If the layout that you selected includes multiple images, repeat steps 3 and 4. This function prints an array of thumbnails of all images. -
Page 59: Printing All Images
Printing All Images Confirming and Printing the Order Applicable mode: All operation modes Applicable modes: Full mode, Quick Print This function prints one each of all images. mode From the main menu, touch [Express Print]. In Full mode and Quick Print mode, the order confirmation The order confirmation screen appears. -
Page 60: Canceling Print Operations
Touch the [Print Start] button. Canceling Print A numeric keypad appears for inputting the password (budget code). Operations To cancel a print operation while it is in progress (the progress bar is displayed on the screen), perform the following procedure. Touch the top left corner of the print operation screen (progress bar displayed) twice in succession. -
Page 61: Image Editing
Specifying the Layout (Crop and Image Editing Rotate) This function allows you to trim and rotate an image, thus Applicable modes: All operation modes (only changing the composition of the image. crop and rotate in Quick Print mode) To adjust the image composition, touch [Crop & Rotate] While selecting or previewing images, touching the on the editing menu. -
Page 62: Inputting Text
Once all of the text has been input, touch the [OK] Inputting Text button. You can input text that will appear on top of printed The layout editing screen appears. images. On the Edit Menu, touch [Text Input]. The text input screen appears. Touch the buttons to edit the layout. -
Page 63: Adjusting The Image Quality
positioning are automatically adjusted to fit the text [Sepia] button entirely within the image. Use this button to change the image to sepia for printing. • Text that is positioned flush with the edge of the image [B&W] button may be cut off when the image is printed. Use this button to print the image in black and white. -
Page 64: Selecting The Print Finish
Use the buttons to adjust the size of the Selecting the Print Finish compensation frame, so that the eye is fully within the frame. Perform red eye reduction on one eye at a time. Applicable modes: All modes Including both eyes in the compensation frame may result in incorrect compensation. -
Page 65: Printing From Dpof Settings
Note Printing from DPOF Proper correction may not be obtained depending on the Settings image. In addition, correction will not be applied if you adjust the image quality via image editing, or if you select the sepia or black and white setting. If a digital camera that supports DPOF was used, the Once all settings are complete, touch the [OK] button to images to print and the quantity for each image can also be... -
Page 66: Printing From A Computer
Connecting to a Computer Printing From a Computer To print from a computer, you must connect the unit to the computer using the supplied USB cable. Plug the USB When the supplied USB cable is used to connect the unit cable into the USB port (device) at the rear of the unit. -
Page 67: Appendix
Appendix • Do not install the unit in any location that is subject to: Precautions – instability – excessive dust – extremely high or low temperatures – vibration Safety – high humidity • Operate the printer using the power source specified in –... -
Page 68: Memory Cards
this unit in order to read data, slide the write-protect switch Memory Cards to the protected state. Contacts Write-protect switch Notes on Using “Memory Stick” Not write- Write- protected protected Notes • Dai Nippon Printing Co., Ltd. bears no responsibility for LOCK LOCK damage to your memory card or data while using this... -
Page 69: Notes On Using Other Types Of Memory Cards
mechanism that automatically determines the size of the SD Card “Memory Stick” media that is inserted and, therefore, The parts of an SD Card are shown below. accept both standard-size “Memory Stick” media and the more compact “Memory Stick Duo” media without Write-protect switch Contacts the use of an adapter. -
Page 70: Notes On Usb Memory
For details, refer to the user’s guide accompanying your • When using an SD Card or MultiMediaCard, insert the card. memory card directly into the corresponding slot. Do not insert these memory cards into the CompactFlash type adapter. Doing so could cause the image data stored in xD-Picture Card the card to be deleted or damaged. -
Page 71: Troubleshooting
Symptom Cause/Remedy Troubleshooting Image data cannot be A mounted memory card does not read. contain any data. Insert a memory card that contains image data. Before sending the unit out for servicing, check the items Data has been recorded on a listed below. -
Page 72: Ink Ribbon And Paper
Ink Ribbon and Paper Specifications Each printing pack contains two sets of the ink ribbon and Power requirements paper roll combination. 100 to 240 V AC, 50/60 Hz Be sure to use the ink ribbon and the paper roll in the carton Input current 3.0 to 1.3 A max. - Page 73 1,248 × 1,248 dots (4 × 4 inches) Maximum number of pixels to be handled (The top and bottom and right and left JPEG: 8,000(H) × 6,000(V) or portions will not be printed by about 2 8,000(V) × 6,000(H) TIFF: 8,000(H) × 6,000(V) or 8,000(V) ×...
- Page 74 Notes • Always verify that the unit is operating properly before use. DAI NIPPON PRINTING CO., LTD. WILL NOT BE LIABLE FOR DAMAGES OF ANY KIND INCLUDING, BUT NOT LIMITED TO, COMPENSATION OR REIMBURSEMENT ON ACCOUNT OF FAILURE TO PRINT CONTENT OF ANY TYPE OR LOSS OF DATA DUE TO FAILURE OF THIS UNIT OR ITS PRINTING MEDIA, ASSOCIATED SOFTWARE,...
Need help?
Do you have a question about the DS-SL10 and is the answer not in the manual?
Questions and answers