Table of Contents
Advertisement
Quick Links
IF YOU CANNOT READ OR UNDERSTAND THESE INSTALLATION INSTRUCTIONS DO NOT
INTRODUCTION
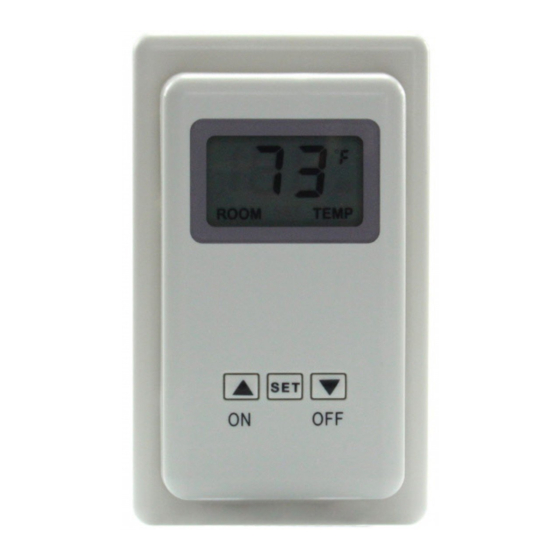
This TS-3 wired wall thermostat was developed to provide a safe, reliable control system for gas heating appliances. The system can
be operated thermostatically or manually from the wall unit.
WALL MOUNT THERMOSTAT
LCD
DISPLAY
ROOM
"SET"
TEMP
THERMO
MODE
SET
BUTTON
ON/UP
SET
BUTTON
ON
OFF
OFF/DOWN
BUTTON
TO INSTALL BATTERIES IN THE THERMOSTAT
1.
Remove face from backing wall plate this is done by sliding the face up about 1/2" then pull the face off the base plate. As
shown in Figure #1
2.
Locate the (2) holders for the 3V button cell batteries.
3.
Slide the button cell batteries into the battery holders. (Make sure that the batteries are installed with the (+) plus side facing
you or up.
4.
Reinstall the face to the backing plate this is done by sliding the face in and down about 1/2" then check that the (2) male
terminal connectors on the face are engaged in the female terminal connectors on the backing plate . As show in Figure #1
TO REMOVE THE BATTERIES FROM THE THERMOSTAT
1.
Remove face from backing plate this is done by sliding the face up about 1/2" then pull the face off the base plate. As shown in
Figure #1
2.
Locate the (2) holders for the 3V button cell batteries.
3.
Insert a small screwdriver into the slot above the button cell battery and push the battery out. As shown in Figure #2
4.
Reinstall the face to the backing plate this is done by sliding the face in and down about 1/2" then check that the (2) male
terminal connectors on the face are engaged in the female terminal connectors on the backing plate. As show in Figure #1
R O
O M
T E
M P
S E
O N
T
O F
F
___________________________________________________________________________________________________________
Skytech: TS-3
INSTALLATION AND OPERATING INSTRUCTIONS
ATTEMPT TO INSTALL OR OPERATE
The TS-3 wired thermostat operates on (2) 3V Button Cell (Included) which powers the LCD screen
and circuit board. Before using the TS-3 wall thermostat the 3V batteries must be installed into the
battery compartments.
It is recommended that CR2032 lithium batteries always be used for longer battery life and
maximum operational performance. If the LCD screen will not come on, check the 3V Button Cell
battery.
Figure #1
I
Model: TS-3
Figure #2
Battery Removal
Slots
+
+
Plus
Plus
Side
Side
(2) 3 Volt Button
Cell Batteries
REV.1-19-12 Page 1 of 5
Advertisement
Table of Contents

Related Manuals for Skytech TS-3


Summary of Contents for Skytech TS-3
- Page 1 IF YOU CANNOT READ OR UNDERSTAND THESE INSTALLATION INSTRUCTIONS DO NOT ATTEMPT TO INSTALL OR OPERATE INTRODUCTION This TS-3 wired wall thermostat was developed to provide a safe, reliable control system for gas heating appliances. The system can be operated thermostatically or manually from the wall unit. WALL MOUNT THERMOSTAT The TS-3 wired thermostat operates on (2) 3V Button Cell (Included) which powers the LCD screen and circuit board.
- Page 2 NOTE: When locating the TS-3 on a wall remember it should be kept away from direct sources of heat such as heating appliance, incandescent lighting, and direct sunlight. Leaving the TS-3 in direct sunlight, for example, will cause its heat-sensing diode to read the room temperature higher than it actually is;...
-
Page 3: Installation Instructions
This TS-3 wired wall thermostat connects to a millivolt gas valve, electronic spark ignition systems or other heating appliances as shown below in Figure #3, Figure #4, & Figure #5. Connect 18 gauge stranded or solid wires from the TS-3 wired wall thermostat to the gas valve, or electronic module. -
Page 4: System Check
• remain on if you are using a millivolt gas valve system). Press the SET button on the TS-3 to change the system to THERMO. Hold the SET button to set the temperature on the TS-3 to a • temperature of a least 2 F (1 C) above the ROOM temperature displayed on the LCD screen. - Page 5 The TS-3 has (2) 3 volt button cell batteries (1) button cell operates the LCD screen and the other button cell powers the PCB board. If the button cell battery that controls sending the PCB board is low or defective the LCD screen may work but the PCB relay may not close the contact (Check each button cell battery) Check that the (2) male terminal connectors on the face are engaged in the female terminal connectors on the backing plate.
- Page 6 Replacement parts will be available at no charge for the first (5) five years of this warranty, and will be available at market cost for the Lifetime of the product to that original owner. If SKYTECH II does not have the parts for an individual model, then a replacement SYSTEM will be provided.
- Page 7 Exclusive offer to Skytech Remote Control Owners This special offer is only provided to customers of Skytech II, Inc. that have purchased a remote control for their Hearth Product. This remote control system can be used for any 110Volt appliance, but perfect your Christmas Tree Lights or any other appliance that is difficult to reach or plug in.
Need help?
Do you have a question about the TS-3 and is the answer not in the manual?
Questions and answers