Dynaudio IP 17 Owners Manual Installation Product
Hide thumbs
Also See for IP 17:
- Owner's manual (28 pages) ,
- Installation products (3 pages) ,
- User manual (22 pages)
Table of Contents
Advertisement
Quick Links
Download this manual
See also:
Owner's Manual
Advertisement
Table of Contents

Related Manuals for Dynaudio IP 17


Summary of Contents for Dynaudio IP 17
- Page 1 Owners Manual Installation Product Bedienungsanleitung Installations-Produkt Home Systems | Professional | Automotive...
-
Page 2: Table Of Contents
IP 24 IP 17 Content Inhaltsverzeichnis Introduction P . 3 Einleitung S. 3 Contents P . 4 Kartoninhalt S. 4 Unpacking P . 5 Auspacken S. 5 Safety Instructions P . 6 Sicherheitshinweise S. 6 Ideal Surrounding P . 6 Einbauhinweise S. -
Page 3: Introduction P
These facilities are so advanced and auch in aufwändiger eigener Fertigung realisieren kann. Aufgrund the quality control is so strict that Dynaudio is likely the only dieser Qualitätsorientierung ist Dynaudio nach der strengen, die specialty audio company to have exceeded ISO 9000 and earned ISO 9000 übertreffenden Qualitätsnorm QS 9000 zertifiziert. -
Page 4: Contents P
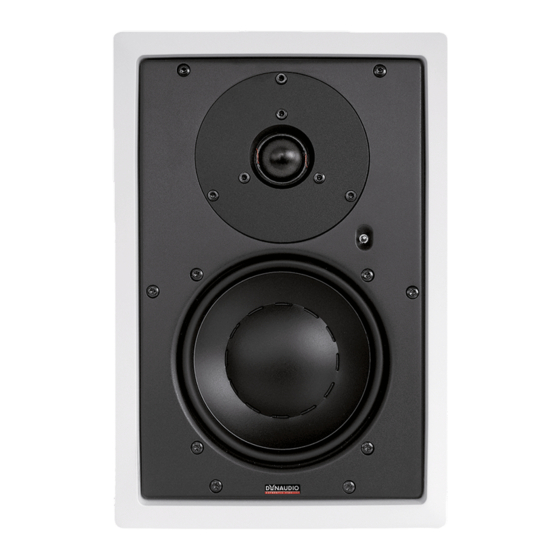
(including doglegs) Aluminiumrahmen (inkl. Rahmenklemmen) Baffle with drivers and crossover Schallwand mit Chassis und Frequenzweiche Position template Positionierungs-Schablone Gasket Dichtung Foam Schaumstoffmatte Grille Abdeckgitter Accessories: Zubehörteile: Additional doglegs zusätzl. Rahmenklemmen Torx 15 Bit Torx 20 Bit 04 Dynaudio Installation Product... -
Page 5: Unpacking P
Ziehen Sie dazu gleichzeitig an den roten Folienstreifen. • Un-tighten the transport screws (IP 17: 6, IP 24: 10), using the • Lösen Sie die zehn äußeren Schrauben (Transportsicherung) Torx 20 bit, and place the screws into the accessory pack for mit dem Torx 20 Bit. -
Page 6: Safety Instructions P
1.1 ft (30 liters). für den IP 24 über 30 Liter, für den IP 17 über 15 Liter. Avoid installing the speakers in the same cavity as any ducts, as Der Einbau in Hohlräume mit Luftschächten oder Rohren kann this may result in excessive rattle. -
Page 7: Positioning P
Der Abstand zwischen den Front-Lautsprechern sollte die Breite than the width of the screen. des Fernsehbildschirms nicht unterschreiten. The surround loudspeakers’ positions shall be determined based Die optimale Platzierung zusätzlicher Heimkino-Lautsprecher on the surround sound system. ergibt sich aus den Anforderungen des Surround-Systems. Dynaudio Installation Product 07... -
Page 8: Optimizing The Sound P
Tip 4: The tweeter level can be adjusted ± 1.5 dB with the Tipp 4: Mit einem Schalter (rechts neben dem Hochtöner) lässt 3-position switch placed on the right hand side of the sich der Wiedergabepegel der hohen Töne um 1,5 dB tweeter. erhöhen oder absenken. 08 Dynaudio Installation Product... -
Page 9: Customization P
Customization Wohnraumanpassung The grilles and frames of the Dynaudio IP Series loudspeakers are Die Aluminiumrahmen und die Abdeckgitter sind in seidenmat- painted in a white semi-matte (RAL 9003) finish. tem Weiß (RAL 9003) lackiert. Both may also be re-painted, and are ready to be refinished to Rahmen und Gitter sind überlackierbar und können damit pro-... -
Page 10: Installation Guide P
Installation Hint: A pre-construction bracket is available to better facilitate Hinweis: Als Zubehör ist für den IP 17 und den IP 24 ein Metall- new construction installations of the Dynaudio IP 17 and IP 24, Einbaurahmen erhältlich, um bei einem Neubau oder einer extra by working both as a template as well as a structural support anzufertigenden Wandöffnung als Schablone und als mecha-... - Page 11 Note: All drawings show the IP 24 as an example. The installation of the IP 17 is identical. Abbildungshinweis: Alle Zeichnungen zeigen beispielhaft den IP 24. Die Installation des IP 17 ist identisch. Dynaudio Installation Product 11...
- Page 12 Place your hand inside the cavity to von hinten gegen die Wand drücken. Ziehen Sie die Klemmen control and assure the doglegs movement. vorsichtig fest. Achten Sie darauf, dass sich dabei die Klammern nicht verdrehen. 12 Dynaudio Installation Product...
- Page 13 0 mm max.: 40 mm 0 " min.: 1.6 " max.: max. min. min.: 36 mm max.: 65 mm 1.4 " min.: max. 2.6 " max.: Dynaudio Installation Product 13...
- Page 14 Zum Festziehen verwenden Sie den Torx 20 Bit. Congratulations. Installation is complete. Setzen Sie das Abdeckgitter ein, indem Sie es zwischen Rahmen und Schallwand vorsichtig andrücken. Bitte drücken Sie nicht in der Mitte des Abdeckgitters. Herzlichen Glückwunsch. Die Installation ist beendet. 14 Dynaudio Installation Product...
- Page 15 Dynaudio Installation Product 15...
-
Page 16: Dimensions P
Dynaudio IP 17 Dimensions Maße Aluminum mounting frame: Height: 12.80 " (325 mm) Aluminiumrahmen: Höhe: 325 mm Width: 8.86 " (225 mm) Breite: 225 mm Cut Out: Height: 11.61 " (295 mm) Wandaussparung: Höhe: 295 mm Width: 7.64 " (194 mm) - Page 17 9.92 " (252 mm) Breite: 252 mm Grille: Height: 13.50 " (343 mm) Abdeckgitter: Höhe: 343 mm Width: 9.60 " (244 mm) Breite: 244 mm Minimum depth required: 3.62 " (92 mm) Minimale Einbautiefe: 92 mm Dynaudio Installation Product 17...
-
Page 18: Warranty P
Warranty Garantie Dynaudio provides a transferable five-year limited manufacturer’s Dynaudio gewährt auf Lautsprecher eine Garantie von 5 Jahren. warranty. Bitte beachten Sie regionale Sondervereinbarungen, um eine über die gesetzliche Gewährleistungsfrist erweiterte Dynaudio This warranty only covers faults or defects in material and Garantie von 5 Jahren zu erhalten. -
Page 19: Technical Specifications P
Technical Specifications / Technische Daten IP 17 IP 24 Sensitivity (2.83 V / 1 m) 88 dB 90 dB Empfindlichkeit (2,83 V/1 m) IEC Long Term Power Handling 150 W 150 W Belastbarkeit (Langzeitbelastung) Impedance (nominal) 8 Ohms, linearized 4 Ohms, linearized... - Page 20 DYNAUDIO International GmbH Ohepark 2 21224 Rosengarten Germany Phone +49 (0) 4108 - 41 80 - 0 © Dynaudio International GmbH, IP II Manual INT 0905. Item No. 455 910 A. Subject to change without notice. All text and image copyrights reserved.
Need help?
Do you have a question about the IP 17 and is the answer not in the manual?
Questions and answers