Sangean PR-D7 Instructions For Use Manual
Fm/am pll synthesized radio
Hide thumbs
Also See for PR-D7:
- Operating instruction (82 pages) ,
- User manual (18 pages) ,
- Specifications (1 page)
Table of Contents
Advertisement
Advertisement
Table of Contents

Related Manuals for Sangean PR-D7


Summary of Contents for Sangean PR-D7
-
Page 2: Important Safety Instructions
Important Safety Instructions 1. Read these instructions. 2. Keep these instructions. 3. Heed all warnings. 4. Follow all instructions. 5. Do not use this apparatus near water. 6. Clean only with dry cloth. 7. Do not block any ventilation openings. Install in accordance with the instructions. - Page 3 10. Protect the power cord from being walked on or pinched particularly at plug, convenience receptacles, and the point where they exit from the apparatus. 11. Only use attachments/accessories specified by the manufacturer. 12. Use only with the cart, stand, tripod, bracket, or table specified by the manufacturer, or sold with the apparatus.
-
Page 5: Lcd Display
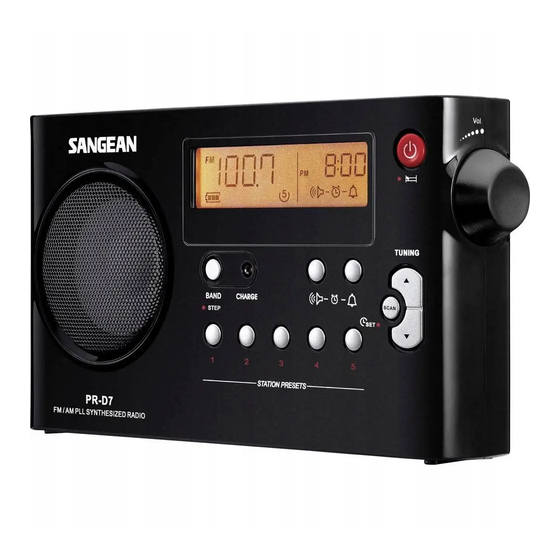
Controls Speaker Band Selection LCD Display Charge LED indicator Alarm by radio Alarm by buzzer Power/Auto shut off button Volume Control Tuning Control Station Scan and Time Set Station Presets Battery Compartment FM Telescopic Antenna Headphone socket DC In socket LCD Display Radio Band Station Frequency... -
Page 6: Battery Operation Using Alkaline Batteries
Battery operation using alkaline batteries 1. Remove the battery cover on the back of the unit by sliding the cover in the direction of the arrow. 2. Insert 6 x AA ( UM3, LR6 ) alkaline batteries into the spaces in the compartment. -
Page 7: Battery Operation Using Rechargeable Batteries
Battery operation using rechargeable batteries 1. Remove the battery cover on the back of the unit by sliding the cover in the direction of the arrow. 2. Insert 6 x rechargeable AA ( UM3 ) batteries into the spaces in the compartment. - Page 8 In addition, the calculation of charging time is based on the capacity of the rechargeable battery and charging current power output of the charger. The two examples in the below table are for your reference only. PR-D7(p6) Size Model Capacity Charging Current Charging Time...
-
Page 9: Setting The Clock
Using the supplied AC power adaptor The supplied AC adaptor is 12 Volts DC output 500 mA center pin positive. 1. Insert the adaptor plug into the DC IN socket on the left hand side of the radio. 2. Plug the adaptor into a standard 13A mains socket outlet. Whenever the adaptor is plugged into the radio and switched on the mains, the batteries are automatically disconnected. -
Page 10: Operating The Radio
Operating the radio This radio is equipped with three tuning methods – Scan tuning, Manual tuning and Memory presets recall. Scan tuning 1. Press the Power button to turn on the radio. 2. Select the required waveband by pressing the Band button. For FM band fully extend and rotate telescopic aerial to get best reception. -
Page 11: Storing Stations In Preset Memories
Manual tuning/station searching 1. Press the Power button to turn on the radio. 2. Select the required waveband by pressing the Band button. Adjust the antenna as described above. 3. A single press on either the Tuning Up or Down button will change the frequency in the following increments: FM: 50 or 100 kHz AM (MW): 9 or 10 kHz... -
Page 12: Recalling Stations From Preset Memories
Recalling stations from preset memories 1. Press the Power button to turn on the radio. 2. Select the required waveband. 3. Momentarily press the required preset button, the preset number and station frequency will appear in the display. Setting the radio alarm When the radio alarm is selected, the radio will turn on and play the chosen radio station at the chosen alarm time. - Page 13 a. Setting radio alarm time 1. The radio alarm can be set either radio is on or off. 2. Press and release radio alarm button, the radio will show radio alarm symbol and radio frequency last tuned. 3. Press button for more than 2 seconds followed by a beep. 4.
-
Page 14: Buzzer Alarm
Setting the HWS ( Humane Wake System ) buzzer alarm A beep will activate when selecting the HWS alarm. The alarm beep will increase in volume every 15 seconds for one minute followed by one minute silence before repeating the cycle. The HWS alarm will sound for an hour until turning off by pressing the Power button. -
Page 15: Snooze Function
Snooze function 1. Whilst the alarm is activated, press any buttons except the Power button will activate the snooze function. The radio or HWS buzzer alarm will be silenced with interval of 5 minutes. 2. The display will flash both the snooze symbol and the alarm symbol. -
Page 16: Setting Tuning Step
Setting tuning step Tuning steps on some countries are different from where you purchase the radio. If you buy the radio in Europe and intend to use in Northern America or some Southern American countries. You may have to adjust tuning step so the radio may continue to serve you well. -
Page 17: Specifications
Specifications Power Requirements AC Power adaptor: DC 12V 500 mA center pin positive Batteries: 6 x UM-3 ( AA size, LR6 ) Battery life: Approx. 38 hours of listening for 4 hours a day at normal volume using alkaline cells. Frequency Coverage: FM 87.50 –...
Need help?
Do you have a question about the PR-D7 and is the answer not in the manual?
Questions and answers