Advertisement
Quick Links
G-302 Quick User Manual
------------------------------------------------------------------------------------------------------------------------------------------------
G-302 Dual Projector Edge Blender Quick User Manual
G-302 is an advanced dual channel video processor with patented warp technology. It is
a standalone system capable of image stacking, dual projector edge blending, 2D to 3D
conversion and 3D demultiplexer with precise geometry adjustment. No additional video
distributor, tool or PC is required for the setup.
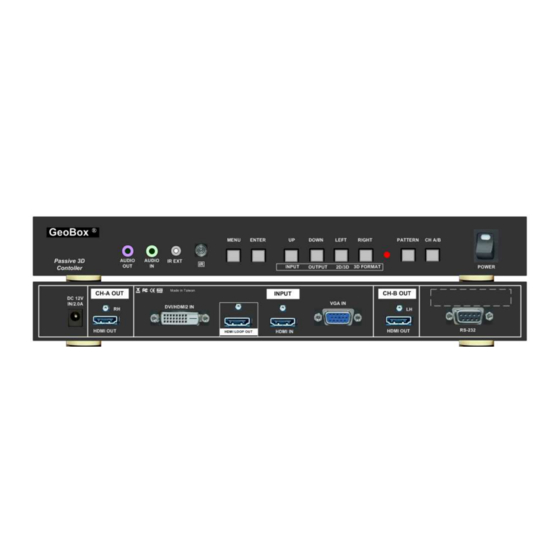
Figure 1
Figure 2
1. Full HD input and output
2. Loop out for 3 projector stacking
3. Precise geometry adjustment for easy
system installation
4. New 2D to 3D conversion technology
5. Convert 3D for 2D TV display
6. Quick dual channel edge blending
7. Support HDMI 1.4 standard 3D
formats from Blue Ray, PC...
8. Multiple input ports
9. 3D demultiplexer into RH/LH for
passive 3D display
10. User friendly OSD and IR remote
control. No PC is required
11. IR extender & RS-232 control
12. Allow same setup for 3D display and
high brightness 2D stacking
13. Support curved screen 3D display
1
Document: G-302101
Features
Advertisement

Related Manuals for Shure Geobox G-302


Summary of Contents for Shure Geobox G-302
- Page 1 G-302 Quick User Manual Document: G-302101 ------------------------------------------------------------------------------------------------------------------------------------------------ G-302 Dual Projector Edge Blender Quick User Manual G-302 is an advanced dual channel video processor with patented warp technology. It is a standalone system capable of image stacking, dual projector edge blending, 2D to 3D conversion and 3D demultiplexer with precise geometry adjustment.
- Page 2 G-302 Quick User Manual Document: G-302101 ------------------------------------------------------------------------------------------------------------------------------------------------ Outlook and Functions Minimum Equipment required for 3D display 1. 1x GeoBox 4. 1x 3D screen (silver matte) 2. 2x Projectors (Native resolution above XGA 5. 3D glasses (Paired with polarizer) with HDMI input connector) 6.
- Page 3 G-302 Quick User Manual Document: G-302101 ------------------------------------------------------------------------------------------------------------------------------------------------ Two projector Image alignment procedures using remote controller 1. Power on the system after installation, double images should appear on the screen. This is to check if complete system is connected correctly. 2. Disconnect input signal during geometry adjustment is recommended for easy Menu view.
- Page 4 G-302 Quick User Manual Document: G-302101 ------------------------------------------------------------------------------------------------------------------------------------------------ Use OSD direction keys to adjust CH-A [Top Left] corner to match CH-B, then press [OK] to go to next step. 1. After press [OK], it will show [4 Corner] menu again in CH-A. 2.
- Page 5 G-302 Quick User Manual Document: G-302101 ------------------------------------------------------------------------------------------------------------------------------------------------ Procedures for 3D display setting in GeoBox 1. After [4 Corner] adjustment, use hot keys in remote controller to select 3D formats. 2. Select [3D/Auto] if the 3D signal is standard HDMI 1.4 3D formats from Blue Ray player. 3.
- Page 6 G-302 Quick User Manual Document: G-302101 ------------------------------------------------------------------------------------------------------------------------------------------------ Other Important Tips for 3D display 1. The final brightness to the eyes will be reduced due to 3D polarizer and glasses. Passive 3D brightness to the eyes will be about 2-3x if compared with the same projector used in active (shutter) 3D system. 2.
- Page 7 G-302 Quick User Manual Document: G-302101 ------------------------------------------------------------------------------------------------------------------------------------------------ Procedures for 2 projector edge blending System configuration 1. To use the same projectors and install with the same settings. Disable auto keystone and set color in standard or sRGB display mode to reduce the possible banding in overlap region.
- Page 8 G-302 Quick User Manual Document: G-302101 ------------------------------------------------------------------------------------------------------------------------------------------------ Image location fine-tune is required to let the images from both projectors with the right locations and same size. To let all grids in overlap area perfectly be aligned together will ensure the best geometry adjustment result.
- Page 9 G-302 Quick User Manual Document: G-302101 ------------------------------------------------------------------------------------------------------------------------------------------------ 1. Activate [4 Corner] key in one channel (figure in CH-B). An indicator (CHANNEL B) will be showed at the bottom right of the OSD. 2. Select the corner for the adjustment and press [OK] to enter 4 corner adjustment in CH-B 3.
- Page 10 G-302 Quick User Manual Document: G-302101 ------------------------------------------------------------------------------------------------------------------------------------------------ 1. After finish geometry alignment in CH-B, press [CH A/B] to switch to CH-A OSD menu. 2. [4 Corner] adjustment menu will appear. If no [4 Corner] menu shows, please press [4 Corner] menu again in remote controller 3.
- Page 11 G-302 Quick User Manual Document: G-302101 ------------------------------------------------------------------------------------------------------------------------------------------------ In the above example, the overlap region is 14 grids (calculated from internal grid pattern but not video source). Each grid pattern represents 50x50 pixels in size under the condition that the output resolution of G-302 is set at 1920x1080 output resolution.
- Page 12 G-302 Quick User Manual Document: G-302101 ------------------------------------------------------------------------------------------------------------------------------------------------ If double image or blurred image appears in overlap area as showed in left figure, it means the setting in [Edge Blend] or [Overlap] value is not correct. Further adjustment is required. 2. There are some reasons that the [Overlap] value is not correct: a.
- Page 13 G-302 Quick User Manual Document: G-302101 ------------------------------------------------------------------------------------------------------------------------------------------------ Image Properties: To select Preset Mode to Neutral, sRGB or Bluish 2. Projector: To adjust installation position of the projector: i、 Increase Overlap region ii、 Reduce off axis angle To change Display Mode and try different color settings. To implement 3D color adjustment.
- Page 14 G-302 Quick User Manual Document: G-302101 ------------------------------------------------------------------------------------------------------------------------------------------------ 1. It is not necessary to use expensive projectors with lens shift or special geometry alignment rack because GeoBox can do pixel by pixel precise geometry adjustment. 2. A normal projector can be chosen for 3D display (no need to have 3D ready). Usually, XGA resolution will create acceptable 3D video quality.
-
Page 15: Technical Support
G-302 Quick User Manual Document: G-302101 ------------------------------------------------------------------------------------------------------------------------------------------------ can be stored in GeoBox [Profile] menu and recall through OSD. 7. GeoBox HDMI connector may be damaged by an unqualified HDMI cable. Please use qualified HDMI cable and carefully plug in and out. 8.
Need help?
Do you have a question about the Geobox G-302 and is the answer not in the manual?
Questions and answers