Table of Contents
Advertisement
60cm Fully
Integrated
Dishwasher
User Manual
Content
Important Safety instructions-------------------- 2
Product description--------------------------------- 4
Start using your the appliance--------------------6
Maintenance and cleaning------------------------ 15
Troubleshooting---------------------------------------17
Warranty----------------------------------------------- 19
For warranty service call 1300 373 199 to
connect you to the nearest authorised
1
service centre
20130114 issue1
BDDW605W
BDDW605W-F
BDDW605X
BDDW605X-F
Advertisement
Table of Contents

Subscribe to Our Youtube Channel
Related Manuals for Bellini BDDW605W


Summary of Contents for Bellini BDDW605W
-
Page 1: Table Of Contents
Content Important Safety instructions-------------------- 2 Product description--------------------------------- 4 Start using your the appliance--------------------6 Maintenance and cleaning------------------------ 15 Troubleshooting---------------------------------------17 Warranty----------------------------------------------- 19 BDDW605W For warranty service call 1300 373 199 to BDDW605W-F connect you to the nearest authorised BDDW605X service centre BDDW605X-F... -
Page 2: Important Safety Instructions
Important Safety Instructions This manual explains the proper installation and use of your the appliance, please read it carefully before using even if you are familiar with the product. The manual should be kept in a safe place for future reference. General Warnings Child Safety Under certain conditions, Hydrogen gas may be... - Page 3 Only authorised personnel should carry out for an automatic dishwasher. Never use soap, servicing. (Certificate of Compliance to be laundry detergent, or hand washing detergent in retained) your dishwasher. Always ensure the appliance is switched off Other means for disconnection from the supply before cleaning or replacing parts.
-
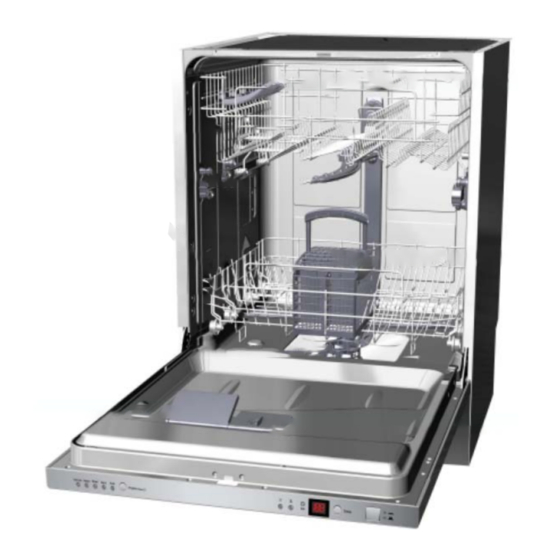
Page 4: Product Description
Product Description 1 Upper Basket 2 Spray Arms 3 Lower Basket 4 Filters 5 Detergent Dispenser 6 Rinse Aid Dispenser 7 Cutlery Tray 8 Cup Holder W x D x H 596x560x820 (mm) Power 12A, 240V socket a.c 50Hz Power 240V a.c supply 50Hz... - Page 5 Dispenser(Item 5&6 Above) Lid release button Pre-wash detergent compartment D (Rinse aid indicator) Rinse aid cap & adjustor Detergent compartment Accessory Name Picture Quantity User Manual Installation Manual 4x26 screw 4x44 screw Hole plug Drain hose hanger T shape plug...
-
Page 6: Start Using Your The Appliance
Start Using Your Appliance 1. Before using 1.1 Fill the Rinse Aid Dispenser Attention! Only use branded rinse aid for dishwasher. Never fill the rinse aid dispenser with any other substances (e.g. dishwasher cleaning agent, liquid detergent). This could damage the appliance. Rinse aid is automatically added during the last rinse, ensuring thorough rinsing, spot and streak free drying. - Page 7 The rinse aid dispenser cap has 6 settings. Always start from "4" but if dish spots and streaks serious please set it to “5” or higher to increase the amount of rinse aid. Factory default set is “5”. NOTE: Increase the dose if there are water drops or spots on the dishes after washing. Decrease if there is sticky &...
-
Page 8: Loading The Upper Basket
If the dishes are heavily soiled, place an additional detergent dose in the pre-wash detergent compartment. This detergent will take effect during the pre-wash phase. The dispenser must be refilled before the start of each washing cycle following the instructions provided in the Wash Cycle Table. - Page 9 If needed, height of the upper basket can be adjusted to create more space for large utensils either in the upper basket or lower basket. The upper basket can be adjusted for height by putting wheels of different height into the rails. Long items, serving cutlery, salad servers or knives should be placed on the shelf so that they do not obstruct the rotation of the spray arms.
-
Page 10: Cutlery Tray
2.3 Folding Racks(Optional only) Folding racks consisting of two parts that are located on the lower basket which are designed to allow you place big items easier as pots, pans, etc. If needed, each part can be folded separately, or all of them can be folded for larger space. - Page 11 Attention! For washing in the dishwasher the following cutlery/dishes Are NOT suitable Are limited suitable Cutlery with wooden, horn china or mother-of-pearl Certain types of glasses can become dull handles after a large number of washes Plastic items which are not heat resistant Silver and aluminum parts have a tendency Older cutlery with glued parts that are not heat resistant to discolour during washing...
-
Page 12: Control Panel
3. Start Washing 3.1 Control Panel Program indicator light: when you select a Program Key-press: Press the key to scroll washing program, the corresponding light through the wash cycles. The light above or will display. next to the selected pad will be ON to indicate which WASH CYCLE has been selected. -
Page 13: Washing Programs
3.2 Washing Programs Running Detergent Energy Water Program Cycle Selection Description of Cycle Time Pre/main (kWh) (min) For the heaviest soiled Pre-wash (40°C) 5/25g 1.20 15.5 loads, such as pots, pans, Main wash (55°C) casserole dishes Rinse Hot rinse (65°C) Intensive dishes that have been Drying... -
Page 14: Wash Cycle Complete
3.4 Caution l It is dangerous to open the door when washing has commenced as the hot water may scald you. l If you want to open the door during washing without turning off the appliance to add dishes, open the door a little, wait for the spray arms to stop working, open the door completely and add dishes. -
Page 15: Maintenance And Cleaning
Maintenance and Cleaning Remove the Plug Cleaning The Spray Arms Before cleaning or performing maintenance, always It is necessary to clean the spray arms regularly for remove the plug from the socket. hard water chemicals will clog the spray arm jets and No Solvents or Abrasive Cleaning bearings. - Page 16 Clean filter assembly The filter is used to avoid the big remnants and other sundries getting inside the pump, efficiently removes food particles from the wash water, allow recirculation during the cycle. The residue can obstruct the filter sometime so suggest removing the larger food particles trapped in the filter after each wash cycle by rinsing the semicircular filter and cup under running water.
-
Page 17: Troubleshooting
Troubleshooting Error code When some malfunctions happen, the appliance will display error codes to warn you. Codes Meanings Possible Causes Door open The door is opened when the dishwasher is operating Water inlet Water inlet malfunction Water drainage Water drainage malfunction Temperature sensor Temperature sensor malfunction Overflow/leakage... - Page 18 To remove spots from glassware: Take out all metal utensils out of the dishwasher. Extremely hard water Do not add detergent. Low inlet temperature Choose the longest cycle. Spots and filming Overloading the dishwasher Start the dishwasher and allow it to run for about 18 to 22 minutes, on glasses and Improper loading then it will be in the main wash.
-
Page 19: Warranty
Consumer until the expiry of two (2) years (Warranty Period). If within the Warranty Period a manufacturing defect is discovered in the Bellini product or it fails to perform to the Company’s specifications as a result of some defect in materials, components or workmanship (Defect) then the Company will, at its option, repair the Bellini product or supply a replacement Bellini product free of charge. - Page 20 1.10 If you are required to transport the Bellini product to the Company or its service agent, you must ensure it is safely disconnected by a qualified tradesman and securely packed and insured. The Company does not accept any responsibility for loss or damage of the Bellini product prior to it being received by the Company or its service agent.
Need help?
Do you have a question about the BDDW605W and is the answer not in the manual?
Questions and answers