Table of Contents
Advertisement
Quick Links
™
TIMes 2
User's GUIde
This guide is also available at www.miowatch.com
B. MOdes Of OperATION
Press MODE to move to the next screen.
TIME
•
Shows day of the week,
alarm, date and time
STOPWATCH
•
Times your activities and
counts laps
TIMER
•
Shows two countdowns
and a lap counter
PACER
•
Shows the pace for
your walk or run. The
flashing number in lower
right corner indicates
frequency.
PC MODE
•
Uploads your data to a
computer via USB cable
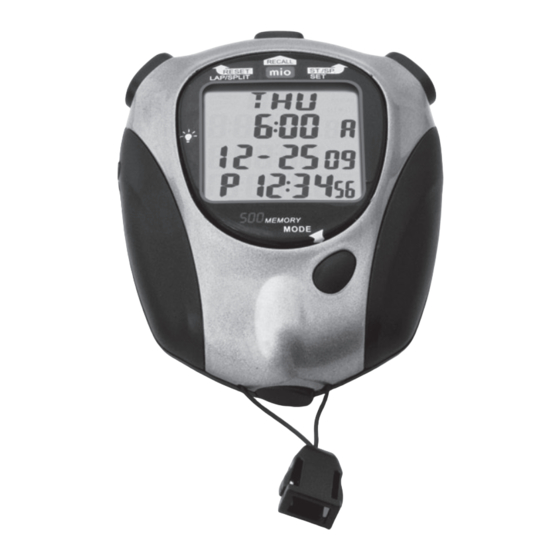
A. MIO TIMes 2 AT-A-GLANCe
PROFESSIOnAl
STOPWATCH
Day of the week
Date
PM/AM indicator
Stopwatch
mode indicator
Running time
C. seTTING ALArM, dATe ANd TIMe
1. Press the MODE button to reach the Time screen.
2. Hold down RESET button until the alarm time is flashing.
3. Press the ST/SP button until the desired hour is reached.
4. Use the RESET button to move on to the next item. Use the
ST/SP button to adjust the setting. The data is set in the
following order: Alarm hour C Alarm minutes (decimal) C
Alarm minutes C Alarm On/Off selection C Year C
Year (decade) C Month C Day C 12/24 hr clock C Hour C
Minutes (decimal) C Minutes C Seconds.
Note: The alarm is set when the alarm icon is on. When the
alarm goes off it will sound for 60 seconds.
Press MODE at any time to exit.
D. UsING The sTOpWATCh
1. Press the MODE button until the Stopwatch screen is shown.
(See Section A for display explanation.)
2. Press ST/SP to start the stopwatch.
3. Press RESET to split the time and record the lap time.
4. Press RESET every time you want to record another lap
time (you can record up to 500 laps) or press ST/SP to stop
the running time.
5. Press ST/SP to start the running time again or press RESET
button to reset all times.
E. reCALLING YOUr TIMes
There are a few different methods for recalling your times.
1. Press the MODE button to reach the recall mode, it will
display Chrono in the top left corner.
2. When you are not using the lap function, but just the
stopwatch function, you press the RECAll button to recall
your split times. Press the RESET button to see the date
of the events, and then use the RESET button to choose
which event times you would like to recall (begins at MCH-
001), continue to press RESET until you have reached your
desired event.
3. When you are using the lap function in addition to the
stopwatch function, pressing the RECAll button will scroll
through your split times first, followed by your lap times,
and then the best, average and slowest time. Again you
Alarm icon
Alarm
Time
CHRONO
Lap counter
LAP
Lap time
SPLIT
Split time
STOP
Stop indicator
RESET button
RECALL button
resets values,
recalls values
creates lap and
split times
RECALL
RESET
ST/SP
LAP/SPLIT
SET
CHRONO
MEM
RECALL
LAP
SPLIT
LIGHT
STOP
button
MEMORY
MODE
USB port
uploads data to PC
can choose the event you would like to recall by pressing
the RESET button and scrolling through the events. The
times are recalled in successive order with the lap/Split
time starting with the first time all the way to the last time.
4. Individual events can be cleared by pressing the ST/SP
button for 3 sec, the word "ClEARED" will be displayed. All
segregated memories can be cleared by pressing ST/SP
for 6 sec, "All ClEARED" will be displayed.
If the lap or split time is greater than 9:59:59.99 then the
AVE, BES and SlO times cannot be calculated.
If the lap counter is greater than 500, the stored data more
than 500 should be deleted when calculating the AVE, BES
and SlO.
If the lap counter is flashing "000" the memory is full. To
save new data you must clear the current data first.
Note: When the AVE, BES and SLO function is being used for
every lap time, the memory cannot hold 500 times.
F. UsING The TIMer fUNCTION
1. Press the MODE button until you reach the Timer Screen.
2. Hold the RESET button down until hour digit blinks.
3. Press ST/SP to find the desired hour for the countdown.
When the desired hour is found, use the RESET button
to move onto the minutes. Repeat the first step and the
move onto the seconds. Keep repeating until finished the
second time as well.
4. Press ST/SP to start the count down. The "1" will start
blinking as the time is counting down.
5. When the first timer reaches zero, the timer will beep
four times and the second timer will start counting down
immediately. If you only want to use one timer you can
leave the other set at 0:00:00.
6. When the second time reaches zero it will beep twice and
the number at the bottom will increase by one.
7. The first timer will automatically start up again. It will
continue until stopped by pressing ST/SP. You can restart
by pressing ST/SP again.
8. Press ST/SP to stop the Timer; press the RESET button to
reset the Timer.
ST/SP button
stars and stops
stopwatch
and timers
MODE
button
switches
modes
Advertisement
Table of Contents

Related Manuals for Mio Times 2


Summary of Contents for Mio Times 2
- Page 1 ™ RESET button RECALL button ST/SP button TIMes 2 A. MIO TIMes 2 AT-A-GLANCe PROFESSIOnAl resets values, recalls values stars and stops STOPWATCH creates lap and stopwatch split times and timers Alarm icon Day of the week User’s GUIde RECALL...
- Page 2 BEnDIng OR DROPPIng THE MIO lIFESTYlE STOPWATCH WIll BE DEEMED TO RESUlT MIO & ACCOMPAnYIng DOCUMEnTS. IF YOU ExPERIEnCE SEVERE OR PROlOngED DIS- FROM ABUSE OR MISUSE. THIS WARRAnTY IS VOID IF THE STOPWATCH CASE OF THE MIO Battery: standard Cr2032 COMFORT OR PAIn AT AnY TIME, SEE YOUR DOCTOR IMMEDIATElY.
Need help?
Do you have a question about the Times 2 and is the answer not in the manual?
Questions and answers