Table of Contents
Advertisement
Quick Links
Package Content
Inspect the packaging carton. Make sure your XDVR2 DVR is properly delivered. Remove all items
from the box and make sure the box contains the following items.
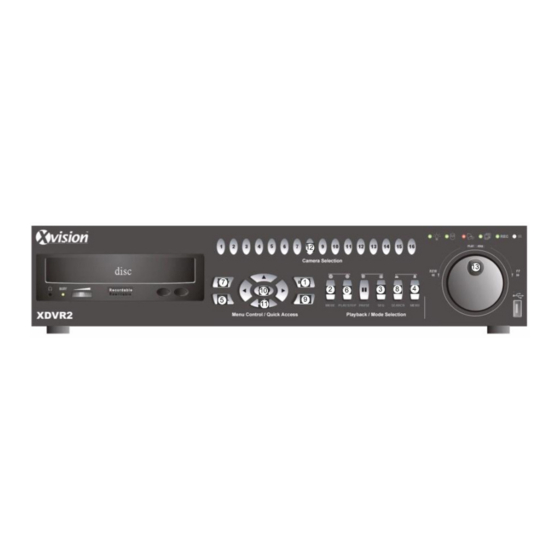
Function Keys on the Front Panel
1. DOME
2. MODE
3. SEQ (Sequence)
4. MENU
Connecting Your DVR
XDVR2 DVR
Quick Installation Guide
XDVR2 DVR
5. CALL
6. PLAY/STOP
7. FREEZE
8. SEARCH
Power cord
9. ESC
10. ZOOM/ENTER
11. Direction Keys
12. CHANNEL
1
Blank
User's
CD-RW
manual
13. Shuttle/Jog
00-579216ZXEA2
Advertisement
Table of Contents

Related Manuals for XVision XDVR2


Summary of Contents for XVision XDVR2
-
Page 1: Quick Installation Guide
XDVR2 DVR Quick Installation Guide Package Content Inspect the packaging carton. Make sure your XDVR2 DVR is properly delivered. Remove all items from the box and make sure the box contains the following items. XDVR2 DVR Power cord Blank User’s... - Page 2 Two USB 2.0 ports on the rear panel for users to connect external USB devices USB Connector to the unit. The XDVR2 series DVR is capable of networking. The LAN port opens the door LAN 10/100M (RJ-45) of DVR to Ethernet where by the Internet.
-
Page 3: Basic Setup
Use the LAN setup when you plan to use a LAN, WAN, or Internet connection without a dialup modem. It requires an Ethernet connection to a network. The default ID of your series DVR XDVR2 must be changed to avoid network conflicts. •... - Page 4 • For DHCP user, set the DHCP to <ON>. The IP address, Netmask, Gateway and DNS settings are retrieved from network servers. DHCP is dynamic; the settings will change from time to time. • For Non-DHCP user, set the DHCP to <OFF>. You must enter an IP address, Netmask, Gateway and DNS settings.
-
Page 5: Dome Control
To configure the RS-485 parameters, select <System Setup> from Main menu, and then select <RS485 Setup>. The default series DVR RS-485 settings are 9600 Baud, 8 Data Bits, 1 XDVR2 Stop Bit and No Parity. Dome Control Button: 1. Set/Go preset 4. -
Page 6: Basic Playback Operation
Basic Playback Operation Searching Recorded Video by Time: • Press SEARCH button to enter the Search menu; the From Time and End Time of the available video is listed on top of the screen. The value is unchangeable. • Use Direction buttons to move the cursor for setting the Start Time; adjusting the date and time values by UP/DOWN keys. -
Page 7: Using Remote Software
Click <OK> to accept the settings and close the <Security> screen. Using the Remote Software: • Start the IE and enter the IP address of your XDVR2 series DVR in the address field. • The ActiveX controls and plug-ins dialog will show twice for confirmation, click <YES> to accept ActiveX plug-ins. - Page 8 For more information on DVR Remote, see DVRRemote user’s manual. DVR Remote Playback To Playback Remote Video: • Click <Play> on the top of the main window toolbar, and then <Remote Playback> tab. • The <From> and <To> on the top of the screen display the date and time from which recorded video is available for playback.
- Page 9 To Playback Local *.avi Files: • Start your windows media player or other media player from <Start> menu (or any other possible access). • Select <File> and then <Open>. • Select the wanted *.avi file, and click <Open>. NOTE: The *.avi files stored for each channel are separated, and therefore the video can be played back in single channel, full screen mode only.
Need help?
Do you have a question about the XDVR2 and is the answer not in the manual?
Questions and answers