Table of Contents
Advertisement
Quick Links
HDVR/XHDVRDVD
Model:
4/8/16 Camera H264 DVR with
Networking
Before you begin
• Please unpack all boxes carefully and identify that all the parts are present.
• Do not cut the DVR cables, this will void the warranty.
• Make sure you use only the recommended power supplies for the DVR. Damage caused to
the DVR by incorrect voltage or wiring is not covered by the warranty.
Model:
HDVR/XHDVRDVD
4/8/16 Camera H264 DVR with
Networking
USER MANUAL
CCTV
Advertisement
Table of Contents

Related Manuals for XVision HDVR


Summary of Contents for XVision HDVR
- Page 1 CCTV HDVR/XHDVRDVD Model: 4/8/16 Camera H264 DVR with Networking Before you begin • Please unpack all boxes carefully and identify that all the parts are present. • Do not cut the DVR cables, this will void the warranty. • Make sure you use only the recommended power supplies for the DVR. Damage caused to the DVR by incorrect voltage or wiring is not covered by the warranty.
-
Page 2: Table Of Contents
Contents 1. Safety Precautions........................4 2. Overview ............................6 3. System Setup..........................7 3.1 Position the DVR ..........................7 3.2 Select Video Format ........................8 3.3 Connect Devices to the DVR ......................8 3.4 Rear Panel Connections.........................8 4. General System Setup ......................10 4.1 Front Panel Introduction ......................10 4.1.1 LED Definition ..........................10 4.1.2 Function Keys...........................11 4.2 Power Up / Shutdown the DVR....................12... - Page 3 Contents 5.4 Video Export ..........................23 5.4.1 Xvision ezBurn Introduction ....................23 5.4.2 Export Normal Video .......................24 5.4.3 Export Event Video........................25 5.5 Dome Control..........................25 5.5.1 Dome Connection........................25 5.5.2 Dome Protocol Setup ......................25 5.5.3 RS485 Setup..........................26 5.5.4 Dome Controlling Keys......................26 5.5.5 Setting Preset Points........................27 5.5.6 Calling Preset Points .......................28...
-
Page 4: Safety Precautions
1. Safety Precautions It is advised to read the Safety Precaution Guide through carefully before operating the product, to prevent any possible danger. WARNING: This symbol is intended to alert the user to the presence of un-insulated “ dangerous voltage”. CAUTION: This symbol is intended to alert the user to presence of important operating and maintenance (Servicing) instructions in the literature accompanying the appliance. - Page 5 Important Information Before proceeding, please read and observe all instructions and warnings in this manual. Retain this manual with the original receipt for future reference and all information relating to the warranty. When unpacking your unit, check for missing or damaged items. If any item is missing, or if damage is evident, DO NOT INSTALL OR OPERATE THIS PRODUCT.
-
Page 6: Overview
2. Overview The HDVR and XHDVRDVD are based on the latest Xvision DVR platform which uses H264 compression for recording, allowing much longer and clearer recordings than MPEG4 compression. The machines are available in 4, 8 and 16 camera versions and have full audio support for every camera input and Real Time recording in 4 (100 fps) and 8 (200 fps) camera versions and Near Real Time in 16 (200 fps) camera. -
Page 7: System Setup
3. System Setup This chapter refers to the system setup and installation. Please follow the instructions to operate the unit. In order to prevent the unit from data loss and system damage, that may be caused by a sudden power surge, use of an Uninterruptible Power Supply (UPS) is highly recommended. Please Note: In this manual and on the DVR menu screens, PPS (pictures per second)and FPS (frames per second) are refering to the same feature. -
Page 8: Select Video Format
Connecting Temporary Devices If any temporary devices need to be added to the DVR as parts of the system, such as USB Pen Drive or other USB device etc, make sure those devices are connected only after the unit is powered up. - Page 9 Power Jack The DVR has a 12V DC power connection jack. Please connect the power supply shipped with the unit. Audio In 4 Channel models Audio In connectors are provided for connecting audio source devices to the unit. 4 channel models are equipped with RCA connectors whilst 8 &...
-
Page 10: General System Setup
4. General System Setup Before operating the DVR, some general configuration should be setup first. The following subsections describe the function keys on the front panel and general configuration of the DVR. The OSD information and its screen positions are shown as following figure. The title of the channel will be displayed on the top-left corner of the window, either in full-screen mode or in split screen mode. -
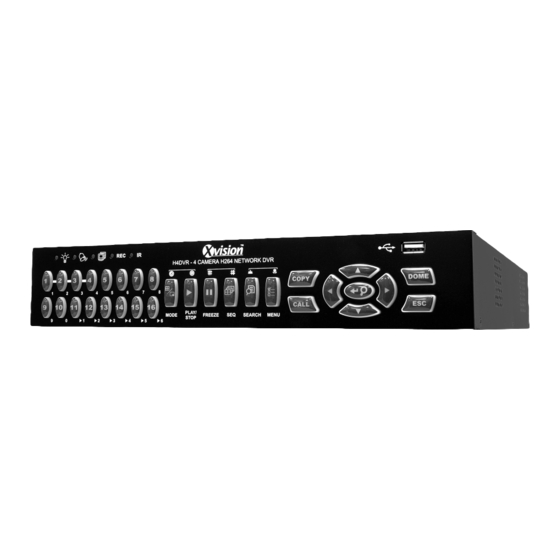
Page 11: Function Keys
4.1.2 Function Keys This section describes the function keys, which are for normal operation, on the front panel of the DVR. Please refer to the Setup Guide for diagrams of the function keys. CHANNEL In both Live and Playback modes, press the CHANNEL key to view the corresponding video in full- screen. -
Page 12: Power Up / Shutdown The Dvr
• Press FREEZE while playing the recorded video, the playback video will be paused. Press LEFT / RIGHT to move the recorded video forwards or backwards one frame at a a time. Press FREEZE again to continue playing the video. SEARCH In both Playback and Live mode, users can press SEARCH to display the Search menu for searching and playing back recorded video by date and time or events. -
Page 13: Enter Osd Setup Menu
<Reboot> Select this item to reboot the unit. The colour bar and system checking information are displayed on the monitor until the unit is completely restarted. 4.3 Enter OSD Setup Menu The configuration of the DVR can be customised by entering the intelligent Graphical User Interface (GUI) OSD setup menu. -
Page 14: Set Date / Time
4.4.1Setting Date / Time Select <Date> / <Time> and press ENTER for adjusting the settings. LEFT / RIGHT keys are used to move the cursor to the previous or next field, ENTER is for selecting, and UP / DOWN are used to change the value in the selected field. -
Page 15: Record Schedule/Quality Setting
DST Bias This function allows users to set the amount of time to move forward from the standard time for daylight saving time. The available options are in minutes. 4.5 Record Schedule/Quality Setting The Record Setup menu allows users to set the recording quality, recording schedules, and other recording parameters. -
Page 16: Preset Record Configuration
4.5.3 Preset Record Configuration The <Preset Config> is used to select the preset recording quality and frame rate. In normal operation, it is strongly recommended that you set the preset configuration as <Best Quality>. The Table below shows the PPS and picture size under <Best Quality> in Half-D1 mode for 16CH models. -
Page 17: Ezrecord Setup
DVR will allocate PPS automatically according to the number of cameras detecting movement at the same time and the total available PPS. 4.5.6 Xvision ezRecord Setup This function is used to set the Day / Night / Weekend PPS (Picture per Second) and Quality for each channel. -
Page 18: Circular Recording
4.5.7 Circular recording Users can choose to record video in circular mode or in linear mode. If circular mode is selected, the DVR will store new video into the HDD spaces whilst overwriting the oldest recorded video. Alternatively, if linear mode is selected, the DVR will stop recording when the HDD is full and the internal alarm will start to beep. -
Page 19: Basic Operation
5. Basic Operation The DVR allows users to access some general operations through the front panel simply. The following sections introduce the general operations of the unit. 5.1 View Live / Playback Video The general functions in live and playback mode are described in the following sections. 5.1.1 Viewing Modes The DVR provides various ways of viewing both live and recorded video. -
Page 20: View Live Cameras
5.1.3 View Live Cameras Users are allowed to view live cameras in various viewing modes, including full-screen, 2x2, 3x3 and 4x4. The general operation under live mode is described as follows. Freeze Live Image Press FREEZE while viewing live image, the image pauses but the date/time information does not, and the system clock continues running. -
Page 21: Sequence
• Press RIGHT / LEFT Direction keys to move the video a single step in either reverse or forward directions. Press and hold RIGHT / LEFT keys to repeatedly reverse/forward the video in single steps. • Press FREEZE again to resume the playback operation. 5.2 Sequence This section explains how to view the sequence mode with both Main Monitor and Call Monitor, if connected. -
Page 22: Search Recorded Video
5.3 Search recorded Video The DVR is capable of searching and playing back recorded video by date and time or events. Enter the specific date and time of the required video, the DVR will search for the matched video and start to playback. Users can search for event video by channel also. In live or playback mode, press SEARCH to enter the Search menu, which is shown as follows. -
Page 23: Search By Event
According to the size of video, the export may take up to 1 hour. 5.4.1 Xvision ezBurn Introduction Using the Xvision ezBurn technology, the ezBurn function provides users a simple method of exporting desired video to an external device, such as a USB Pen Drive. -
Page 24: Export Normal Video
TWO keys (SEARCH and COPY) and THREE touches are all that’s needed for completing the export. The entire exporting process will be done through the front panel, without needing to enter the OSD setup menu. The ezBurn exporting process is illustrated below: The entire process is described step by step in the following sections. -
Page 25: Export Event Video
5.4.3 Export Event Video To export event video, follow these steps: • Press SEARCH and play the required event video. To play event video, refer to section ‘Searching Recorded Video’. • After entering the playback mode, press COPY. The “ezBurn” window will display as shown below. -
Page 26: Rs485 Setup
The following menu is displayed. Analog Camera 1. Analog Camera Select 2. Dome Protocol None 3. Dome ID 4. Camera Title 5. Covert 6. Brightness 7. Contrast 8. Saturation 9. Hue 10. Audio Association To configure the speed dome protocol, select a camera first and set the communications protocol associated with the dome camera using the Direction keys and the ENTER key. -
Page 27: Setting Preset Points
Set / Go Preset This key is used to enter the Dome Preset menu to set up certain positions as a preset and go to the predetermined preset positions for viewing. Toggle Hint Screen This function is used to avoid viewing the dome parameter information while controlling speed dome cameras. -
Page 28: Calling Preset Points
• Press 2 to hide the Dome Control Hint Screen; press 2 again to toggle the Hint Screen. • Use Direction keys to position the speed dome camera in the desired position. Hint Screen DOME / ESC: Exit MODE / PLAY: Iris Open / Close SEQ / FREEZE: Focus Near / Far MENU / SEARCH: Zoom In / Out ENTER: Auto Focus / Iris... - Page 29 Dome Preset First Page Index Set Preset Go Preset • Use UP / DOWN keys to select the desired preset number from the menu. • Set the <Go Preset> of the selected preset number to <Yes>, and press ENTER to call the preset point.
-
Page 30: Remote Monitoring Software
6. Remote Monitoring Software The remote monitoring software is a browser-based software application designed to operate with this DVR. Using the software, users can view live and recorded video, and configure the DVRs remotely via a LAN, WAN or Internet using a Windows PC. The connected PC will automatically download the remote monitoring software plug-ins from the DVR, when the DVR is connected by entering it’s IP address in the address bar of the browser. -
Page 31: Installation Of Software
6.2 Installation of Software Refer to the following description to install the remote monitoring software. 6.2.1 Change Internet Settings The PC operating with the remote monitoring software should be set up to accept ActiveX plug- ins. Please follow the steps to set the Internet security settings accordingly. •... - Page 32 • Uncheck “Require server verification (https:) for all sites in this zone”. Type the IP address of the unit in field and click <Add> to add this web site to the zone. • Click <OK> to confirm the setting and close the Trusted sites dialogue box. •...
-
Page 33: Install The Remote Monitoring Software
6.2.2 Install the Remote Monitoring Software Start the browser to initiate the installation of the remote monitoring software on the PC. The IP address of the DVR can be saved as a Favorites item in the web browser to enable easy access in the future. -
Page 34: Login / Logout
6.2.2.1 Login / Logout Login using either the <Admin> or <User> account. The <Admin> account can can make unlimited modifications to the configurations, while the <User> account is limited to general remote access of the unit. One “Admin” and up to two “Users” can access a DVR at the same time. Nevertheless, if the “Admin”... -
Page 35: Software Upgrades
6.2.2.2 Software Upgrades If a new version of the remote monitoring software is available on the DVR, an upgrade will be prompted while accessing the unit. Follow the steps to upgrade the software. • The message, as shown above, will be prompted. Click <Yes> to accept the version upgrade. •... -
Page 36: Instant Recording
Set Preset (•) Set Preset is used to set up preset positions. The remote monitoring software allows the user to set up to 255 preset positions with DynaColor, American Dynamics, Fastrax, JVC, Panasonic (C & N), and Pelco (Pelco P & Pelco D) domes. Use the Direction buttons to move dome camera to the desired position, and then click the button and choose wanted number from the pull-down list. -
Page 37: Playback Instant Recorded Video
6.3.2.2 Playback Instant Recorded Video Follow the steps to playback a video recorded by “Instant Recording”. • Click <Play> on main window toolbar and click <Local Playback> tab. • Click <Open> to choose a recorded file. • Click <OK> to start playing the recorded video. 6.3.3 Playback Video The remote monitoring software allows users to view recorded video either from the DVR, or from the hard disk drive of the PC. -
Page 38: Playback Local *.Drv Files
6.3.3.2 Playback Local *.drv Files The <Local Playback> tab allows users to playback *.drv video files stored in the PC's hard drive. Follow the steps below to playback a downloaded *.drv file with the remote monitoring software. • Click <Open> and the file selection screen is displayed. •... -
Page 39: Take A Snapshot
6.3.5 Take a snapshot Snapshot is a simple screen capture tool. When users click on the SNAPSHOT button, it will capture the screenshot of the window that is currently showing on the screen. Each click captures one screenshot to be saved as a JPEG file on the desktop. The snapshot file will be named as “Snapshot-*”. - Page 40 • Click the <Delete Files> button in the <Temporary Internet Files> field; the <Delete Files> screen displays as below. • Check the <Delete all offline content> box and click <OK>. • Now, enter the IP address of the DVR to make the connection again.
-
Page 41: Appendix A: Technical Specifications
Appendix A- Technical Specifications All specifications are subject to change without notice. Specifications 16CH Video Operation System Embedded ( Linux ) Input BNCx16,1.0Vp-p, 75 ohm BNCx8, 1.0Vp-p, 75 ohm BNCx4 1.0V p-p, 75 ohm Output Main BNCx1,1.0Vp-p, 75 ohm Call BNCx1,1.0Vp-p, 75 ohm VGA Output (Optional) 800x600, 1024x768, 1280x1024 pixels (Optional) -
Page 42: Appendix B: Remote Controller
Appendix B- Remote Controller The operational function keys on the remote control are described below: The functions of the remote control keys are the same as the keys of the front panel of the DVR. The only difference between the remote control and the front panel keys is the “DVR SEL” key. The DVR Selection key is used to switch control between each DVR. -
Page 43: Appendix C: Setting Up A Dvr Behind A Router
After the DVR Unit ID is changed, setup the “DVR SEL” of the remote control. Press “DVR SEL”, and then press the Remote Control # immediately to select the DVR. For example, assuming the DVR Unit ID is set to 225, press “DVR SEL” and then press “2” immediately. Now, the remote control will only be able to control the specified DVR. - Page 44 Following is an example of how the router should be set. Router DVR 1 DVR 2 (D-Link DI-724P+) IP: 192.168.0.100 IP: 192.168.0.167 IP: 192.168.0.200 WAN IP: Trigger port: 80 Trigger port: 81 218.160.54.13 LAN IP: 192.168.0.1 • To change the setting of the router, a PC with web browser is required. •...
- Page 45 A. Select <Enabled> to set up the service. B. Enter the name of the setting in the Name field: DVR 1. C. Enter Private IP: 167 D. Choose <TCP> as the Protocol Type. E. Enter Private Port: 80. F. Enter Public Port: 80. G.
Need help?
Do you have a question about the HDVR and is the answer not in the manual?
Questions and answers