Table of Contents
Advertisement
Advertisement
Table of Contents

Related Manuals for XVision X2RxN


Summary of Contents for XVision X2RxN
- Page 1 Professional HD IP NVR User Guide Thank you purchasing the XRN HD IP NVR from Xvision Pro HD. Please ensure that you read and understand this User Guide before operating the camera. Please store this User Guide in an easily accessible location.
-
Page 2: Table Of Contents
Contents SAFETY INSTRUCTION ....................3 CHAPTER 1 OVERVIEW OF X2RXN ................1 1.1 F ....................... 2 RONT ANEL X2RxN Front Panel ...................... 2 1.2 R ......................... 3 ANEL X2RxN Rear Panel ....................... 3 1.3 R ....................4 EMOTE ONTROLLER CHAPTER 2 X2RXN CONNECTION ................5 2.1 HDD I... -
Page 3: Safety Instruction
5.3.4 Local Setting ....................39 5.3.5 Logout ......................39 CHAPTER 6 APPENDIX ....................40 6.1T ...................... 40 ROUBLESHOOTING CHAPTER 7 ACCESSORIES ..................42 CHAPTER 8 SPECIFICATIONS ..................43 X2R4N S ........................43 X2R8N S ........................44 X2R16N S ......................... 45 X2R32N S ......................... -
Page 4: Chapter 1 Overview Of X2Rxn
Chapter 1 Overview of X2RxN 1.1 Functional Descriptions and Features Function Brief Description Supports VGA and HDMI, real-time monitoring by web application manager and Real time mobile phone, and support electronic amplifier, multi-screen sequence and PIP monitoring display. Supports video compression standard of H.265. The video quality, resolution of each channel and video frame rate are adjustable. -
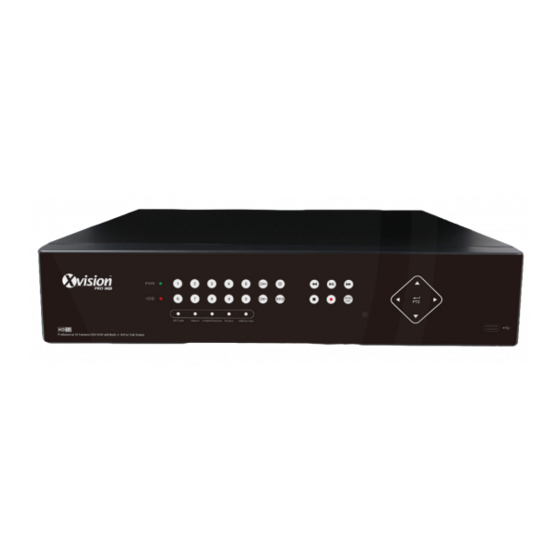
Page 5: Front Panel
Key title Item Remark Function & Description or Indicator If the “Green” indicator is on, the X2RxN is getting power Power Indicator normally. IR Receiver IR receiver for Remote Controller. If the “Red” indicator flashes, the hard drive is being read or HDD Indicator written to. -
Page 6: Rear Panel
Instantly plays back the last 5 minutes recording Instant Playback Search Shortcut key to Search menu Backup Shortcut key for backup A.R.S Shortcut key for P2P QR code Add Camera Shortcut key to Add IPC 1.3 Rear Panel X2RxN Rear Panel X2R4N X2R8N X2R16N... -
Page 7: Remote Controller
Audio signal output, RCA interface WAN Port Network input interface of the router/Connect to web camera. LAN Port LAN network interface, support POE, can supply power to Xvision IPC. e-SATA port (not on all units) External HDD Connection 1.4 Remote Controller... -
Page 8: Chapter 2 X2Rxn Connection
HDD Installation: (1) Make sure your X2RxN is not powered, now you can remove the screws on both sides of the X2RxN and the rear panel. Slide the cover away from the front panel and lift off. (2) Within the X2RxN original box you will have the SATA cables for data and a Molex cable for power, connect these to the main board. -
Page 9: Startup Wizard
Homepage and Network setup; you can setup the network port example DHCP/Static etc. IPC Setup; you can add and delete IPC’s; Record Schedule’s, you can set the recording time and scheduled recording of X2RXN. HDD; HDD formatting and overwriting and Main Interface... -
Page 10: Chapter 4 X2Rxn Menu
Note: When an internal HDD is not connected to X2RxN or the HDD is not formatted, you will hear a buzzer alarm. If you want to cancel the buzzer alarm, please navigate into [EventAlarm] to set HDD loss, HDD space not enough and alarm output to “off”. -
Page 11: Main Menu Flow Chart Guide
4.1 Main Menu Flow Chart Guide IP Camera Live Display Output Privacy Zone Record Schedule Record Mainstream Parameter Sub stream Network Network Email DDNS Motion Alarm Main Menu Alarm Record Search Record Search Event Search Device General Users System Info Maintain Advanced Events... -
Page 12: Main Menu
POE switch to assign your IPC(s) IP addresses automatically, please note the IP addresses handed out will be based on the settings you input on the X2RxN e.g. if your X2RxN IP address is 192.168.1.2 your 1st IPC will be 192.168.1.3 and so on. - Page 13 4.2.1.1.2 Live Go to “Main Menu” → “Display” → “Live” Channel:Select channel number. Show Time:Tick the checkbox to display time. Channel Name:Name marked on the IPC. Date Format:Set date format such as d/m/y or m/d/y. Time Format:12 hour or 24 hour.
-
Page 14: Record
4.2.1.1.4 Privacy Zone Privacy Zone is for setting areas that you do not want to be visible on the live view (Public areas) 1. Select the number of the zone to be set (maximum 4 zones can be set for single channel) 2. - Page 15 4.2.1.2.2 Schedule Go to “Main Menu” → “Record” → “Schedule” to enter into the Schedule interface and set the record schedule of the X2RxN. Select the channel and the date to be set. One week’s schedule can be set. The record schedule of the current channel can be copied to any other channel or all channels.
-
Page 16: Network
Go to “Main Menu” → “Parameter” → “Network” Select your choice of network connection (PPPOE, DHCP, and Static) and set Port, then you may remotely control the monitoring, recording, playback or backup of the X2RXN through network. DHCP as an example. In this mode, the router automatically assigns an IP address for the X2RxN. - Page 17 Web port number. When using DDNS domain name to access the X2RxN, user shall confirm that the port can be normally connected to current IP on the public network and the settings for server address/host name/user/password/setting should be consistent with the settings on the X2RxN local setting.
- Page 18 Alarm Type Functions & Descriptions When the X2RxN fails to receive video signals due to some problems (camera damage, Video Loss line dropout or damage, power failure), the alarm will appear. When the IP camera detects object moving, the alarm will be activated. Sensitivity is Motion subject to the actual application environment test.
- Page 19 Time Axis setup, file clip and zoom in/out 1) The X2RxN supports processing control bar function when playing back record files. Time Axis zoom: Default value is 24 hours. Allow user to select 2 hours, 1 hour, 30 minutes or user-defined.
- Page 20 Detailed operation: Fixed time axis: If you select [ ] option, that means the processing control bar cover two-hours video content. The time range refers to 1 hour before and after the middle point. 2)Record clip and backup function and playback zoom in/out function. ...
- Page 21 If the file is backed up with format of .264, it can be played back by XIQClient player on the CD attached with the X2RXN (the player will be automatically installed during installing XIQClient. CD backup file is in format of *.NVR).
- Page 22 : Play: Click to play file : Pause: Click to pause. : Stop: Click to stop playback. : Next: Click to play next file. : Previous: Click to play previous file : Slow Playing: click to play at 1/2,1/4,1/8,1/16 speed. :...
-
Page 23: Device Hdd
“Encoding Rate” and “Frame Rate” of image. Auto-overwrite: When set to ENABLE, the X2RxN will overwrite the oldest files on the hard drive if hard drive space is full. When set to DISABLE, the X2RxN will stop recording if hard drive space is full. - Page 24 4.2.4 .1 System 4.2.4.1.1 General Go to “Main Menu” → “System” → “General” to enter into the interface. The user may set Date, Time, Date Format, Time Format, Language, Video Format, Menu Timeouts enable Show Wizard on this page. 4.2.4.1.2 DST Go to “Main Menu”...
- Page 25 Disk Management: allow you to manage and control the HDD and USB drive. Remote Login: allow you to remotely login X2RxN. SEQ Control: allow you to sequence live screens for all the channels. Manual Record: allow you to manually start/stop record.
-
Page 26: Log
Upgrade: Decompress update file package and copy the upgrade file folder named “nvrupgrade” to the root directory of USB flash disk; Insert the USB flash disk into USB port of the X2RxN; Click <Upgrade>. -
Page 27: Shutdown
It is recommended to load ex-factory default after upgrading. The auto maintain function can be effective only when the X2RxN returns back to Preview mode with no any operation within the set auto maintain time. Also please note not all IPC support firmware upgrade through the X2RxN. -
Page 28: Menu Lock
In consideration of system security, user may click the icon on the toolbar when you leave the X2RxN and the system interface will be locked. User has to input Device ID, User Name and Password on the login interface to unlock (Default: User Name: admin, Password: blank). -
Page 29: Chapter 5 Web Application Manager
Chapter 5 Web Application Manager ActiveX control download and installation Open your web browser and input the IP address of the X2RxN, such as: . Your PC will download and install “ActiveX” plug-in automatically. If http://192.168.1.168 your computer system is Windows Vista or Windows 7/8, you may need to setup the user authority for remote control, or you may not be unable to backup or record. -
Page 30: Web Application Manager Login
There is an option for opening all channel preview, select it to open all live pictures. Press Login to log in to client and remotely visit X2RXN. The default password is admin and the administrator is authorized to modify the password. -
Page 31: Menu Bar
5.3.1 Menu Bar Menu Bar: Live, Replay, Configuration, Local Setting and Logout 5.3.1.1 Live Display Log in the Web Application Manager, system will be defaulted to enter into <Live> interface. You can click [Play] button to Open/close live images, on-spot record, capture, and many live display modes. -
Page 32: Playback
5.3.2 Playback Click to enter into Playback interface to remotely view the records in X2RxN HDD, Supports 4 channel playback. 5.3.2.1 Record Search Record playback procedure: Firstly, select the date you want to check and select 4 channels. Any recorded files in... - Page 33 Secondly, select record type (Normal record, Alarm record and All) and channels, and then click “ ”,and the time axis panel will display specific time quantum. On the time axis, red part stands for alarm record, yellow stands for normal record and original part stands for no record during this period.
-
Page 34: Remote Settings
The captured file will be saved as .bmp format. Record file download: Click download icon “ ” on the control bar to display all the matched record file according to the search conditions of channels. Tick-select the record file you want to download and click [Start download] .System will download the record file in sequence and save to local PC. - Page 35 Live: Change channel name, position, channel preview and relevant parameters. If show time is set as <disable>, current X2RxN system time will not appear on the screen on live mode. Privacy Zone: Each channel can set 4 privacy zones, the relevant parameters should be consistent with X2RxN local setting.
- Page 36 Record Schedule: The parameters should be consistent with X2RxN local setting. Green stands for Normal record; Yellow stands for Motion detection; Red stands for I/O trigger record. Stream setting: User may set Mainstream and Sub-stream. The relevant parameters should be consistent with X2RxN local setting.
- Page 37 DDNS: After user applies for DDNS service, you can enable <DDNS> function under any one network type mode (Static, DHCP and PPPoe). You may remotely visit the X2RxN through the domain name (http://domain name: Web port No). When visiting the X2RxN using DDNS, you should make sure the port and current IP can connect in public network (WAN).
- Page 38 Detailed settings should be consistent with the X2RxN local settings. I/O alarm setting (not available on all models): Set parameters for I/O Alarm, Alarm Out, Alarm Record, Send Email, etc. Detailed setting should be consistent with the X2RxN local settings.
- Page 39 PTZ: (Not supported on all models) Set the relevant parameters of PTZ. Detail setting should be consistent with X2RxN local settings. 5.3.3.6 System Click <System> option to unfold its sub-options: General, Users and information. General: Check X2RxN language and video system and set system time, date/time format, menu display time, DST and NTP parameters.
- Page 40 Information: Search device name, device number, device type, MAC address, software version, IE version and hardware version of X2RxN shown. 5.3.3.7 Advanced Click Advance to unfold its sub-options: Firmware Update, Load default, Events and Maintain. Firmware Update: Remotely update X2RxN system.
- Page 41 Secondly, click “Start” to start updating. The updating progress can be seen on the screen. Load Default: Remotely restore default parameters of the X2RxN. Events: Configure Event Type, Buzzer, Send Email, Show Message and other parameters. Detailed setting should be consistent with X2RxN local setting.
-
Page 42: Local Setting
Maintain: Remotely set auto maintain time for X2RxN shown. Detailed setting should be consistent with X2RxN local setting. 5.3.4 Local Setting Set Record Path (save Live record and Playback clip file), Download Path for remote file, Snapshot Path for captured pictures, Interval for switching record files (Packaging time), and File type (H264 and AVI) shown. -
Page 43: Chapter 6 Appendix
If not, check with your place of purchase for advice. 6. Q: I want to take out HDD from my PC and install it in X2RxN. Can it work? A: please check with your place of purchase if your HDD is supported in the X2RxN, also remember if you add a HDD to the X2RxN this will format your HDD and you will lose all information stored on it. - Page 44 sensitivity is set too low. 11. Q: Why doesn’t alarm work? A: Please check if the alarm setting, alarm connection and alarm input signals are corrected correctly. 12. Q: Why does buzzer keep alarming? A: Please check the alarm setting, check if motion detection function is enabled and object motion is detected all the time and if I/O alarm is set as Always Off.
-
Page 45: Chapter 7 Accessories
Chapter 7 Accessories Remote Controller Power transformer User Manual USB Mouse... -
Page 46: Chapter 8 Specifications
Chapter 8 Specifications X2R4N Spec Model X2R4N Recording Bandwidth Max 25Mbps Recording Resolution 1080P(1920×1080) / 720P(1280×720) / D1 (704×576) Recording Compression H.264 Display Split D1/720P:4ch real-time live/Playback performance 1080P :2ch real-time Output Interface 1 HDMI, 1 VGA 1920×1080, 1280×1024,1440x 900, 1280×720, Display Resolution 1024×768 Bit Rate... -
Page 47: X2R8N Spec
X2R8N Spec Model X2R8N Recording Bandwidth Max 100Mbps Recording Resolution 1080P(1920×1080) / 720P(1280×720) / D1 (704×576) Recording Compression H.264 Display Split 1/4/8 D1/720P :8ch real-time; live/Playback performance 1080P : 6ch real-time Output Interface 1 HDMI, 1 VGA Display Resolution 1920×1080, 1280×1024,1440x 900, 1280×720, 1024×768 Bit Rate 32 ~ 8192kbps Record Mode... -
Page 48: X2R16N Spec
X2R16N Spec Model X2R16N Recording Bandwidth Max 200Mbps Recording Resolution 1080P(1920×1080) / 720P(1280×720) / D1 (704×576) Recording Compression H.264/H.265 Display Split 1/4/8/16 D1:16ch real-time; live/Playback performance 720P:12ch real-time; 1080P: 6ch real-time Output Interface 1 HDMI, 1 VGA Display Resolution 1920×1080, 1280×1024,1440x 900, 1280×720, 1024×768 Bit Rate 32 ~ 8192kbps Record Mode... -
Page 49: X2R32N Spec
X2R32N Spec Model X2R32N Recording Bandwidth Max 200Mbps Recording Resolution 1080P(1920×1080) / 720P(1280×720) / D1 (704×576) Recording Compression H.264/H.265 Display Split 1/4/8/16/32 D1:16ch real-time; live/Playback performance 720P:12ch real-time; 1080P: 6ch real-time Output Interface 1 HDMI, 1 VGA Display Resolution 1920×1080, 1280×1024,1440x 900, 1280×720, 1024×768 Bit Rate 32 ~ 8192kbps Record Mode... -
Page 50: X2R32En Spec
X2R32EN Spec Model X2RN32EN Recording Bandwidth Max 200Mbps Recording Resolution 1080P(1920×1080) / 720P(1280×720) / D1 (704×576) Recording Compression H.264 Display Split 1/4/8/16/32 D1:16ch real-time; live/Playback performance 720P:12ch real-time; 1080P: 6ch real-time Output Interface 1 HDMI, 1 VGA Display Resolution 1920×1080, 1280×1024,1440x 900, 1280×720, 1024×768 Bit Rate 32 ~ 8192kbps Recording Mode... - Page 51 In the unlikely event that you encounter a problem with this product, it should be returned to the place of purchase. Xvision UK, Unit 2 Valley Point, Beddington Farm Road, Croydon, Surrey CR0 4WP www.xvision.com...
Need help?
Do you have a question about the X2RxN and is the answer not in the manual?
Questions and answers