Table of Contents
Advertisement
Quick Links
Advertisement
Table of Contents

Related Manuals for Lathem 2000


Summary of Contents for Lathem 2000
- Page 1 Mechanical Time Recorder User’s Guide...
-
Page 2: Table Of Contents
Here’s all the information you need for setting and operating your new Lathem time recorder. Service information is also included in this manual, in case any problems ever arise. Thank you for choosing a Lathem time recorder. Should you ever need assistance, please let us know. Ordering Accessories ... 2 Setting the Time ... -
Page 3: Ordering Accessories
Ordering Accessories Lathem time recorders fulfill a wide range of timekeeping requirements. For maximum results, only use Lathem accessories specifically designed to fit your time recorder. To purchase the appropriate accessories for your time recorder, contact your local Lathem dealer or visit: http://shop.lathem.com... -
Page 4: Setting The Time
Mechanical Time Recorder User’s Guide Setting the Time Determine Your Model Model Print Hours xxx1 1 – 12 , 1 – 12 xxx2 1 – 12 , 1 – 12 xxx3 1 – 12 , 1 – 12 xxx4 00 – 23 xxx5 00 –... - Page 5 Raise the Type Section 1. Unlock the case cover and pull it forward to remove it. 2. Note the position of the Release Latch and Face Setting Wheel used later in this process. 3. Wait until you hear the clock “click”. 4.
- Page 6 Mechanical Time Recorder User’s Guide If your model prints Tenths (model with 4 the section “Setting Decimal Wheel with Tenths”. If your model prints Hundredths or 00-23 hours, refer to the Dial of Decimal Equivalents in Figure 3 (page 5) to determine the correct setting.
- Page 7 Mechanical Time Recorder User’s Guide Dial of Decimal Equivalents Figure 3 The dial in Figure 3 shows the tenths and hundredths setting for each minute. The inner circle represents regular minutes, the middle circle represents tenths, and the outer circle represents hundredths of a minutes.
- Page 8 Mechanical Time Recorder User’s Guide Setting Decimal Wheel with Tenths 3. Rotate the Clock Face Setting Wheel Figure 4.3 to set the hands to match the time set on the wheels. 4. Rotate the Main Setting Wheel to advance both the Clock Face and Print Wheels together.
- Page 9 Set the Time on the Analog Clock Face 1. Make a sample registration on paper. 2. Rotate Clock Face Setting Wheel 5.1 until the clock face displays the same time as shown on the sample registration. DO NOT TURN CLOCK HANDS EXCEPT BY USING SETTING WHEEL.
- Page 10 Mechanical Time Recorder User’s Guide Set the Time on the Digital Clock Face 1. Make a sample registration on paper. 2. Use the Hour and Minute buttons to set the display to the time shown on the sample registration. 3. To synchronize the display with the type wheels, listen for the type wheels to click.
-
Page 11: Changing The Ribbon
3. Lift ribbon hold-down guide 7.2 – use pencil to support in up position. 4. Remove ribbon and replace with new Lathem ribbon. Make sure the ribbon feeds from bottom of spools and runs BETWEEN reversing fingers 7.3, the red side aligned with date wheel(s). -
Page 12: Replacing The Type Section
Mechanical Time Recorder User’s Guide Replacing the Type Section If your type section needs servicing, you can easily remove and replace it without sending the entire machine for service. 1. Remove the top cover. 2. Remove Type Section Retaining Ring – 8.1. 3. -
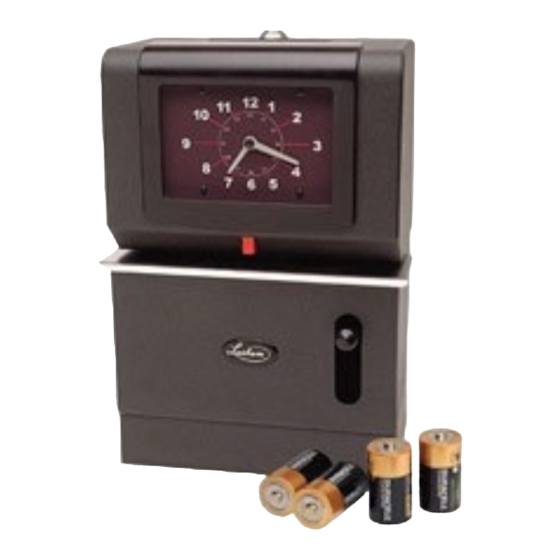
Page 13: Install / Replace Batteries In Batt
Install / Replace Batteries in BATT The 2000-BATT requires four “D” size batteries and should operate for six months before replacement. beeper sounds momentarily each minute when the battery supply discharges below 4.5 volts. follows when this occurs: 1. Pull and remove the front two rubber feet underneath the unit. -
Page 14: Changing The Motor
Mechanical Time Recorder User’s Guide Changing the Motor 1. Unplug cord from wall outlet (except 2100BATT). 2. Remove type section from main frame (see “Replacing the Type Section”). 3. Figure 10 shows a close-up of cam block terminal. 4. Disconnect Motor Wire Leads – 10.1 by turning each Screw –... -
Page 15: Warranty
Warranty One-Year Limited Warranty Lathem warrants the hardware products described in this guide against defects in material and workmanship for a period of one year from date of original purchase from Lathem or from an authorized Lathem reseller. The conditions of this warranty and the extent of the responsibility of Lathem Time Corporation (“Lathem”) under this warranty are listed below. - Page 17 Printed in USA P/N: OMOV0605...
Need help?
Do you have a question about the 2000 and is the answer not in the manual?
Questions and answers