Table of Contents
Advertisement
Quick Links
Advertisement
Table of Contents

Subscribe to Our Youtube Channel
Related Manuals for Sirius XM RAdio DH3


Summary of Contents for Sirius XM RAdio DH3
- Page 1 USER GUIDE Dock & Play Home Kit...
-
Page 2: Table Of Contents
Table of Contents Compatibility . . . . . . . . . . . . . . . . . . . . . . . . . . . . . . . . . . . . . . . . . . . . . . . . 3 Introduction . -
Page 3: Compatibility
Compatibility This Home Kit is compatible with the following Dock & Play Radios: SiriusXM: • Onyx Plus • Edge • Onyx • Onyx EZ • XpressRCi • XpressRC • XpressR Sirius: • Sportster 5 • Starmate 8, 5, 4, 3 • Stratus 7, 6, 5 • Stratus... -
Page 4: Introduction
Introduction Thank you for purchasing the SiriusXM Dock & Play Home Kit! The Home Kit lets you play your compatible XM or SiriusXM Dock & Play Radio through your home stereo system or powered speakers . • There is no need for a second subscription . Just connect this Home Kit to a stereo system or set of powered speakers - and then simply move your Radio from any location to your home or office . -
Page 5: Safety And Care Information
Introduction Safety and Care Information IMPORTANT! Self installation instructions and tips are provided for your convenience . It is your responsibility to determine if you have the knowledge, skills, and physical ability required to properly perform an installation . SiriusXM shall have no liability for damage or injury resulting from the installation or use of any SiriusXM or third party products . -
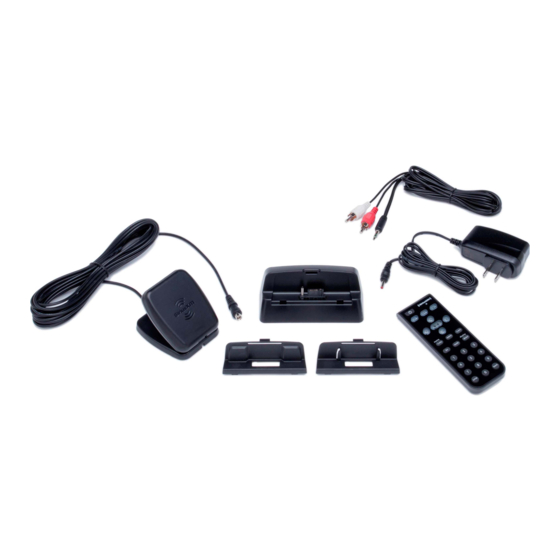
Page 6: What's In The Box
Introduction What’s in the Box? XM & SiriusXM Radio Dock Adapter Home Dock Sirius Radio Dock Adapter memo t-mix menu t-scn display mute direct jump bank PULL Indoor/Outdoor Home Power Stereo Audio Remote Control Home Antenna Adapter Cable... -
Page 7: Home Dock Color-Coded Connections
Introduction Home Dock Color-Coded Connections The color-coded Home Dock makes it simple to connect the cables to the appropriate connectors at the rear of the dock . Rear View AUDIO ANT (Silver) AUDIO (Green) POWER (Red) Connection for Connection for Connection for the Indoor/ stereo system or... -
Page 8: Remote Control Functions
Introduction Remote Control Functions Power Button Arrow Buttons Up/Down Press to turn Radio on and off. Press to preview and tune to channels through the channel lineup; also press to scroll through Pause and Replay Buttons lists and highlight menu items. For Radios which have these features, pause, rewind, and replay live radio and smart Arrow Buttons Left/Right... -
Page 9: Remote Control Battery Replacement
Introduction Remote Control Battery Replacement The Remote Control has a child resistant battery compartment which requires a pointed object to open the battery compartment . A paper clip is recommended, as shown . To Replace the Battery: 1. Press the paper clip or Paper Clip other object into the lock release opening... -
Page 10: Home Installation
Home Installation There are several steps to setting up your Home Kit . Follow these steps for an easy installation . Step 1: Insert the Radio Dock Adapter Into the Dock You’ll need to insert the Radio Dock Adapter that is compatible with your Radio into the Home Dock . - Page 11 Home Installation 2. Orient and place the Radio Dock Adapter that you selected into the Home Dock . Be sure the adapter is centered, and is seated all the way down into the dock . 3. Once the adapter is seated correctly in the Home Dock, gently press the top of the adapter against the dock with your finger until it clicks into place .
- Page 12 Home Installation Should it become necessary to remove the Radio Dock Adapter from the Home Dock, use your fingernail to gently press down on the top of the adapter, and then use a long thin object such as a paper clip, a screw driver or something similar to pry the adapter away until it releases from the dock .
-
Page 13: Step 2: Connect The Home Dock And Dock The Radio
Home Installation Step 2: Connect the Home Dock and Dock the Radio When installing the Home Dock in your home, choose a location in close proximity to your stereo system or powered speakers, and also where the cable from the Indoor/Outdoor Home Antenna can reach the Home Dock . The location should be easily accessible and provide good visibility of the display, but should not be located where it will be in direct sunlight, which will affect the visibility of the display screen . - Page 14 Home Installation B . Connect the Home Power Adapter Connect the Home Power Adapter to the red Power connector at the rear of the Home Dock, and plug it into a wall outlet . AUDIO C . Dock Your Radio Insert your Radio into the Home Dock as shown, and turn the Radio On by pressing the Power button .
-
Page 15: Step 3: Place And Aim The Indoor/Outdoor Home Antenna
Home Installation Step 3: Place and Aim the Indoor/Outdoor Home Antenna To begin, try experimenting with the Indoor/ Outdoor Home Antenna to get a feel for the reception in your location . In major metropolitan areas, you might find that you 866-635-2349 get great reception in several locations without siriusxm.com... - Page 16 Home Installation Other Indoor/Outdoor Home Antenna Installation Suggestions Try moving the Indoor/Outdoor Home Antenna closer to a window, ideally one that is facing due south . Not sure which way is south? Think about where the sun rises (in the east) and sets (in the west) .
- Page 17 Note that you will want to consider any potential hazards when you choose the mounting location, and possibly consider professional SOUTH installation . Sirius XM Radio Inc . is not liable for any damages . To mount the antenna, you will need four screws (not included)
- Page 18 Home Installation with a 1/4” head (e .g ., an M3 OUTDOORS screw), and that are suitable for the material onto which you are affixing the antenna, (e .g ., wood, metal, etc .) . The screws should be spaced 1-3/8”...
-
Page 19: Step 4: Connect The Home Dock To A Stereo System Or Powered Speakers
Home Installation locations until you find one where you are receiving a good signal . The Indoor/Outdoor Home Antenna’s reception can also be tweaked by opening or closing the antenna clamshell, and turning the antenna . While observing the signal strength, make small adjustments to the angle of tilt of the clamshell until the highest possible signal strength is achieved . - Page 20 Home Installation In or Line In connection of your stereo system, using the provided Stereo Audio Cable . 1. Take the provided Stereo Audio Cable and connect the single 1/8” (3 .5 mm) connector to the green AUDIO connector at the rear of the Home Dock .
- Page 21 To Connect the Home Dock to Your Powered Speakers The Home Dock can be connected directly to a set of powered speakers . 1. Connect the 1/8” (3 .5 mm) connector from the powered speakers to the green AUDIO connector at the rear of the Home Dock . 2.
-
Page 22: Troubleshooting
Troubleshooting Your Home Kit has been designed and built to be trouble-free, but if you experience a problem, try this: • Check that all connections are firm and secure . • Make sure you have connected the Home Dock as described in this User Guide . - Page 23 Troubleshooting If you see this on the screen: Try this: — • No program information, such as artist name, song title, or channel exists . If this happens: • Try this: You do not receive all the • If you have not yet activated your service, refer channels to which you to the Activation or Subscribe section in the subscribed...
- Page 24 Troubleshooting If this happens: Try this: Traffic and Weather channels • These channels use a different audio technology sound different from other than other channels so they often sound channels different from other channels . The Radio shuts off • If your Radio has these features, check these: unexpectedly –...
-
Page 25: Product Specifications
Product Specifications System Power Requirements: 110 V AC, 200 mA (max) Operating Temperature: -4°F to +140°F (-20°C to +60°C) Audio Output: 1 .5 V rms (max) Home Dock Dimensions: 4 . 1 in (W) X 1 .8 in (H) X 1 .7 in (D) 105 mm (W) X 45 mm (H) X 44 mm (D) Weight (without adapter): 1 .8 oz (50 g) -
Page 26: Patent Information
Patent and Environmental Information Patent Information It is prohibited to, and you agree that you will not, copy, decompile, disassemble, reverse engineer, hack, manipulate, or otherwise access and/or make available any technology incorporated in this product . The music, talk, news, entertainment, data, and other content on the Services are protected by copyright and other intellectual property laws and all ownership rights remain with the respective content and data service providers . -
Page 27: Fcc Statement
• Consult the dealer or an experienced radio/TV technician for help . WARNING! The FCC and FAA have not certified Satellite Radio Receiver use in any aircraft (neither portable nor permanent installation) . Therefore, Sirius XM Radio Inc . cannot support this type of application or installation . -
Page 28: Copyrights And Trademarks
Copyrights and Trademarks © 2014 Sirius XM Radio Inc . “Sirius”, “XM” and all related marks and logos are trademarks of Sirius XM Radio Inc . and its subsidiaries . “BBC” and “Radio One” are trademarks of the British Broadcasting Corporation and are used under license . -
Page 29: Indoor/Outdoor Home Antenna Template
Indoor/Outdoor Home Antenna Template 1-3/8” 1-1/8”... - Page 30 Sirius XM Radio Inc . 1221 Avenue of the Americas siriusxm .com New York, NY 10020 1 .866 .635 .2349 © 2014 Sirius XM Radio Inc . SXDH3 141119a...
Need help?
Do you have a question about the DH3 and is the answer not in the manual?
Questions and answers