Table of Contents
Advertisement
Advertisement
Table of Contents

Related Manuals for Caffitaly System Bella


Summary of Contents for Caffitaly System Bella
- Page 1 Instruction book Model Bella...
-
Page 2: Table Of Contents
Table of Contents Adjusting the cup/mug height Brewing coff ee Preparing other beverages Programming the quantity of coff ee in a cup Daily maintenance Descaling the machine... - Page 3 Main topics Safety warnings _ _ _ _ _ _ _ _ _ _ _ _ _ _ _ _ _ _ _ _ _ _ _ _ _ _ _ _ _ _ _ _ _ _ _ _ _ _ _ _4 Instructions for use and disposal _ _ _ _ _ _ _ _ _ _ _ _ _ _ _ _ _ _ _ _ _ _ _ _ _ _ _ _ _ _ _6 Your Ca ffi taly System contact _ _ _ _ _ _ _ _ _ _ _ _ _ _ _ _ _ _ _ _ _ _ _ _ _ _ _ _ _ _ _ _ _6 Intended use _ _ _ _ _ _ _ _ _ _ _ _ _ _ _ _ _ _ _ _ _ _ _ _ _ _ _ _ _ _ _ _ _ _ _ _ _ _ _ _ _ _7...
-
Page 4: Safety Warnings
Safety warnings Please keep these instructions safe. It is necessary to pay attention to these warnings in order to avoid the risk of personal injury and damage to the appliance. Do not use the appliance if it is damaged in any way. At the fi rst sign of defects or unusual noises or smells, turn off the appliance and unplug it. - Page 5 Safety warnings Never place your hands inside the capsule compartment. Danger of injury! Never remove parts of the appliance. Do not insert objects into the openings. This could cause electric shocks! Any operation that is not described in this instruction manual should only be performed by an Authorized Service Center! Clean the appliance carefully and regularly.
-
Page 6: Instructions For Use And Disposal
Instructions for use and disposal The appliance has been manufactured using high quality materials that can be reused or recycled. Dispose of the appliance in a suitable waste collection center. When you decide to dispose of the appliance, unplug it from the power outlet. Then cut off the power cord as close to the body of the appliance as possible. -
Page 7: Intended Use
Intended use The appliance is made to brew coff ee and dispense hot water. It is intended for domestic use and must be used in accordance with these instructions. Use only Map Coff ee capsules. Any other use is to be considered improper. Use of the appliance in any manner other than as directed herein could cause harm to persons and void the guarantee. -
Page 8: Description
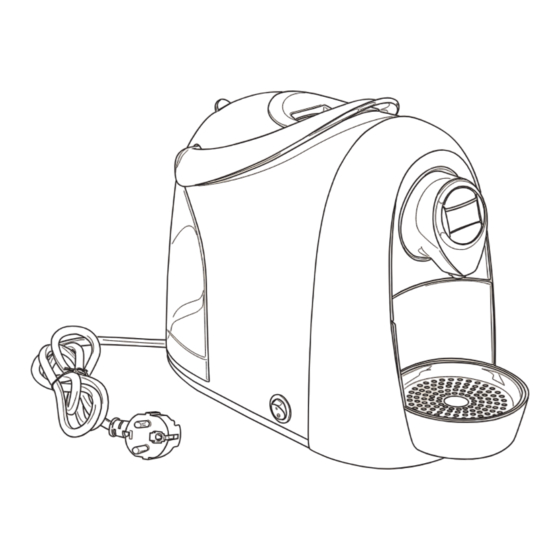
Description Capsule compartment Water tank door Lever for opening capsule compartment Water tank Dispensing spout Used capsule drawer Vasca raccogligocce Electric cord Power on/off switch Espresso button Coff ee button Descaling indicator light Alarm indicator light beverage Filter button (chocolate, tea flavoured beverages) -
Page 9: Priming Your Machine
Priming your machine Fill the water tank with fresh, still water. Plug in the appliance and turn it on. The buttons and alarm indicator light will blink simultaneously. Place an ample container under the dispensing spout. Press one of the coff ee buttons. Wait for the machine to At the end of this operation, empty out the water from complete the priming cycle and fi ll with water. -
Page 10: Turning On The Appliance
Turning on the appliance Fill the water tank with fresh, still water. The buttons will blink simultaneously to indicate that the machine Turn the appliance on. is warming up. When the buttons remain steadily lit, the appliance is ready for operation. General operating indications DESCALING SIGNAL DESCALING SIGNAL - DISABLING... - Page 11 WARMING UP WHEN THE WATER RUNS OUT DURING OPERATION The indicator light will blink RED and the appliance will emit The buttons fl ash simultaneously. r water flow has been 3 beeps: the water tank is empty o interuppted. Raise lever to eject capsule, lower lever. Fill the tank with fresh, still water.
- Page 12 IF THE LEVER IS RAISED If the lever is raised while a beverage is being dispensed. The indicator light will blink RED and an intermittent beep will be emitted. The appliance will immediately stop dispensing. Close the lever Press a button to reset the alarm. Espresso Long coff ee Filter coff ee...
-
Page 13: Adjusting The Cup/Mug Height
Adjusting the cup/mug height The appliance can be adjusted for the use of mugs or espresso The appliance is initially set for the use of large cups or mugs. cups. In order to use espresso cups, you must lift and turn the grill on top The grill must be positioned over the drip tray turned. -
Page 14: Brewing Coff Ee
Brewing coff ee Warning! Before you start brewing, make sure the capsule container is not full. Raise the lever to open the capsule compartment. Insert the capsule, pressing it gently into place. Close the lever fi rmly. Place a cup or mug under the coff ee dispensing spout (see chapter 4). -
Page 15: Preparing Other Beverages
Raise the lever to eject the used capsule into the drawer. Close the lever. NOTE: The quantities of coff ee dispensed can be reprogrammed according to personal taste and the size of the cups/mugs used. Please refer to chapter 7 for reprogramming instructions. Preparing other beverages beverages Capsules may be available for preparing beverages such as tea, chamomile tea, fi lter... -
Page 16: Programming The Quantity Of Coff Ee In A Cup
Programming the quantity of coff ee in a cup Warning! Before you start brewing, make sure the capsule container is not full. Raise the lever to open the capsule compartment. Insert the capsule, pressing it gently into place. Close the lever fi rmly. Place a cup or mug under the coff ee dispensing spout depending on the type of coff ee you wish to program (see chapter 4). -
Page 17: Saving Energy
Saving energy The machine features a function (normally activated) which automatically reduces energy consumption by around 98% after one hour has elapsed since it was last used. To deactivate (or reactivate) this function, proceed as follows: Make sure the lever is lowered. Keep the buttons pressed down and at the same time turn on the The indicator light will fl ash three times and three beeps will be machine by pressing the power on/off switch. -
Page 18: Daily Maintenance
Daily maintenance Remove the drip tray and used capsule drawer. Lift the capsule drawer; empty and rinse it out. Remove the grill. Empty the drip tray and rinse it out with Remove the water tank. Empty and rinse out the tank. The water fresh water. -
Page 19: Descaling The Machine
Descaling the machine The machine features an advanced program that monitors how much water is used to dispense beverages. This measurement provides the user with indications as to when the machine needs to be descaled. Specifi c indications are given in chapter 3. Carefully read the directions for use on the package of the descaling agent. - Page 20 Place a container (at least 250 ml) under the coff ee dispensing Make sure the lever is lowered. spout. Keep the buttons pressed down and simultaneously turn on the The blue button and the LEDs blink alternately. Press the button to machine by pressing the power on/off switch.
- Page 21 When the cycle is over, the blue button and the LEDs blink Carefully rinse out the water tank and fi ll it with fresh drinking alternately. water. Empty and rinse out the used capsule drawer and drip tray. The blue button and the LEDs blink alternately. Press the button to start the rinse cycle.
- Page 22 When the rinse cycle is over, the blue button and the LEDs blink Carefully rinse out the water tank and fi ll it with fresh drinking alternately. The machine will emit a beep. water. Empty and rinse out the used capsule drawer and drip tray. Press the button to quit the cycle.
-
Page 23: Draining The Appliance
Draining the appliance CAUTION - When the appliance is not used for a long time, it is necessary to drain the water lines. Liquids may freeze and damage the appliance. Turn the machine off . Make sure the lever is lowered. Remove and empty out the water tank. -
Page 24: Troubleshooting
Troubleshooting Problem Cause Solution No coff ee is brewed. The water tank is empty, the alarm Fill the tank with fresh water. indicator light is on and red. Press the desired coff ee button. The appliance will resume brewing. The coff ee is not hot enough. Cold cups / mugs Preheat the cup.
Need help?
Do you have a question about the Bella and is the answer not in the manual?
Questions and answers