Table of Contents
Advertisement
Quick Links
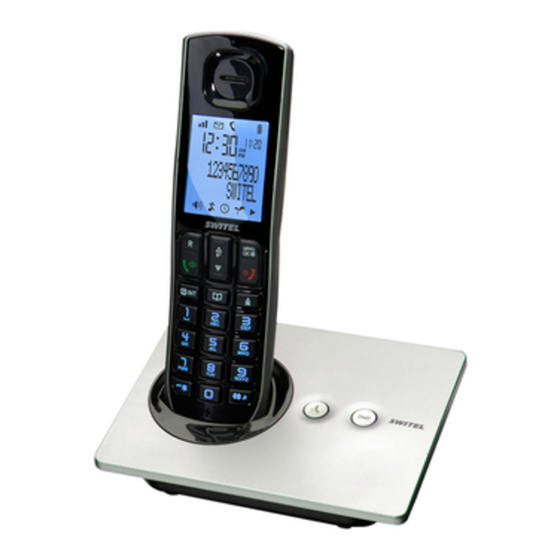
Basic Base station
Cordless DECT/GAP telephone
DC55x
A PAGE Button
Operating Instructions
- Press to page all system handsets
LCD display items
Unpacking your phone
In the box you will find:
- the cordless handset (two handsets with a Twin system, three with a Triple system and
four with a Quad system).
- the base unit
- two rechargeable battery cells for each handset.
- a battery compartment cover for each handset.
- a telephone line cable for the base unit.
- a mains power adapter for the base unit.
- charger pods, each with an power adapter, for multihandset system.
- Displays when the telephone base is within reception range.
- Flashes when the telephone base is out of range
- an operating instruction
- Displays when there is a new voice mail message. Available only if you have subscribed to voice
** Keep your sales receipt as it is your guarantee.
mail service from your telephone service provider.)
Charging batteries for the first time
- Displays when there are new calls
Before you start to use your telephone make sure that all batteries are fully charged for
- Scrolls to indicate battery charging when handset is in the telephone base or charger.
16 hours.
- Flashes and empty when battery level is low
Important note:
- Speakerphone is in use
This telephone is not designed for Emergency calls when the mains power fails.
- Displays when the ringer is turned off
For Emergency calls you should have a basic phone that operates without mains power,
connected to your line so that you can make calls during a power failure.
- Displays when the alarm is set.
Phone Function Keys
- Energy saving mode is activated
E TALK / SPEAKER
Introduction
- Make or accept a call
CAUTION: When using telephone equipment, there are basic safety instructions that
F DELETE / INTERCOM
A
should always be followed. Refer to the Important safety instructions section in this user's
- Press to delete the last number or letter entered.
guide for more information.
- Press to initiate an intercom call or transfer a call.
IMPORTANT: Since cordless phones operate on electricity, you are suggested to have
G */ TONE/KEYLOCK Button
at least one phone in your home that is not cordless, in case of power outage.
- Long press to activate or deactivate key lock
H MENU/OK/MUTE Button
Important Installation Guidelines
- Press to show menu.
B
- Press to select an item, or to save an entry or set-
Avoid sources of noise and heat, such as motors, fluorescent lighting, microwave ovens,
ting.
heating appliances and direct sunlight.
- Press to mute a call, press again to resume conver-
Avoid areas of excessive dust, moisture and low temperature.
sation.
C
Avoid other cordless telephones or personal computers.
H
I END Button
D
- During a call, press to hang up.
Never install telephone wiring during a lightning storm.
I
E
- During programming, press to cancel and exit wi-
Never install telephone jacks in wet locations unless the jack is specifically designed for
J
thout making changes.
wet locations.
F
K
- Press and hold to turn the handset on or off.
Never touch non-insulated telephone wires or terminals, unless the telephone line has
J PHONEBOOK Button
been disconnected at the network interface.
- Press to access the phonebook.
Use caution when installing or modifying telephone lines.
K REDIAL Button
- Press to review redial list.
Telephone base and charger installation
L #/PAUSE/RINGER OFF Button
G
L
1. Plug the smaller end of the power adapter into the power jack at the bottom of the
- Press and hold to turn the ringer off.
telephone base.
- Press and hold to add a dialing pause when dialing
or entering numbers into phonebook.
2. Plug one end of the telephone line into the jack at the bottom of the telephone base.
A Earpeace
3.Plug the other end of the telephone line into a telephone wall jack.
4.Plug the larger end of the power adapter into an electrical outlet not
B LC Display
controlled by a wall switch.If you have DSL high speed Internet service, a DSL filter is
C R Button
required (not included). Contact your DSL service provider for more information about
- Flash the line
DSL filter.
D Navigation Button
CAUTION: Use only the power adaptor that came with this unit. (Telephone
- Up to increase volume or view the Call log
base:TENPAO-S003IV0600050 or ESL-IA5060G(6Vdc/500mA), charger:
- Down to decrease volume.
TENPAO-S003IV0600015 or ESL-IA1560G(6Vdc/150mA). Using other power adapters
may damage the unit. Contact your local distributor if you need to order replacement for
the power adapters.
Your phone's base station is supplied with an energy-efficient switching power supply
(Input 100~240 V
approx. 0.14 W. The average efficiency is approx. 69.12 %.
The electrical consumption of the base is:
- in operation mode (idle/call): approx. 0.53 / 0.67 W
- during charging of the handset: approx. 1.03 W
The charging station(s) supplied with a telephone set is (are) equipped with an
energy-efficient switching power supply (Input 100~240 V
The zero load is approx. 0.14 W. The average efficiency is approx. 69.14 %. The
charging station has the following power consumption levels:
- without a handset: Approx. 0.14 W
- while charging the handset: Approx. 0.66 W
Telephone jack requirements
To use this phone, you need a RJ11C type modular telephone jack, which might look like
the one pictured here, installed in your home. If you do not have a modular jack, call your
local phone company to find out how to have one installed.
A
CAUTION:
1.Use only the power adapter that came with this unit. Using other power adapters may
damage the unit.
B
2.To prevent fire or electrical shock hazard, do not expose this product to rain or
moisture.
Battery installation
B DND (Do Not Disturb)
For optimum battery performance, charge the battery for 16 hours before first use.
- Press to turn DND mode on or off
1.Make sure the battery compartment cover is not attached with the handset.
2.Insert the AAA rechargeable batteries in the battery compartment, matching the +/-
polarity markings.
3.Align the cover against the battery compartment and slide it upwards until it clicks into
place.
4.Charge the handset by placing it in the telephone base or charger. The light on the
handset is on when charging.
CAUTION:
1.To reduce the risk of fire or personal injury, use only the model (HIGHPOWER - HRF
AAA400 or SANIK- SN AAA40H, 400mA 1.2V Ni-MH) which is compatible with this unit.
2. If the handset will not be used for an extended period of time, unplug the batteries and
remove them from the handset to prevent possible leakage.
Battery safety - CAUTION
ONLY use the rechargeable batteries supplied with the handset. DO NOT use
non-rechargeable batteries - they may explode and cause damage to your telephone.
ECO Mode
Both in Call mode as well as in Standby mode, the radiation is reduced considerably as
compared to standard, cordless DECT telephones.
Advanced settings
Dialing mode
To change the dialing mode:
1.%.
2.+/-: ADV SETTING -> %.
3.+/-: DIAL MODE -> %.
4.+/-: Select the desired setting -> %.
Reset
This feature allows you to restore all system settings, except the answering system
messages and phonebook, to default settings. This feature could be useful, for example,
if you have forgotten the security code to access the answering system remotely.
1.%.
2.+/-: ADV SETTING -> %.
3.+/-: RESET -> %.
4.%.
NOTE: All settings under the ANS SYSTEM, BLOCK LIST, PROGRAM DND, CLOCK &
ALARM, SETTINGS, HANDSET TONES, BASE TONES and ADV SETTING menus in
the handset will be restored to default settings, the redial list and call log will also be
cleared.
Recall time
This setting allows you to choose between SHORT, MEDIUM or LONG to accommodate
the setting of your telephone service provider for using customer calling service, such as
call waiting.
To change the recall time:
1.%.
2.+/-: ADV SETTING -> %.
3.+/-: RECALL TIME -> %.
4.+/-: Select the desired setting -> %.
Registering a handset
The telephone system can support up to a total of 5 cordless handsets. Handsets that
were included with your main base are pre-registered.
To add or re-register a handset:
1.Press and hold L on the base for 5 seconds until a beep sounds.
2.% when handset displays REGISTER YOUR HANDSET.
3.Enter the PIN (default: 0000) -> %.
, Output 6 V
, 500 mA). The adaptor input power without load is
A beep sounds on the handset when the registration is successful.
AC
DC
NOTES:
1.An error tone will sound if the registration is not successful.
Deregistering a handset
1.%.
, Output 6 V
, 150 mA).
2.+/-: ADV SETTING -> %.
AC
DC
3.+/-: DEREGISTER -> %.
4.Enter the PIN (default: 0000) -> %.
5.+/-: select the desired handset -> %.
Handset options
To delete all entries
1.%.
Ringer volume
2.+/-: BLOCK LIST -> %.
You can set the handset ringer volume from level 1 to level 5 or turn the ringer off.
3.+/-: select any entry -> %.
1.%.
4.+/-: DELETE ALL -> % twice to confirm.
2.+/-: HANDSET TONES -> %.
3.+/-: RING VOLUME -> %.
Do not disturb
When DO NOT DISTURB (DND) mode is activated, all incoming calls will be silent. This
4.+/-: select the desired setting -> %.
feature only silences the ringer, the incoming number, if you have subscribed to the caller
NOTE: Press and hold the # key to switch the ringer between on and off when the
ID service from your telephone service provider, will be recorded in the caller ID history
handset is in idle mode. The G icon displays on the screen when ringer off feature is
as normal.
activated.
Global DND
Ringer melody
When global DND is activated, all system handsets and the telephone base will be silent
You can select from 10 ringer tones.
when there is an incoming call. Press the DND button on the telephone base to turn this
1.%.
feature on or off.
2.+/-: HANDSET TONES -> %.
3.+/-: RING MELODY -> %.
Handset DND
4.+/-: select the desired setting -> %.
You can program individual handset to silence during predetermined time frames. This
setting is independent to each handset and only silences the ringer of the handset
Key tone
programmed.To program the DND time for individual handset
The handset can be programmed to emit a tone with each key press. To change the key
1.%.
tone setting:
2.+/-: PROGRAM DND -> %.
1.%.
3.+/-: select the desired option -> %.
2.+/-: HANDSET TONES -> %.
ONE TIME: The telephone silences once during the set time.
3.+/-: KEY BEEP -> %.
DAILY: The telephone silences daily during the set time.
4.+/-: ON or OFF -> %.
OFF: Turn DND off (settings completed).
4.Enter the desired start time. select %.
Display language
5.Enter the desired stop time. select %.
To change the display language:
NOTES: When global DND is turned on, individual handset will continue to be in DND
1.%.
mode even after the set DND time on the handset ends.
2.+/-: SETTINGS -> %.
3.+/-: LANGUAGE -> %.
Clock and alarm
4.+/-: select the desired setting -> %.
Date and time
Equalizer
You can set the date and time of the telephone system as follows.
This feature allows you to change the balance of the audio of the handset to best suit
1.%.
your hearing.
2.+/-: CLOCK & ALARM -> %.
1.%.
3.% again: SET DATE/TIME.
2.+/-: SETTINGS -> %.
4.Enter the current month, day and year.
3.+/-: EQUALIZER -> %.
5.%.
4.+/-: select from NATURAL, BASS or TREBLE.
6.Enter the current hour and minute. +/- select AM or PM -> %.
5.%.
Time format
Energy save
The display format of time can either be selected as 12 hour or 24 hour. To change your
This feature enables the handset to operate in energy saving mode. With this feature
setting:
turned on, the handset will automatically turn the handset backlight off.
1.%.
1.%.
2.+/-: CLOCK & ALARM -> %.
2.+/-: SETTINGS -> %.
3.+/-: SET FORMAT -> %.
3.+/-: ENERGY SAVE -> %.
4.% again -> TIME FORMAT.
4.+/-: ON or OFF -> %.
5.+/-: select the desired setting (12 HOURS or 24 HOURS) -> %.
NOTE: When ENERGY SAVE is turned on, the I icon shows on the handset screen.
Date format
Block list
The display format of date can either be selected as Month/Day or Day/Month. To
You can program telephone numbers into the block list so that the telephone silences
change your setting:
when a call is received from one of the blocked numbers. The handset shows BLOCK
1.%.
LIST when the programmed numbers call and will not record the number in the caller ID
history.
2.+/-: CLOCK & ALARM -> %.
3.+/-: SET FORMAT -> %.
To add a new entry
4.+/-: DATE FORMAT -> %.
1.%.
5.+/-: select the desired setting (MM/DD or DD/MM) -> %.
2.+/-: BLOCK LIST -> %.
3.% again -> ADD NEW.
Alarm
4.Enter the desired number -> %.
The alarm can be programmed to sound once or daily for one minute. The alarm setting
is independent to each handset.
To view the list
1.%.
1.%.
2.+/-: CLOCK & ALARM -> %.
2.+/-: BLOCK LIST -> %.
3.+/-: ALARM -> %.
3.+/- to browse through the block list.
4.+/-: select the desired alarm option -> %.
OFF: Turn alarm off (settings completed).
To edit an entry
1.%.
ONCE: The alarm sounds once at the set time.
DAILY: The alarm sounds daily at the set time.
2.+/-: BLOCK LIST -> %.
5.Enter the desired hour and minute -> +/- select AM or PM.
3.+/-: select the desired entry -> %.
6.%.
4.+/-: EDIT CONTACT -> % twice.
5.Edit the number by using the ( key to erase and backspace, then enter new
Alarm tone
numbers using the dial pad keys and press %.
You can select from 3 alarm melodies.
To delete an entry
1.%.
1.%.
2.+/-: CLOCK & ALARM -> %.
2.+/-: BLOCK LIST -> %.
3.+/-: ALARM TONE -> %.
3.+/-: select the desired entry -> %.
4.+/-: select the desired alarm tone -> %.
4.+/-: DELETE ENTRY -> % 3 times to confirm.
Telephone operation
Make a call
1.Press $.
2.Dial the phone number after you hear the dial tone.
Predial a call
1.Dial the phone number using the dial pad keys. If you make an error while dialing, you
can press del/int to erase the last digit entered.
2.Press $.
Answer a call
Press $ to answer an incoming call.
When there is an incoming call, the screen and dial pad backlight will be on.
NOTE: The screen shows the elapsed time as you talk (in hours, minutes and seconds).
End a call
Press & or place the handset in the telephone base or charger to end a call.
Speakerphone
Anytime during a call, press $ to switch between speakerphone and normal handset
use. When the speakerphone is active, the handset screen shows F.
NOTE: Using the speakerphone will drain the battery faster than the normal handset
use.
Volume control
You can adjust the volume of the handset or speakerphone anytime during a call.
On the handset, press + to increase or - to decrease the volume.
NOTE: Only the listening volume can be adjusted.
Make a call using the redial memory
The last ten telephone numbers previously dialed are stored in the redial list (up to 24
digits each).
1.Press redial.
2.+/-: select the desired phone number -> $ to dial.
Save a number from the redial list to the phonebook
1.Redial.
2.+/-: select the desired phone number -> %.
3.+/-: SAVE NUMBER -> %.
4.Enter the name by using the dial pad and then press %.
5.Edit the number by using the dial pad if necessary, and then press %.
Delete number from the redial list
1.Redial.
2.+/-: select the desired phone number -> %.
3.+/-: DELETE -> % twice to delete the selected number.
-OR-
+/-: DELETE ALL -> % twice to delete all numbers.
Mute
The mute function allows you to turn off the microphone while on a call. You can hear the
other party but the other party cannot hear you.
1.Press % during a call.
2.Press % again to resume conversation.
NOTE: The screen shows MUTE ON when mute feature is activated.
Call waiting or call waiting with caller ID service
To use call waiting, you must subscribe to call waiting service from your telephone
service provider. This feature allows you to receive calls while you are already talking on
the phone. You will hear a call waiting alert tone when there is a second incoming call. If
you subscribe to both caller ID and call waiting with caller ID services, the second caller's
information is displayed after you hear the call waiting alert tone.
1.Press flash to answer the second incoming call.
2.Press flash to switch between calls.
Voice mail service
The B icon flashes on the screen when you have received a new voice mail message
from your service provider.
IMPORTANT: Voice mail service is different from the answering system. In order to use
the voice mail service, you must subscribe to it from your telephone service provider.
Using multiple handsets
The system allows a maximum of two handsets to have a conversation with an outside
call at a time. If a handset is already on a call and you would like to join the call, press
& on another handset.
The call will not be terminated until all handsets hang up.
Handset page
You can locate a misplaced handset by paging it.
1.Press $ on the telephone base. All registered handsets beep for one minute.
2.Press $ on the telephone base or press & on any handset to stop paging.
Advertisement
Table of Contents

Subscribe to Our Youtube Channel
Related Manuals for switel DC55x


Summary of Contents for switel DC55x
- Page 1 NOTE: Press and hold the # key to switch the ringer between on and off when the DC55x 2.Press $. ID service from your telephone service provider, will be recorded in the caller ID history handset is in idle mode.
- Page 2 1.+. Problems and solutions IF YOUR PRODUCT UTILIZES BATTERIES, THE FOLLOWING ADDITIONAL SWITEL equipment is produced and tested according to the latest production methods. 2.Press $ to answer the intercom call on the other handset. PRECAUTIONS SHOULD BE OBSERVED: 2.+/-: locate the desired record -> %.
Need help?
Do you have a question about the DC55x and is the answer not in the manual?
Questions and answers