Table of Contents
Advertisement
Quick Links
QUICK SET UP MANUAL –
PROFESSIONAL WEATHER CENTER
Using 915MHz wireless transmission of weather data, this unique weather station can
be powered using batteries for all your weather needs in the home or office.
INSTANT TRANSMISSION is the state-of-
This product offers:
the-art new wireless transmission
technology, exclusively designed and
developed by LA CROSSE TECHNOLOGY.
INSTANT TRANSMISSION offers you an
immediate update (every 4.5 seconds!)
(every 6.5 seconds for rain!) of all your
outdoor data measured from the
transmitters: follow your climatic variations
in real-time!
Rain Sensor
1) Base and
(TX32U-IT)
funnel
SETTING UP:
Wireless transmission
at 915 MHz - thermo-
hygro and rain sensor
to the Weather Center
Rain sensor
Cable connection between the wind sensor and the thermo-hygro sensor
1
1) 2 x Screws
and Plastic
anchors
Weather Center
Wind sensor
3
Carefully open and check that the following contents are complete:
Item:
Consisting of:
Base Station
1) Main unit
Thermo-
1) Main unit
Hygro
2) Air Flow
Sensor
cover
(TX31U-IT)
Wind Sensor
1) Main unit
(TX23U)
with wind
vane
2) 32 ft cable
(already
attached the
main unit)
3) Mast holder
Note:
When putting the Weather Center into operation, it is important to perform in close
proximity (e.g. on a table) a complete wiring and set-up of the system. This step is
important to test all components for correct function before placing and mounting them
at their final destinations (See Positioning below). Spin the wind vane and tip the rain
gauge to test.
1.
Unwind the cables of the Wind sensor. Connect the Wind sensor to the Thermo-
hygro transmitter by plugging the connector head into the socket of the Thermo-
hygro sensor. The cord should "click" into place.
2.
First insert the batteries into the Thermo-hygro sensor and Rain sensor ("How
to install and replace the batteries into the Thermo-hygro sensor" and
"How to install and replace the batteries into the Rain sensor" below).
3.
Then insert the batteries into the Weather Center (see "How to install and
replace the batteries into the Weather Center" below). Once the batteries are
installed, all segments of the LCD will light up briefly and a short signal tone will
Fittings:
Illustration:
1) Wall mounting
screws
2) Plastic anchors
for screws
3) 2 x cable ties
1) 1 x U-bolts for
mast holder
2) 2 x Washers
3) 2 x Nuts
4) 2 x cable ties
2
Sockets for wind sensor
4
Advertisement
Table of Contents

Related Manuals for La Crosse Technology TX31U-IT


Summary of Contents for La Crosse Technology TX31U-IT
- Page 1 INSTANT TRANSMISSION is the state-of- This product offers: the-art new wireless transmission technology, exclusively designed and developed by LA CROSSE TECHNOLOGY. INSTANT TRANSMISSION offers you an immediate update (every 4.5 seconds!) (every 6.5 seconds for rain!) of all your outdoor data measured from the...
- Page 2 be heard. It will then display the time as 12:00, the date as 1.1.05, the weather icons, and air pressure value. "- - -" will be shown for outdoor data. Afterwards, the Weather Center will start receiving data from the transmitter. The transmission reception icon will be blinking to indicate that the station is trying to get the thermo-hygro transmitter data.
-
Page 3: Function Keys
HOW TO INSTALL AND REPLACE THE BATTERIES INTO THE WEATHER CENTER The Weather Center works with 3 x AA, IEC LR6, 1.5V Alkaline batteries. When the batteries need to be replaced, the low battery symbol will appear on the LCD. To install and replace the batteries, please follow the steps below: Remove the battery compartment cover. -
Page 4: Lcd Contrast Setting
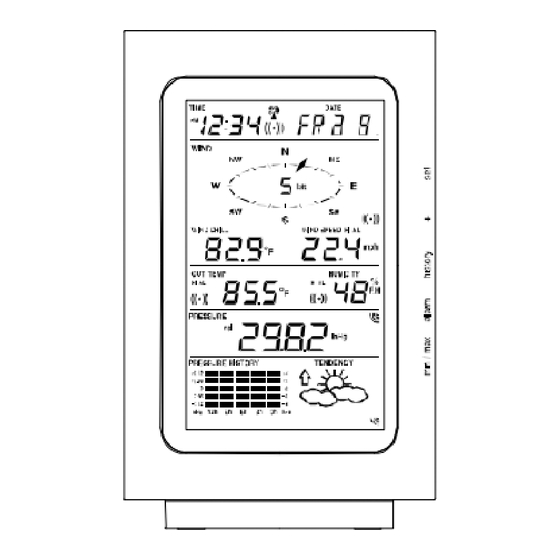
Time alarm icon Low battery Indicator (weather center) Time display Wind Chill in °F or °C Outdoor temperature or dew point in °F or ºC Outdoor temp. alarm icon Relative air pressure display in inHg or hPa, or total and 24h rainfall display in inch or mm Air pressure... - Page 5 12/24 HOUR TIME DISPLAY SETTING: The time can be set to view as 12-hour or 24-hour format. The default time display mode is 12-h. To set to 24-h time display: Use the + or MIN/MAX key to toggle the value. Confirm with the SET key and enter the CALENDAR SETTING.
-
Page 6: To Exit The Manual Setting Mode
The default value is 0.09 inHg. Select lower numbers in high humidity areas, i.e. Oceanside. Select high numbers in arid areas, i.e. Desert. The sensitivity value will start flashing Use the + or MIN/MAX key to select the value. Confirm with the SET key and enter the STORM WARNING SENSITIVITY SETTING. -
Page 7: Warranty Information
La Crosse Technology, Ltd or La Crosse Technology, Ltd’s authorized service center. La Crosse Technology, Ltd will repair or replace this product, at our option and at no charge as stipulated herein, with new or reconditioned parts or products if found to be defective during the limited warranty period specified above.
Need help?
Do you have a question about the TX31U-IT and is the answer not in the manual?
Questions and answers