Table of Contents
Advertisement
CONTENTS
Topic
Inventory of Contents
About WWVB
Quick Set-Up Guide
Detailed Set-Up Guide
Battery installation
Program Mode
Program Sequence
Function Keys
Setting the LCD Contrast
Time Zone Setting
Daylight Saving Time Setting
Radio-Controlled Time Setting
12/24 Hour Time Setting
Time Setting (WWVB & Manual)
Setting the Year, Day and Month
Setting the Snooze
Setting the Temperature Format
Features
Indoor Temperature
Outdoor Temperature
Minimum & Maximum Records (Indoor, Outdoor, & Resetting)
Alarm (Setting, Snoozing & Stopping)
Viewing date, weekday or alarm time
Additional Remote Control Sending Units (Set-Up, Viewing, &
Operation)
Mounting
Troubleshooting
Maintenance & Care
Specifications
Warranty Information
Page
Advertisement
Table of Contents

Related Manuals for La Crosse Technology TX2000 Discovery


Summary of Contents for La Crosse Technology TX2000 Discovery
- Page 1 CONTENTS Topic Page Inventory of Contents About WWVB Quick Set-Up Guide Detailed Set-Up Guide Battery installation Program Mode Program Sequence Function Keys Setting the LCD Contrast Time Zone Setting Daylight Saving Time Setting Radio-Controlled Time Setting 12/24 Hour Time Setting Time Setting (WWVB &...
-
Page 2: Inventory Of Contents
INVENTORY OF CONTENTS 1. The thermo station (Figure 1). 2. One TX6U remote temperature sensor with mounting bracket (Figure 2). 3. Three each, ½” Philips screws. 4. One strip double-sided adhesive tape. 5. Instruction manual and warranty card. Additional Equipment (not included) 1. - Page 3 QUICK SET-UP GUIDE Hint: Use good quality Alkaline Batteries and avoid rechargeable batteries. 1. Have the indoor thermo station and remote temperature sensor 3 to 5 feet apart. 2. Batteries should be out of both units for 10 minutes. 3. Place the batteries into the remote temperature sensor first then into the thermo station.
-
Page 4: Battery Installation
DETAILED SET-UP GUIDE BATTERY INSTALLATION A. REMOTE TEMPERATURE SENSOR 1. Remove the mounting bracket. bracket snaps on and off easily. Battery 2. Remove the battery cover, by sliding the Cover cover down. 3. Observing the correct polarity install 2 AA batteries. -
Page 5: Program Mode
zone is Eastern). You will need to adjust the time zone to match your local time. PROGRAM MODE Programming Note: If 30 seconds is allowed to pass, or the CH button is pressed during the programming mode, the unit will confirm/set the last information entered—the display will stop flashing and return to normal time-date readings. -
Page 6: Function Keys
FUNCTION KEYS The Secondary Buttons are located directly below the Primary Buttons, and behind the shield on the face of the unit. To access the Secondary Buttons: place a solid object in the slot (above the shield) and gently pull out and down. -
Page 7: Time Zone Setting
TIME ZONE SETTING 1. Press and hold the SET button for 5 seconds. “LCD” will show in the time LCD and the number setting will flash. 3. Press and release the SET button again. 4. The time zone will flash in the date LCD. 5. -
Page 8: Daylight Saving Time (Dst) Setting
DAYLIGHT SAVING TIME (DST) SETTING 1. Press and hold the SET button for 5 seconds. 2. “LCD” will show in the time LCD and the number setting will flash. 3. Press and release the SET button twice. “DST” will appear in the date LCD and either “1” or “0” will flash. -
Page 9: Or 24 Hour Time Setting
6. Press and release the SET button to confirm and advance to the 12/24-hour time setting. VII. 12 OR 24 HOUR TIME SETTING 1. Press and hold the SET button for 5 seconds. 2. “LCD” will show in the time LCD and the number setting will flash. -
Page 10: Manual Time Setting
condition for reception is at night, between midnight and 6:00 am— when there is less atmospheric interference. To keep your time as accurate as possible, the thermo station conducts a WWVB search every night between these hours, and overrides any manually set time. The WWVB tower icon (appearing in the TIME LCD) will flash when a signal-search is in progress and a signal is being received, and will remain steady when the signal has been received. -
Page 11: Setting The Year, Day And Month
SETTING THE YEAR, DAY AND MONTH Note: Reception of the WWVB signal will also set the date and day. The reception of the signal will override any programmed date and day. 1. Press and hold the SET button for 5 seconds. 2. -
Page 12: Setting The Snooze
SETTING THE SNOOZE 1. Press and hold the SET button for 5 seconds. 2. “LCD” will show in the time LCD and the number setting will flash. 3. Press and release the SET button 8 times. 4. The snooze duration will flash in the date LCD. 5. -
Page 13: Indoor Temperature
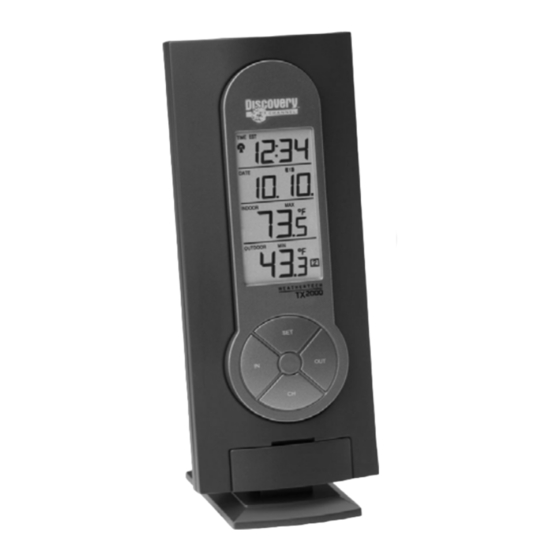
FEATURES OF THE TX2000 WWVB Tower Icon (indicates time reception) Alarm icon Low battery icon Satellite icon (indicates outdoor transmission) I. INDOOR TEMPERATURE The current indoor temperature is displayed in the INDOOR LCD. II. OUTDOOR TEMPERATURE The temperature received from the remote temperature sensor is viewed in the OUTDOOR LCD. - Page 14 displayed. The minimum records will display for 30 seconds before returning to the normal display mode. 2. Press the IN button again (once while “MIN” is still displayed, twice otherwise). “MAX” appears above the indoor temperature and the LCD will flash, indicating that the maximum temperature and the time and date of occurrence are displayed.
-
Page 15: Alarm Function
C. RESETTING THE MIMIMUM AND MAXIMUM RECORDS 1. All the Indoor records (minimum and maximum) will be reset after the IN button is pressed and held for 5 seconds. 2. All the Outdoor records (minimum and maximum) will be reset after the OUT button is pressed and held for 5 seconds. IV. -
Page 16: Adding Remote Temperature Sensors (Optional)
button. The ((2)) icon will represent activation and deactivation of Alarm 2. B. SNOOZING AND STOPPING THE ALARM 1. Press and release the SNZ button to activate the snooze function. 2. To turn the alarm off completely press any button other than the SNZ button. -
Page 17: Set-Up Of Multiple Units
A. SET-UP OF MULTIPLE UNITS 1. It is necessary to remove the batteries from all units currently in operation. 2. Remove the battery covers to all remote temperature sensor units. 3. Place all remote temperature sensor units in a numeric sequential order. -
Page 18: Mounting With Screws
sudden changes in temperature will decrease the accuracy of the indoor weather station, and changes in elevation will result with inaccurate weather forecasting for the next 12 to 24 hours. These changes will require a 12 to 24 hour wait before obtaining reliable data. To achieve a true temperature reading, avoid mounting where direct sunlight can reach the remote temperature sensor or indoor weather station. -
Page 19: Wall Mounting
4) Gently pull the indoor thermo station down to lock the screw into place. TROUBLESHOOTING NOTE: For problems not solved, please contact La Crosse Technology. Problem: No reception of WWVB time signal. Solution: 1) Wait overnight for signal. 2) Be sure indoor thermo station is at least 6 feet from any electrical devices, such as televisions, computers, or other radio-controlled clocks. -
Page 20: Maintenance And Care Instructions
• Do not submerge in water. • Immediately remove all low powered batteries to avoid leakage and damage. • Opening the casings invalidates the warranty. Do not try to repair the unit. Contact La Crosse Technology for repairs. SPECIFICATIONS... -
Page 21: Warranty Information
La Crosse Technology, Ltd or La Crosse Technology, Ltd’s authorized service center. La Crosse Technology, Ltd will repair or replace this product, at our option and at no charge as stipulated herein, with new or reconditioned parts or products if found to be defective... - Page 22 All replaced parts and products become the property of La Crosse Technology, Ltd and must be returned to La Crosse Technology, Ltd. Replacement parts and products assume the remaining original warranty, or ninety (90) days, whichever is longer.
- Page 23 This device complies with part 15 of the FCC rules. Operation is subject to the following two conditions: This device may not cause harmful interference. This device must accept any interference received, including interference that may cause undesired operation. FCC ID: OMO-01RX (Receiver), OMO-01TX (transmitter) Freq. 433.92 MHz La Crosse Technology Made in China WS-7041...
Need help?
Do you have a question about the TX2000 Discovery and is the answer not in the manual?
Questions and answers
Can I purchase another outside part for my weathertech TX2000? My outside piece does not work due to battery corrosion